
Creating Mix.nlu models
Use Mix.nlu to build a highly accurate, high quality custom natural language understanding (NLU) system quickly and easily, even if you have never worked with NLU before.
About Mix.nlu
Mix.nlu provides a convenient web front-end allowing you to:
- Design an ontology for a domain consisting of intents and entities
- Build a training set of samples annotated according to this ontology
- Train and perform basic testing of language models based on the ontology and samples
The goal of this is the creation of application specific language models (ALMs) for Natural Language Understanding (NLU) and domain language models (DLMs) for Automatic Speech Recognition (ASR). Model resources are built and deployed from the Mix Project Dashboard.
Client applications can then harness these models to transcribe speech into text using the ASR as a Service gRPC API and interpret text meaning using the NLU as a Service gRPC API.
The underlying ontology developed in Mix.nlu is also shared with the Mix.dialog tool, which is used to design conversational agent models that can leverage ASR and NLU resources to interpret user intent and respond appropriately to what people write and say. Client applications harness dialog models using the Dialog as a Service gRPC API.
Mix.nlu is the departure point for this conversational AI journey.
Model development workflow
The following steps summarize the workflow to develop, deploy, and iterate on an NLU model and optionally a recognition-only domain language model (DLM):
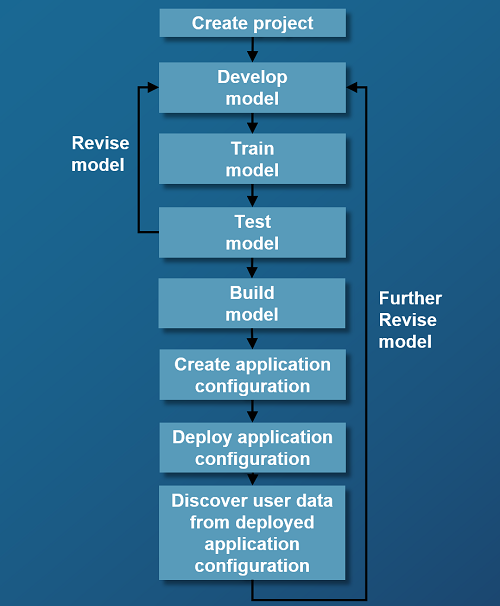
- Create a project: The first step is to create a project in Mix.dashboard. This project contains all the data necessary for building your models.
- Develop your model: You then develop your model in Mix.nlu by creating your ontology and adding training samples.
- Train your model: Training is the process of having the model learn model parameters based on the training data that you have provided.
- Test your model: After you train your model, use the Try panel to test it interactively on sample sentences and tune it.
- Build your model: When you make a build, you create a model version, which is a snapshot of your model as it exists now.
- Create your application configuration: To use your model in an application, you create your application configuration, which is the combination of the model versions that you want to use in your application (for example, Mix.asr model v2 with Mix.nlu model v3 for project CoffeeMaker).
- Deploy your application configuration to an environment that is accessible by your application.
- Discover what your users say: Collect feedback on how well your model is performing by viewing how the model handled actual user utterances in the deployed application configuration.
- Circle back to step 2, refining the model based on insight from user data.
Open the project in Mix.nlu
To open a project in Mix.nlu:
- From Mix.dashboard, select your project in the Projects list.
- Click the .nlu icon.
Mix.nlu UI overview
The interface of Mix.nlu UI is divided into three tabs containing different functionalities to help you develop, optimize, and refine your NLU model.
 Develop tab: Define the types of things your users will say, create and annotate examples of these sentences, and use these to train and test your model. The Develop tab offers a simpler interface intended for novice users working on smaller projects.
 Optimize tab: Allows the same functionality as the Develop tab, but with some more advanced tooling to optimize development. The Optimize tab is intended for more advanced users working on larger projects.
  Discover tab: For projects with a deployed application configuration, this tab shows recent data on what real users said, with information on how well your model understood what the users were saying. This gives useful feedback to further refine the model.
Click on one of the icons to enter the tab.
About the Mix.nlu Develop tab
You use the Mix.nlu Develop tab to create intents and entities, add samples, try your model, and then train it.
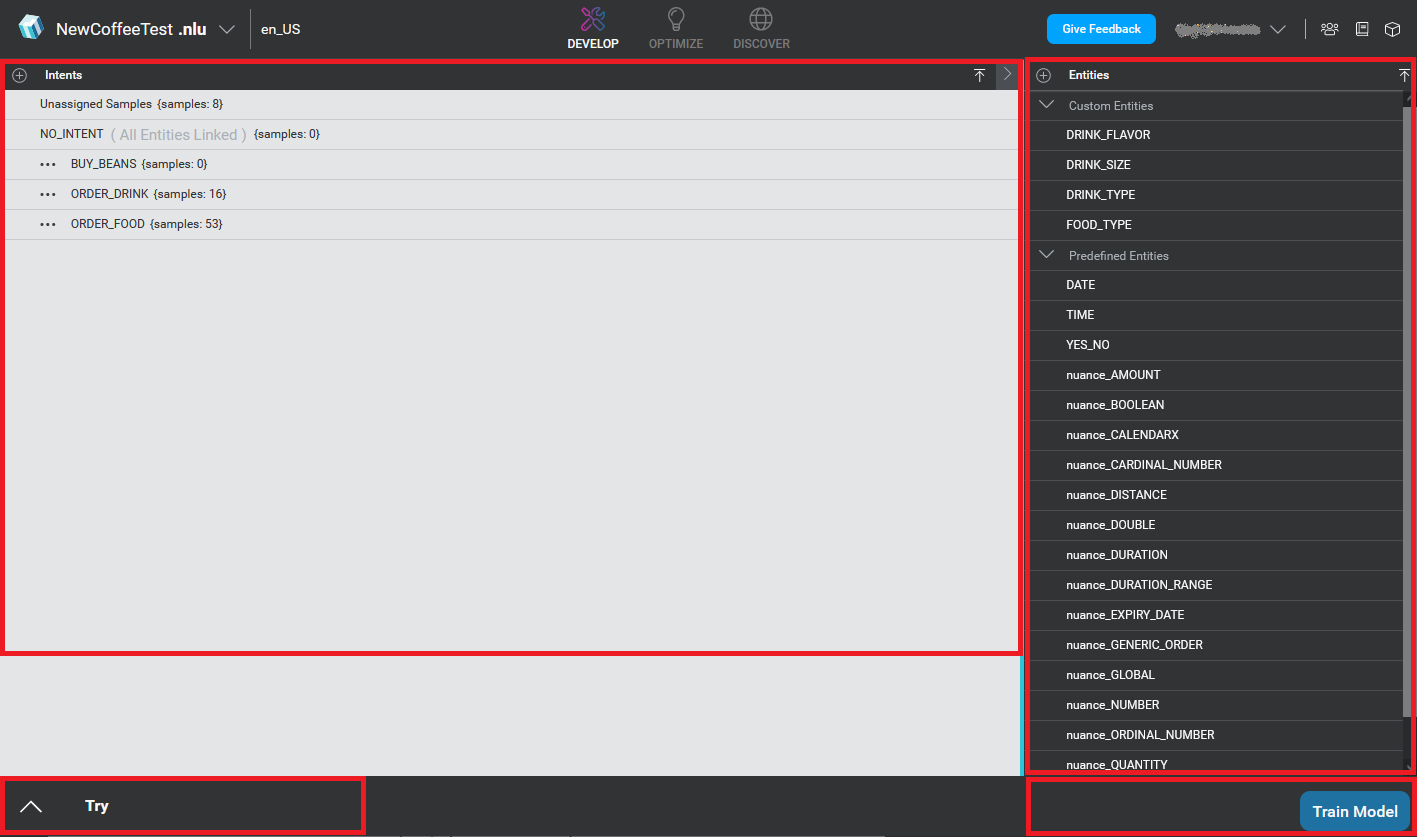
When you open the Develop tab, you see the following elements:
- On the left is the Intents area. You add intents from the Intents bar. The intents bar also allows you to import files to add samples and add to the definitions of intents and entities, similar to import functionality in Mix Dashboard. When you first open the window, the Intents area lists the intents that are available in your project.
- On the right is the Entities area. You add and import entities from the Entities bar. When you first open the window, the Entities area lists the Entities that are available in your project. Select an entity to see its details.
- On the bottom-left is the Try area, where you can try out your model against sample utterances.
- On the bottom right is the Train Model button, which lets you train your model so that you can use it.
View samples for an intent
In the intents area, click on an intent to select that intent. This will replace the list of intents with a view of the specific intent, any entities that are linked to the intent, and a table of samples connected to the intent. Initially upon creating an intent, the intent will have no entities linked, and no samples. You need to link entities as needed and add samples.
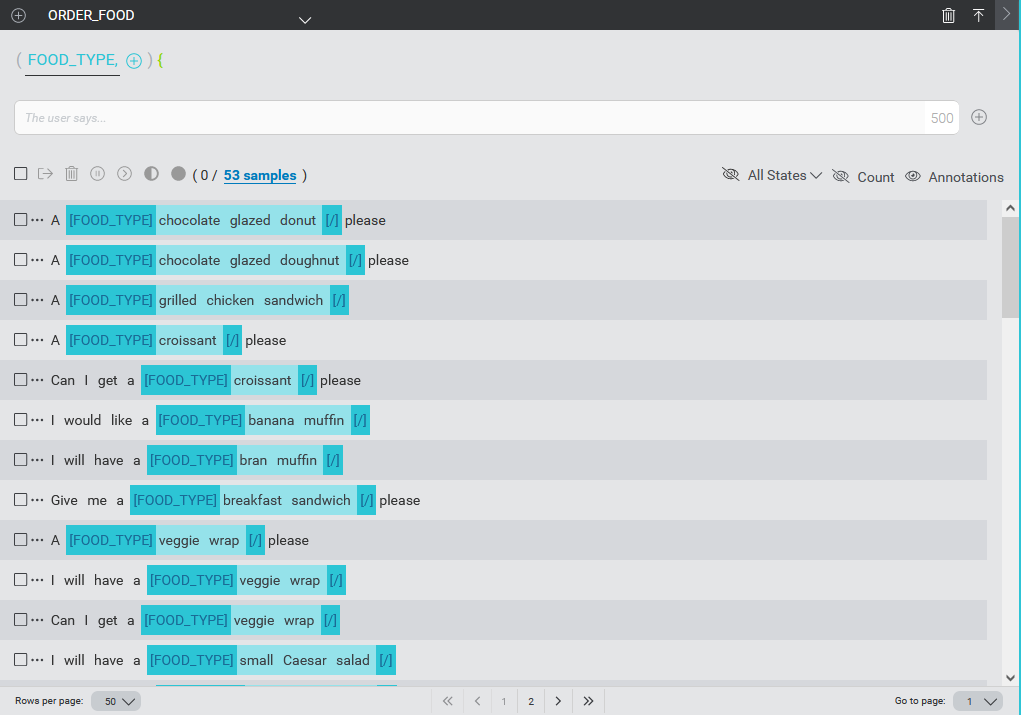
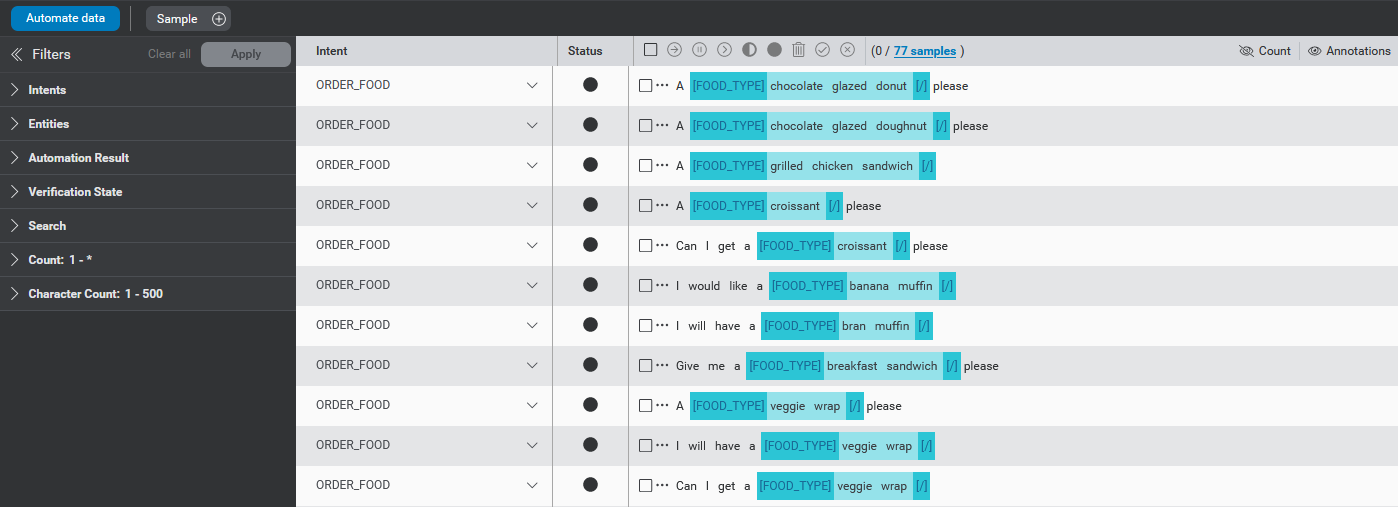
If there are a lot of samples under the chosen intent, the samples will be displayed in pages. By default, 50 samples are shown per page. Controls at the bottom of the samples area let you navigate from page to page as well as change the number of samples displayed per page.
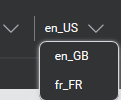
Multiple language support
Mix.nlu supports multiple languages (or locales) per project. As you can imagine, sample phrases of what your users may say will differ from one language to another. Your samples, therefore, will be different per language/locale.
To filter the list of samples, select the language code from the menu near the name of your project. (If your project includes a single language, no menu appears.)
For example, this project supports three locales, with en_US currently selected:
Mix.nlu also allows you to define different literals for list-type entity values per language/locale. This allows you to support the various languages in which your users might ask for an item, such as "coffee", "café", or "kaffee" for a "drip" coffee. More information on how to do this is provided in the sections that follow.
Develop your model
To develop your model, you:
- Add intents to your model. An intent defines and identifies an intended action. An utterance or query spoken by a user will express an intent, for example, to order a drink. As you develop an NLU model, you define intents based on what you expect your users to do in your application.
- Add entities to your model. Entities identify details or categories of information relevant to your application. While the intent is the overall meaning of a sentence, entities and values capture the meaning of individual words and phrases in that sentence.
- Link your entities to your intents. Intents are almost always associated with entities that serve to further specify particulars about the intended action.
- Add samples. Samples are typical sentences that your users might say. They teach Mix how your users will interact with your application.
- Annotate your samples. Once you define entities in an ontology, you need to annotate the tokens within the samples so that the machine learns.
- Modify intents and annotations. Make any required modifications to your intents and annotations.
- Verify samples before training. As a final step, review the verification status of each sample phrase or sentence. This is an essential step that has a direct impact on the accuracy of the data used to create your model(s).
Add intents to your model
An intent is something a user might want to do in your application. You might think of intents as actions (verbs); for example, to order. For more information about intents, see Intents.
To add intents to your model:
- In Mix.nlu, click the Develop tab.
- On the Intents bar, click the plus (+) icon to add an intent.
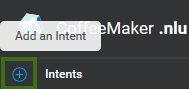
- Type the name of your intent (for example, ORDER_COFFEE) and press Enter.
The intent name is added to the list of intents.
Edit an intent name
To edit an intent name:
- In the Develop tab intents list, open the menu for the intent.
- Select Edit intent name. You can now edit the text of the intent name
- Make the edits to the intent name.
- Press Enter or click the check icon to make the change. If you instead want to cancel the edit and go back to the existing name, press Escape or click the x icon.
Add entities to your model
Entities collect additional important information related to your intent. You might think of entities as analogous to variable slots or parameters that, when filled in with user-provided details, make the intent specific and actionable.
For example, if a user has the intent to order an coffee-based drink, the user would need to specify to the agent what type of coffee they want, how big a cup they want, any flavoring they want to add, and so on. These details can vary from order to order, but generally speaking some of these details will always need to be specified to make a coffee order. So in this case for example you might include entities such as COFFEE_TYPE, COFFEE_SIZE, FLAVOR, and so on.
Each entity, as a variable, can take on some set of possible values. So for example, when a user wants to order a coffee and says "Can I have a large vanilla latte," entities take on the following values:
- COFFEE_TYPE takes the value "latte"
- COFFEE_SIZE takes the value "large"
- FLAVOR takes the value "vanilla"
This section describes how to create and define custom entities, which are specific to the project. It also describes the configurable settings for entities.
Note that when you want to define entities for your intents, you also have the option to use one of the existing predefined entities, which are entities that have already been defined to save you the trouble of creating them from scratch.
Examples of predefined entities include:
- Monetary amounts
- Boolean values
- Calendar items (dates, times, or both)
- Cardinal and ordinal numbers
For more information, see Predefined entities.
To simplify your model, avoid adding a unique entity for each instance of a similar item. Instead, add a single entity that describes a general type of item. For example, if you are making a model that will handle orders for Cappuccino, Espresso, and Americano, it doesn't make sense to treat these as different entities, because they are closely related. It makes sense to treat these as different values of a common entity named COFFEE_TYPE.
Data types
An entity is like a variable containing a piece of information relevant to an intent. Like a variable in a computer program, an entity in Mix can be specified with a data type aligned with the kind of contents the entity will hold. Entities in Mix are shared between Mix.nlu and Mix.dialog. The data type forms a contract between Mix.nlu and Mix.dialog that allows dialog designers to use methods and formatting appropriate to the data type of the entity in messages and conditions.
The available data types are as follows:
| Data type | Description | Use case examples |
|---|---|---|
| Generic | Text data without any special format. | A name of a person, names of product types |
| Yes/No | Yes or no | The answer to a yes/no question |
| Boolean | True or false | The answer to a true/false question |
| Number | A numerical quantity | A quantity measured with a whole number or decimal |
| Digits | A sequence of digits from 0-9 | A PIN, an ID code |
| Alphanumeric | A sequence of letters or numbers, A-Z, a-z, 0-9 | A user name, an ID code, a license plate number |
| Date | A YYYYMMDD date | A calendar date |
| Time | An HHMM time | A clock time |
| Amount | A quantity with units, defined by the magnitude and units | A monetary amount |
| Distance | A measure of distance, including magnitude and distance unit | Distance in kilometers, meters, miles, and so on |
| Temperature | A measure of temperature, including possibly signed magnitude and units | Temperature in Celsius or Fahrenheit |
If you have a previously existing project, with previously created entities, by default the entities will initially have a special data type of "Not set." This will behave the same as Generic type. You cannot set a newly created entity to Not set.
Collection methods
An entity also has a collection method. A collection method is related to how the set of possible values of the entity can be enumerated or defined.
- Can the possible values be conveniently enumerated in a list?
- Are the possible values strings of characters following a simple pattern you can describe with a regular expression?
- Can the possible values be expressed as some sort of grammar with rules defining what is a valid value?
- Can the possible values be expressed as a subtype or composition of other entities?
- Or can the entity contain any open-ended text or spoken input that might be provided?
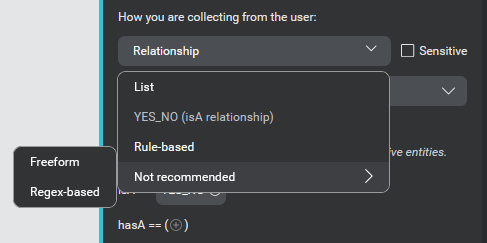
Along these lines, entity collection methods are as follows:
| Collection method | Description |
|---|---|
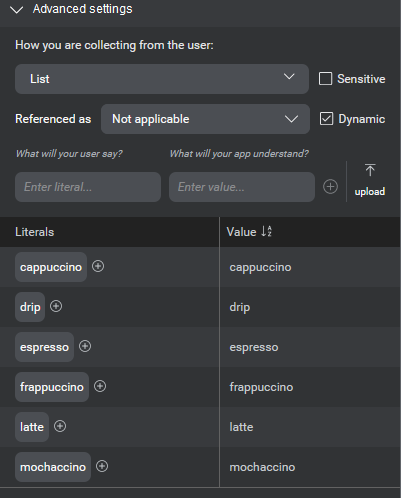
| List | A list entity has possible values that can be enumerated in a list. For example, if you have defined an intent called ORDER_COFFEE, the entity COFFEE_TYPE would have a list of the types of drinks that can be ordered. See List entities. |
| Regex-based | A regex-based entity defines a set of possible structured text string values using a regular expression pattern. See Regex-based. For example account numbers, postal (zip) codes, order numbers, and other pattern-based formats. |
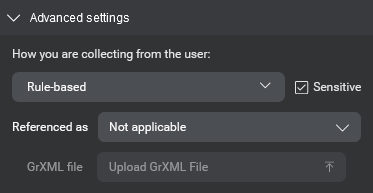
| Rule-based | A custom rule-based entity defines a set of values based on a GrXML grammar file. While regular expressions can be useful for matching patterns in text-based input, grammars are useful for matching multi-word patterns in spoken user inputs. This type is only available for some users. See Rule-based entities. |
| Relationship | A relationship entity has a specific relationship to one or more existing entities, with either a subtype (isA) or composition (hasA) relationship. See Relationship entities. For example a NAME hasA FIRST_NAME and hasA LAST_NAME; a DESTINATION isA LOCATION |
| Freeform | A freeform entity is used to capture user input that you cannot enumerate in a list. For example, a text message body could be any sequence of words of any length. In the query "send a message to Adam hey I'm going to be ten minutes late", the phrase "hey I'm going to be ten minutes late" becomes associated with the freeform entity MESSAGE_BODY. See Freeform entities. |
The collection method determines how the NLU service will look for and collect matches for the entity in user text input. If the data type specifies what is collected, the collection method specifies how it is collected. Choosing the right collection method makes it easier for your semantic model to pick out the appropriate entity content and interpret entity values from user utterances.
Data type and collection method compatibility
Specific data types are compatible with some collection methods but not with others. Each data type has a default collection method which will be set initially if a data type is selected but the collection method is not specified.
| Data type | Compatible collection methods | Default collection method |
|---|---|---|
| Generic | All collection methods | List |
| Yes/No | ListRule-basedRelationship isA YES_NO | Relationship isA YES_NO |
| Boolean | ListRule-basedRelationship isA nuance_BOOLEAN | Relationship isA nuance_BOOLEAN |
| Number | Rule-basedRegexRelationship isA nuance_CARDINAL_NUMBERRelationship isA nuance_DOUBLERelationship isA nuance_NUMBER | Relationship isA nuance_NUMBER |
| Digits | Rule-basedRegexRelationship isA nuance_CARDINAL_NUMBER | Relationship isA nuance_CARDINAL_NUMBER |
| Alphanumeric | ListRule-basedRegex | List |
| Date | Rule-basedRelationship isA DATE | Relationship isA DATE |
| Time | Rule-basedRelationship isA TIME | Relationship isA TIME |
| Amount | Rule-basedRelationship isA nuance_AMOUNT | Relationship isA nuance_AMOUNT |
| Distance | Rule-basedRelationship isA nuance_DISTANCE | Relationship isA nuance_DISTANCE |
| Temperature | Rule-basedRelationship isA nuance_TEMPERATURE | Relationship isA nuance_TEMPERATURE |
When creating a new entity, Mix will support you in selecting a compatible collection method. When you first create your entity, Mix will automatically assign the default compatible collection method.
If you then decide to choose a different collection method, Mix will give you recommendations for the most compatible collection methods and advise you on which collection methods are not recommended for the data type.
If you use Relationship isA as a collection method, the predefined entities available to choose from for the isA relationship will be restricted based on what is compatible with the chosen data type. For example, if your data type is Date, Mix will allow you to choose Relationship isA DATE.
The Generic data type should be used if you want to set an entity with collection method of isA relationship to predefined entities that are not covered by other data types. For example, nuance_DURATION or nuance_QUANTITY.
Why is compatibility important?
Choosing collection methods compatible with the data type helps Dialog work more effectively when Dialog is using the NLU service for interpretation of the text of user inputs. In this case NLU is more likely to capture entity values whose format aligns with the format of the data type Dialog expects. This allows you to more effectively tune conditions and message formatting in your dialog flows.
Impacts of changes to data or collection method
If you try to change either the data type or the collection method in a way that would break compatibility, you will receive a warning, and be invited to select a collection method compatible with your data type.
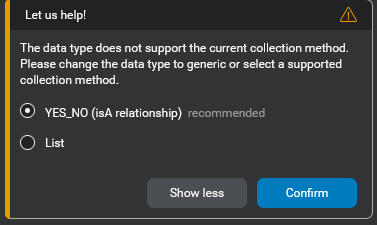
You can however choose to ignore the compatibility warning and proceed.
Create an entity
To add entities to your model:
- On the Entities bar, click the search bar.
- Type the name of the entity (for example, COFFEE_TYPE) and click the Entity icon
 .
.
A menu Add a new entity to collect appears. - Under Add a new entity to collect, select a data type for your entity.
- Click the Add Entity icon to create the new entity.

- Click the name of the new entity in the Custom Entities list to open the entity editor and perform additional configurations.
The entity editor appears. It contains two sections: Data type and Advanced settings. The Data type section is collapsed initially, but allows you to modify the data type. The Advanced settings section allows you to set other configurable items for the entity.
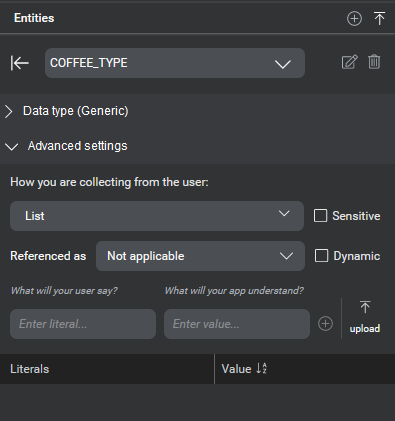
- To simplify things for you, the default collection method for your chosen data type is preselected for you. If you are happy with this, and the default is not the list collection method, you are done. Otherwise, continue. If the default collection method chosen is list, proceed to step 8. Otherwise click the Edit collection method toggle and then proceed.

- Under How you are collecting from the user, select a collection method for the entity.
Mix gives you a short list of recommended collection methods for your chosen data type. Again, the most recommended default option for your data type is pre-selected.
- Make sure to select the sensitive checkbox if your entity will collect sensitive data that should not appear in call logs.
- Configure other details of the entity as appropriate (see the Advanced settings table below for a description of the fields).
Advanced settings
The following settings are available in the advanced settings section. Note that some of these are applicable only when specific collection methods are selected.
| Field | Description |
|---|---|
| Collection method | Specifies the type of entity. Selectable under How you are collecting info from the user . |
| Referenced as | Defines how the entity can be referred to; for example, whether it is referring to a person (CONTACT: "him"), a place (CITY: "there"), a thing (APPOINTMENT, "it"), or a moment in time (APPOINTMENT_TIME: "then"). These are used for handling anaphoras in dialogs. |
| Sensitive | Indicates whether the entity contains sensitive personally identifiable information. Values assigned to any entity marked as Sensitive at runtime will appear in call logs as a masked value. for more details, see Handling sensitive information Note: This only applies to call logs, not diagnostic logs. |
| Dynamic | (Appears when editing entities with list collection method only) Indicates if the entity is dynamic or not. Dynamic list entities allow you to upload data dynamically at runtime. See Dynamic list entities. |
| Literals | (Appears when editing entities with list collection method only) Lets you enter literals and values. A set of literals is the range of tokens in a user's query that corresponds to a certain entity. With literals, you can specify misspellings and synonyms for an entity's value. For example, in the queries "I'd like a large t-shirt" and "I'd like t-shirt, size L", the literals corresponding to the entity SHIRT_SIZE are "large" and "L", respectively. In both cases, the value is the same. Literals can be paired with values, which are then returned in the NLU interpretation result. For example, "small", "medium", and "large" can be paired with the values "S", "M", and "L". For projects that include multiple languages, you can specify variations per language/locale for an entity value. See List entities for details. Note: There is a limit to the number of literals that you can enter. See Limits for more information. |
| Your relationships | (Appears when editing entities with relationship collection method only) Lets you define the entity in relation to other user-defined or predefined entities. |
Link your entities to your intents
The next step is to link your entities to your intents so that they can be interpreted.
For example, if you have an intent called ORDER_COFFEE that uses the COFFEE_SIZE and COFFEE_TYPE entities, you need to link these entities with the ORDER_COFFEE intent. You also need to link any predefined entities that you want to use.
To link entities to your intents:
- On the Intents bar, select the intent.
- Click the link entity plus (+) icon and select the entity to link.
- Repeat for each entity that you want to link to the intent.
Add samples
Samples are typical phrases or sentences that your users might say. They teach Mix how your users think (their mental models) when interacting with your application.
If your project includes multiple languages, be sure to select the appropriate language before you start to enter samples.
You can enter a maximum of 500 characters per sample.
In Mix.nlu, you can add samples in a few different ways:
- Add samples one at a time or a few at a time under a selected intent
- Import a larger set of samples using an uploaded .txt file.
Samples can be added one at a time under a selected intent in the Develop tab. Samples can also be added up to 100 at a time in the Optimize tab.
Samples can be uploaded as a .txt file from:
- Develop tab
- Optimize tab
- Mix.dashboard.
The more samples you include for each intent, the better your model will become at interpreting.
For optimal machine learning, samples should be based on data of real-world usage.
Add samples one at a time under a selected intent
To add samples:
- (As required) Select the language from the menu near the name of the project.
- In the Intents area, click the name of the intent.
- In the "The user says" field, type a sample utterance and press Enter. For example, "I want a double espresso."
- Repeat this procedure as needed to add samples.
Import multiple samples at once using text file import
To add multiple samples at once via a .txt file upload:
- (As required) Select the language from the menu near the name of the project.
- In the intents bar, click the
 upload icon. An Upload a file dialog will open.
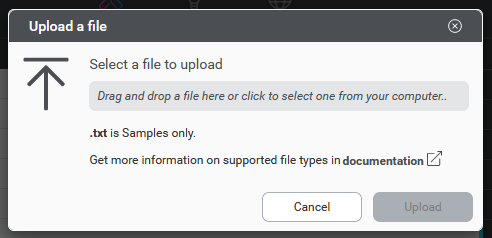
- Use the file picker to select a .txt file containing samples.
- Select an intent under which to upload the samples
- Click Upload to initiate the upload
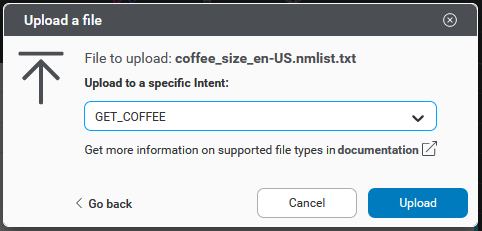
Samples uploaded to a specific intent are attached to that intent in Mix.nlu, but there is no annotation marked for any of the new samples. You will want to go in and add annotations after uploading.
The file upload in the Develop tab is intended for simple imports under one intent.
More advanced text file upload of samples is available in Mix.dashboard and in the Optimize tab. The dashboard and Optimize file import allow you to apply Auto-intent to the samples.
For additional details on importing samples, see Import data. For information about creating data sets see Generating data and training the initial model.
Note on samples and contractions
Contractions are common in a number of languages, in particular in many European languages like English, French, and Italian. A contraction is a shortened version of a word or group of words combined together by dropping letters and joining with an apostrophe. For example, he's and didn't in English, c'est and l'argent in French, and c'è and l'estratto in Italian.
When sample sentences are added to Mix, whether via import or by typing the sentences in the Develop tab under an intent, the sample sentence is tokenized — broken up into individual tokens (individual units of meaning, usually words) that can be marked up with annotations.
For some languages, the tokenization may work differently than you might expect when encountering contractions using an apostrophe. Sometimes, the tokenization will split the two parts at the apostrophe, with the first part, apostrophe, and second part split as separate tokens.
There is not currently a workaround for this, but be aware that you may see this behavior in some cases.
Edit the sample text
To edit the text of a sample:
- Open the menu for the sample.
- Select Edit sample.
- Make the edits to the sample text.
- Press Enter or click the check icon to make the change. If you instead want to cancel the edit and go back to the existing text, press Escape or click the x icon.
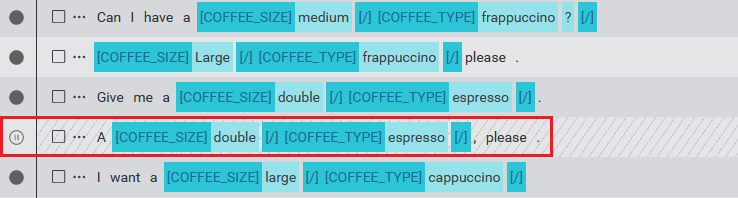
Annotate your samples
The final step in developing your training set is to annotate the literals in your samples with entities and tag modifiers.
This will help your model learn to not only interpret intents, but also the entities related to the intents.
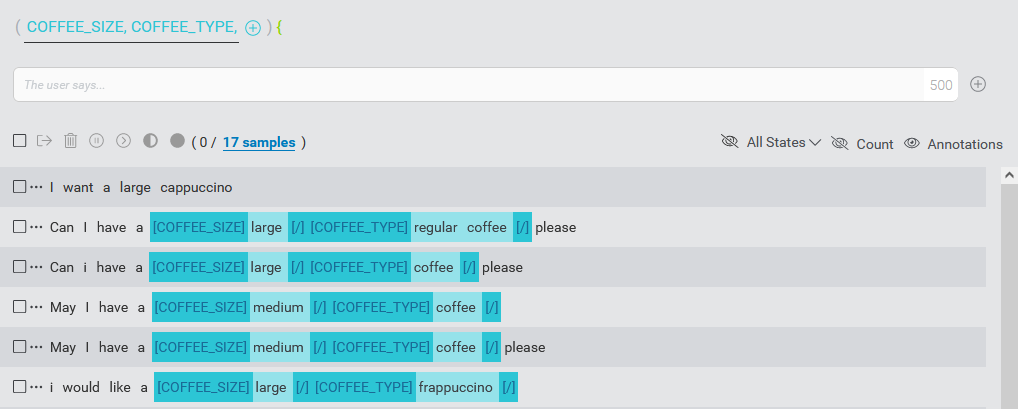
Annotated sentence example
As a simple example, consider the following sentence for an intent ORDER_COFFEE:
I want a large cappuccino.
Suppose that this intent has two linked entities, COFFEE_SIZE and COFFEE_TYPE. You can annotate this sample sentence to indicate which entities correspond to what literals. You could annotate the sample as follows:
I want a [COFFEE_SIZE]large[/] [COFFEE_TYPE]cappuccino[/]
Here, the word large is annotated with the COFFEE_SIZE entity and cappuccino is annotated with the COFFEE_TYPE entity.
Annotation use cases
Be aware that some of the details of annotation will depend on whether you are:
- Annotating tokens with no previous annotations
- Annotating previously annotated tokens
More details are available in the sections below.
Selecting tokens
To annotate a sample, you first need to select the relevant tokens in the sample that you want to annotate. Note that a literal can potentially span multiple consecutive tokens, for example, "United States of America". Click on the first and last words for the literal. This highlights and brackets the span of words you want to label. It also opens an entity selection menu to select an entity label.

If you make a mistake and need to deselect and start again, simply click anywhere on the screen. Once you have finished selecting the relevant tokens, select the appropriate entity from the menu to apply the annotation.
Annotating tokens with no previous annotations
If you are annotating a previously un-annotated span of tokens, you can choose an entity from one of two sources in the entity selection menu:
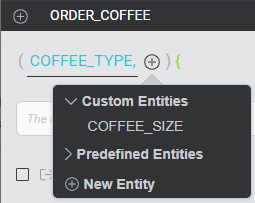
- From a list of entities that have already been linked to the present intent. If any entities have already been linked, these will appear at the top of the list in the menu.
- From one of the other user-defined or predefined entities available in your project, using Link Entity.
- Select Link Entity from the menu.
- Select Custom Entities to browse the list of user-defined entities, or Predefined Entities to browse the list of predefined entities.
- Select an entity to complete the annotation. This entity will also be linked to the present intent.
Annotating previously annotated tokens
If you try to annotate a span of text that has already been annotated with an entity, the Link Entity option will be unavailable.
Generally, you will also not be able to annotate that span of text with any of the other entities linked to the intent. The exception to this is if a hierarchical relationship (hasA) entity has already been linked to the intent, and the entity for the annotated text is either the inner or outer part of that relationship. In that case the other entity will be available in the list of entities and you will be able to annotate over or within the same text.
For example, suppose your intent has a linked entity FULL_NAME, which is a hasA relationship entity containing two inner entities GIVEN_NAME and FAMILY_NAME. Suppose you have a sample with the following partial annotation:
Notify [FULL_NAME]John Anderson[/].
You will still be able to annotate within this span of text to annotate John with GIVEN_NAME and Anderson with FAMILY_NAME.
You can also still apply tag modifiers, as applicable.
Tag modifiers
A tag modifier modifies or combines entities using a logical operator AND, OR, or NOT.
AND and OR modify two instances of the same entity type to represent one entity value and/or the other. NOT modifies one entity to represent not selecting that entity.
To add AND, OR, or NOT tag modifiers to your annotation, first annotate the entities you want to modify. Then select the entities to modify by clicking the first annotation and then clicking the last annotation. Select Tag Modifier and the appropriate modifier from the entity selection menu.
For example, consider the following partially annotated sentence:
I want a [COFFEE_TYPE]cappuccino[/] and a [COFFEE_TYPE]latte[/]
To annotate with the AND modifier, click the annotation for cappuccino and then the annotation for latte to select both as well as any tokens in between. With the span encompassing both COFFEE_TYPE annotations selected, choose the AND modifier in the Tag modifier sub-menu. The AND modifier is added, wrapping the two COFFE_TYPE annotations:
I want a [AND][COFFEE_TYPE]cappuccino[/] and a [COFFEE_TYPE]latte[/][/]
Annotating with an OR modifier is similar.
To understand how to annotate with a NOT modifier, consider the following partially annotated sentence:
I would like a [COFFEE_SIZElarge[/] [COFFEE_TYPE]coffee[/] with no [SWEETENER]sugar[/].
Here you want to add a NOT annotation to the sample to help your model distinguish between asking for sweetener vs asking specifically not to put sweetener. Click the word not and the SWEETENER annotation to select both, and then choose NOT from the Tag modifier sub-menu. The NOT modifier is added:
I would like a [COFFEE_SIZElarge[/] [COFFEE_TYPE]coffee[/] with [NOT]no [SWEETENER]sugar[/][/].
For information on verifying the status of samples, see Verify samples.
Modify intents and annotations
Mix.nlu provides various ways to modify the intents and annotations that you have added.
Fix incorrect samples
If you make typos while adding samples, or if some samples were not transcribed correctly, you should fix them to make sure that they correspond to what users actually said. This builds a better model.
To fix an incorrect sample:
- Click the ellipsis icon
 beside the sample that you want to edit and click Edit.
 - Correct the text as appropriate.
- Click the checkmark to save your changes.
Edit or remove annotations
To change an entity that annotates a sample:
- Click the entity in the sample then click Remove.
- To choose a new entity, click the literal and choose a new entity.
Change intent
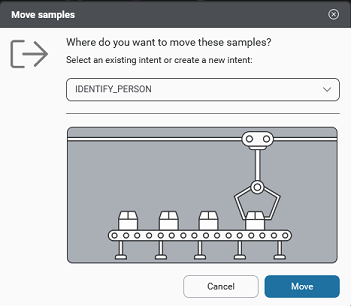
To assign one or more samples to a different intent, use the Move selected Samples dialog. When moving sample sentences, you can choose to also move or delete any annotations that you've made.
You can move the samples to either an existing intent, or a new intent that you create on the fly.
There are three ways to initiate a change of intent for samples:
- Using the intent dropdown for a single sample in the Optimize tab
- Using the ellipsis menu for a single sample in Develop or Optimize
- By selecting one or more samples and selecting the move to another intent icon in the header bar in Develop or Optimize
To assign one or more sample sentences to a different intent:
- Select one or more samples. You can click the ellipsis icon or the intents dropdown (Optimize tab) for the sample to select a single sample, or use the checkboxes to select one or more samples.
- Select to move sample using one of the available ways:
- If using the ellipsis menu, click Move sample.
- If using the intents dropdown in Optimize, select one of the existing intents or create a new one. If you choose NO_INTENT or UNASSIGNED_SAMPLES, or create a new intent, the sample will be moved immediately to the chosen intent, and you will be done. Otherwise, proceed to step 3.
- If selecting with checkboxes, click the change intent icon in the header bar. This launches the Move sample(s) dialog.
- In the Move samples dialog, if not done in the previous step, select an existing intent to move to, or create a new one. If choosing an existing Intent, pick a specific other intent, NO_INTENT, or UNASSIGNED_SAMPLES. If creating a new Intent, enter a name for the new intent.
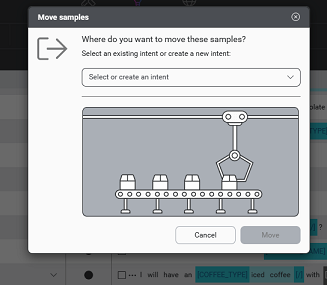
- Click Move to proceed.
 Mix.nlu will review the samples you are moving, the entity annotations for those samples, the target intent, and its linked entities as applicable. In the following cases, Mix.nlu will simply proceed with the move, and you will be done (otherwise proceed to step 5):
- The samples do not contain annotations
- You are moving the samples to a newly created intent. In this case, the entities will automatically be linked to the new intent upon moving.
- You are moving to an existing intent and the entities in the annotations are all already linked to the new intent
- If the samples do contain annotations, and some of the entities are not already linked to the target intent, you will be invited to either keep the annotations and import the entities or remove them from the samples. (This choice is not available when moving intents to UNASSIGNED_SAMPLES. Annotations will be removed if moving to UNASSIGNED_SAMPLES.)
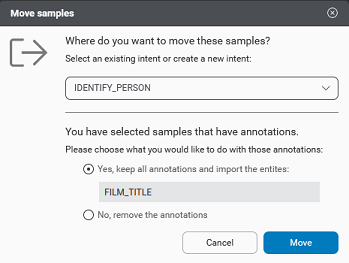
- Click Move.
The verification status of the samples after the move depends on the initial verification state and how sample entities are being handled.
| Initial verification status | Final verification status |
|---|---|
| Excluded | Excluded flag removed. Goes to either Intent-assigned or Annotation-assigned depending on native state and previous considerations. |
| UNASSIGNED_SAMPLES | Goes to Intent-assigned. |
| Existing intent, Intent-assigned | Goes to Intent-assigned. |
| Existing intent, Annotation-assigned | If removing entity annotations, goes to Intent-assigned. If not removing entity annotations, goes to Annotation-assigned. |
Assign NO_INTENT
Sometimes an entity applies to more than one intent or, to look at it another way, an entity can mean different things depending on the dialog state. Rather than add this entity to multiple intents, it's best to use NO_INTENT.
Consider these two example interactions. The first one is in the context of booking a meeting.
| User: | Create a meeting |
| System: | For when? |
| User: | Tomorrow at 2 |
This second example is in the context of booking a flight.
| User: | Book flight to Paris |
| System: | For when? |
| User: | Tomorrow at 2 |
In each of these interactions, there is a clear intent in the user's first statement, but the second utterance on its own has no clear intent.
In this case, it's best to tag "Tomorrow at 2" as [nuance_CALENDARX]Tomorrow at 2[/] to cover both scenarios (and not as [MEETING_TIME]Tomorrow at 2[/] or [FLIGHT_DEPARTURE_TIME]Tomorrow at 2[/]).
As shown in the examples, often these words or phrases are fragments and are used in a dialog as follow-up statements or queries.
NO_INTENT can also be used to support the recognition of global commands like "goodbye," "agent" / "operator," and "main menu" in dialogs. For more information, see configure global commands in the Mix.dialog documentation.
Verify samples before training
Before generating models, verify your training sample data. This step involves reviewing each sample phrase or sentence for intents and entities and ensuring that they have been assigned the correct status. It also involves confirming which samples to include in the training set for the model, and which to exclude.
This process improves your model's accuracy.
Verification of the sample data needs to be carried out for each language in the model, and for each intent.
Open and view samples by language and intent
To get started, open up the set of sample sentences for the language and intent.
- Open the Develop tab.
- (For multi-language projects) Select the language from the menu near the name of the project.
- Click an intent to view the samples.
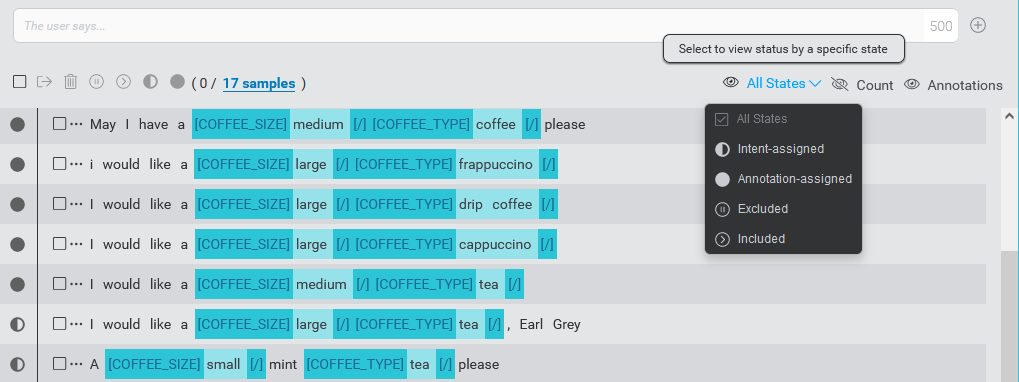
Display status information
By default, status information for samples is not displayed. To see the status information, click the status visibility toggle.
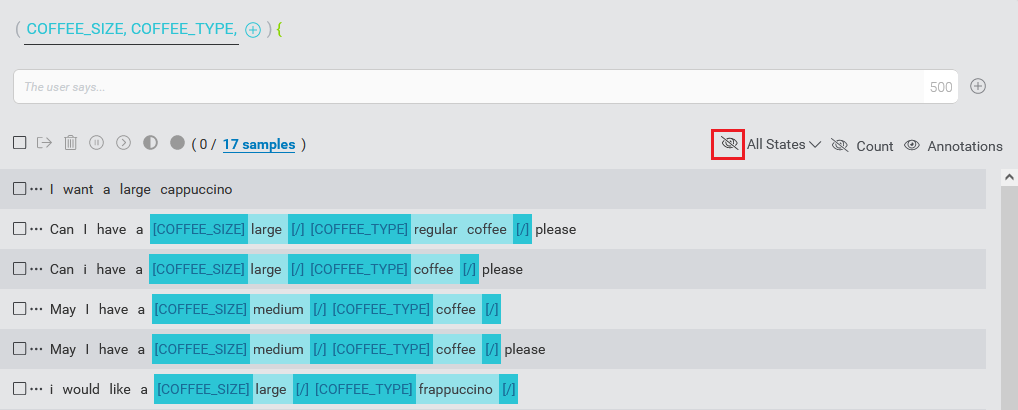
Status icons will then appear to the left of the sample items (Or on the right for samples in right-to-left scripts).
In the same area as the Status visibility toggle are toggles for:
- Annotations: Hide/show annotations. By default, annotations are visible.
- Count: Hide/show sample count. By default, counts are hidden.
Overview of verification states
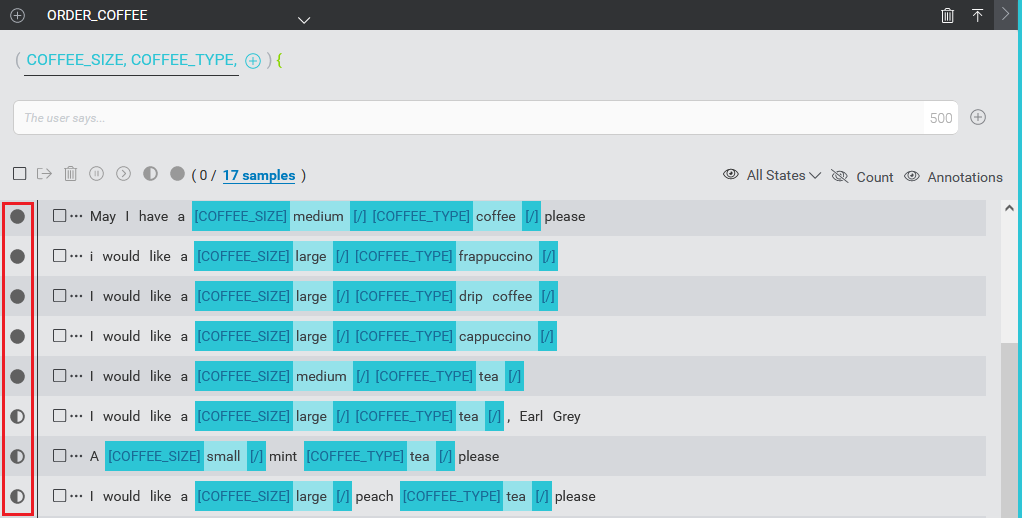
Samples can be in the following verification states:
| Icon | State | Description |
|---|---|---|
| Intent-assigned | A half-filled circle icon indicates that the sample has been assigned an intent. For example, via .txt or TRSX file upload, by adding a sample using Try, or by manually adding a sample phrase or sentence to an intent in the Mix.nlu UI. Sample may or may not be annotated. Impact of this state on the model: Samples assigned this state will only be used to detect the intent. The data provided by this sample will not be used to detect the presence of Entities. |
|
| Annotation-assigned | A filled-circle icon indicates that the sample has been assigned an intent and annotation is complete. Sample can be annotation-assigned via TRSX file upload or in the Mix.nlu UI. Sample may or may not be annotated. Impact of this state on the model: Samples assigned this state are used to detect the intent as well as any annotated entities. If such a sample contains a literal that appears in an entity but is not annotated, it will be used as a "counter example" for that entity; that is, it will lower the chance of such entity literals being detected. |
|
| Excluded | A "pause" icon indicates that the sample, although assigned an intent, is to be Excluded from the model. Sample can be Excluded in the UI or via TRSX file upload. Sample may or may not be annotated. Impact of this state on the model: Samples assigned this state are Excluded. |
Samples assigned to UNASSIGNED_SAMPLES, either via .txt or TRSX file upload or manually in the UI, do not have a status icon. These samples contain no annotations and are excluded from the model.
Exclude or include samples
You can exclude a sample from your model without having to delete and then add it again. By default, new samples are included in the next model that you build. By excluding a sample, you specify that you do not want it to be used for training a new model. For example, you might want to exclude a sample from the model that does not yet fit the business requirements of your app.
To exclude a sample, click the ellipsis icon ![]() beside the sample and then choose Exclude.
beside the sample and then choose Exclude.
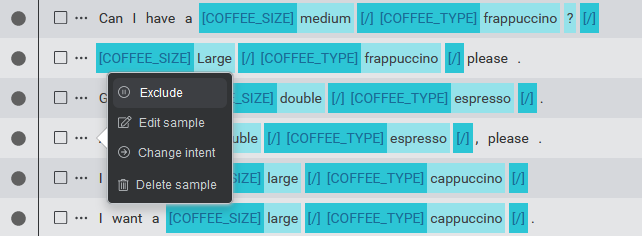
An excluded sample appears with gray diagonal bars and the status icon changes to indicate it is excluded.
You can still modify the excluded sample. Any annotations that were attached to the sample before it was excluded are saved in case you want to re-include it later.
To include a previously excluded sample, either use the ellipsis icon menu or click on the status icon. The sample is restored to its previous state with any previous intent and annotations restored.
Change the status of a sample
When you start annotating a sample assigned to an intent, its state automatically changes from Intent-assigned to Annotation-assigned. This signals to Mix.nlu that you intend to add the sample to your model(s). You can always choose to assign a different state to the sample; for example, to exclude it (change the state to Excluded) or to use it to detect intent only (change to Intent-assigned).
To change the status of a sample, hover over the status icon and click. This will allow you to change the state from Intent-assigned to Annotation-assigned or vice-versa.
Filter displayed samples by status
When there are a lot of samples for an intent, you may want to filter the displayed samples by status. To do this, open the drop-down menu next to the status visibility toggle to choose the status to display.
Notes
- You do not have to annotate every sample but you should set all samples that you wish to include in your model(s) as Annotation-assigned . This helps the model to ignore false entity matches.
- If you move an Annotation-assigned sample to another intent, its state changes to Intent-assigned. Confirm that the annotations are correct given the new intent. Any subsequent annotations you make will change the sample's state to Annotation-assigned. You can always change the verification state as described earlier.
- You cannot accept or un-accept individual annotations within a sample. The annotation status applies to the complete sample.
- When training/building your model, you must include at least one sample that is either Intent-assigned or Annotation-assigned.
Bulk operations
For convenience, bulk operations are available to allow you to perform actions on multiple samples within an intent at once. You can include or exclude samples, assign them as Intent-assigned, or assign them as Annotation-assigned. You can also choose to remove the selected samples or move them to another intent.
Before you can apply a bulk operation, you first need to select one or more samples.
There are a few ways to do this.
To choose a few samples on the present page, use the check boxes beside the samples to individually select the samples.
Alternatively, you can select all samples on the current page by clicking the Select this page check box above the list of samples. Clicking the check box beside an individual selected sample deselects that sample.
There is an indicator on the row above the samples indicating how many samples are currently selected out of how many total samples. When you have not yet selected samples, this will show 0 / total samples. The total samples count is shown as a hyperlink. Clicking the total selects all samples on all pages.
Deselecting an individual sample when all samples on all pages are selected deselects that sample, as well as the samples on the other pages not currently displayed.
Changing the number of rows per page or navigating to a different page within the intent will not affect the current selection if no other changes are made.
However, all selected samples will be deselected if you do any of the following:
- Go to another intent
- Apply a filter
- Navigate to a different tab (Optimize or Discover)
- Change the current language
- Adding, removing, or editing a sample
- Changing the sample count
- Adding or removing annotations for a sample
- Changing verification state of a sample
- Importing samples with file upload
Once you have selected a set of samples, apply the bulk operation to the selected samples by clicking the appropriate icon in the row above the samples.

The general idea here is that bulk operations apply to all selected samples, but there are operation-specific particularities you should be aware of.
| Operation | Notes on behavior |
|---|---|
| Exclude | Already excluded samples will stay as-is. Intent-assigned and Annotation-assigned samples will be excluded, but the previous state, including any assigned intent and annotations, will be remembered in case you want to re-include the sample. |
| Include | Already included samples will stay as-is. Previously excluded samples will be re-included with the same verification state as they had before being excluded. |
| Intent-assigned | Excluded samples are not impacted and stay excluded. |
| Annotation-assigned | Excluded samples are not impacted and stay excluded. |
Only visible samples can be selected for bulk changes, that is, samples that have not been filtered from the view.
It is also possible to Perform bulk operations in the Optimize tab. The Optimize tab allows a broader set of operations which can be applied across all intents rather than just one.
Train your model
Training is the process of building a model based on the data that you have provided.
If your project (or locale) contains no samples, you cannot train a model. You need at least one sample sentence that is either intent-assigned or annotation-assigned. Be sure to verify samples.
Developing a model is an iterative process that includes multiple training passes. For example, you can retrain your model when you add or remove sample sentences, annotate samples, verify samples, include or exclude certain samples, and so on. When you change the training data, your model no longer reflects the most up-to-date data. As this happens, the model must be retrained to enable testing the changes, exposing errors and inconsistencies, and so on.
Training a model
To train your model:
- In Mix.nlu, click the Develop tab.
- (As required) Select the locale from the menu near the name of the project.
- Click Train Model.
Mix.nlu trains your model. This may take some time if you have a large training set. A status message is displayed when your model is trained.
To view all status messages (notifications), open the Console panel ![]() .
.
Training a model that includes prebuilt domains
If you have imported one or more prebuilt domains, click the Train Model button to choose to include your own data and/or the prebuilt domains. Since some prebuilt domains are quite large and complex, you may not want to include them when training your model.
To train your model to include one or more domains:
- Click the arrow beside Train Model.
The list of prebuilt domains is displayed in addition to your own data.
In the example below, the Nuance TV and Nuance Weather prebuilt domains have been imported into the project: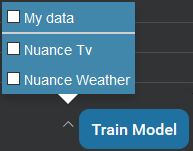
- Check the domains you want to include.
- Check My data to include your data.
- Click Train Model.
Training warning and error logs
Training error log example

Sometimes during the training process, issues can arise with the training set. This can result in either warnings or errors or both.
Errors are more serious issues that cause the training to fail outright.
Warnings are other issues that are not serious enough to make the training fail but nevertheless need to be brought to your attention.
Samples with invalid characters and entity literals and values with invalid characters are skipped in training but the training will continue. Such a sample is set to excluded in the training set so that it will not be used in the next training run or build.
Detailed information about any errors and warnings encountered during training is provided as a downloadable log file in CSV format. If only warnings are encountered, a warning log file is generated. If any errors are encountered, an error log file is generated describing errors and also any warnings.
A download link appears next to the Train Model button. The type of log file (error vs warning) is indicated by an icon beside the link, ![]() for errors and
for errors and ![]() for warning. Click to download the CSV file.
for warning. Click to download the CSV file.
The file includes one line for each error and/or warning encountered, with two columns. One column gives the severity of the issue, either WARNING or ERROR, while the other column gives a message containing details.

Test it
After you train your model, you can test it interactively in the Try panel. Use testing to tune your model so that your client application can better understand its users.
The Try panel is available in both the Develop and Optimize tabs.

Try to interpret a new sentence
To test your model:
- In Mix.nlu, click the Develop tab.
- (As required) Select the language from the menu near the name of the project.
- Click Try. The Try panel appears.
- Enter a sentence your users might say and press Enter.
Read and understand the results
The Try panel presents the response from the NLU engine.
The Results area shows the interpretation of the sentence by the model with the highest confidence. In the image here, the Results area displays the orderCoffee intent with a confidence score of 1.00. The Results area also shows any entity annotations the model has been able to identify.
Note that the Results area will not reflect any the changes you have made to intents and entities since the last time you trained the model.
No annotations appear in the Results area if the NLU engine cannot interpret the entities in your sample using your model. Also, there is no annotation for dynamic list entities. Only your client application can provide this information at runtime.
Full information from the NLU engine, including all interpretations, appears formatted as a JSON object. For easier reading, you can expand or collapse sections of the information. You can also copy the results JSON, or sections of it to the clipboard.
For more information on the fields in an interpretation, see InterpretResult in the NLUaaS API documentation.
Add the sentence to the training set
If you are unsatisfied with the result in Try, you can add the sentence to your project as a new sample and then manually correct the intent or annotations. Realistic sentences that the model understands poorly are excellent candidates to add to the training set. Adding correctly annotated versions of such sentences helps the model learn, improving your model in the next round of training.
To add a sentence you have just tested, click Add Sample. The sample will be added to the training set for the intent identified by the model, along with any entity annotations the model recognized.
If Try recognized an intent, but no entities, the new sample will be added as Intent-assigned.
If Try also recognized entities, the new sample will be added as Annotation-assigned.
If the same sentence is already in the training set with the same annotations, the count will be updated for that sentence. If the same sentence is already in the training set, but with different annotations, then to maintain consistency in the training set you will not be able to add the sample from Try.
Correct errors in the interpretation
Once the sample is added into the training set, make corrections to the intent and annotation labels to help the model better recognize such sentences in the future.
If the recognized intent was incorrect, change the intent.
If the annotated entities were incorrect, edit the annotation.
Roll out your model
Now that you have developed, trained, and tested out your model, you are ready to roll out the model and the project. This way, users can interact with it via an application and you can see how well your application works "in the wild".
To do this, you need to:
- Build your model resources.
- Create and deploy an application configuration.
- Create authorization credentials.
This will build and deploy resources and give you application-specific credentials to access the resources.
With resources deployed and credentials in hand, you will be able to build a client application that harnesses the resources. Resources are accessed via the NLUaaS gRPC API or the ASRaaS gRPC API.
The data collected from applications can then be brought back in to Mix.nlu via the Discover tab.
Discover what your users say
Now that your model is ready, and rolled out to users in an application, you can look at what people say or type while using your application. These samples from users can be brought in and visualized in the Discover tab, along with information about the origin of the samples and how your model interpreted each sample. You’ll review them there, then add the ones you want directly into your intents in your training set to improve and grow your model.
Gain access to Discover data
In order to bring user data from a deployed application into Discover, note that you need to have call logs and the feedback loop enabled for your specific Mix application.
Contact your Nuance representative for more details about how to set this up.
To view the data in the Discover tab, you also need to be a member of the organization where the project associated with the application lives, as well as the project itself.
View Discover data
To open the Discover tab for a project:
- From the Mix Dashboard, select a project with a deployed application configuration.
- Click the .nlu icon to open Mix.nlu.
- Select the Discover tab.
When you first open the Discover tab, there will be no data displayed, and you will be prompted to select a source of data to display.
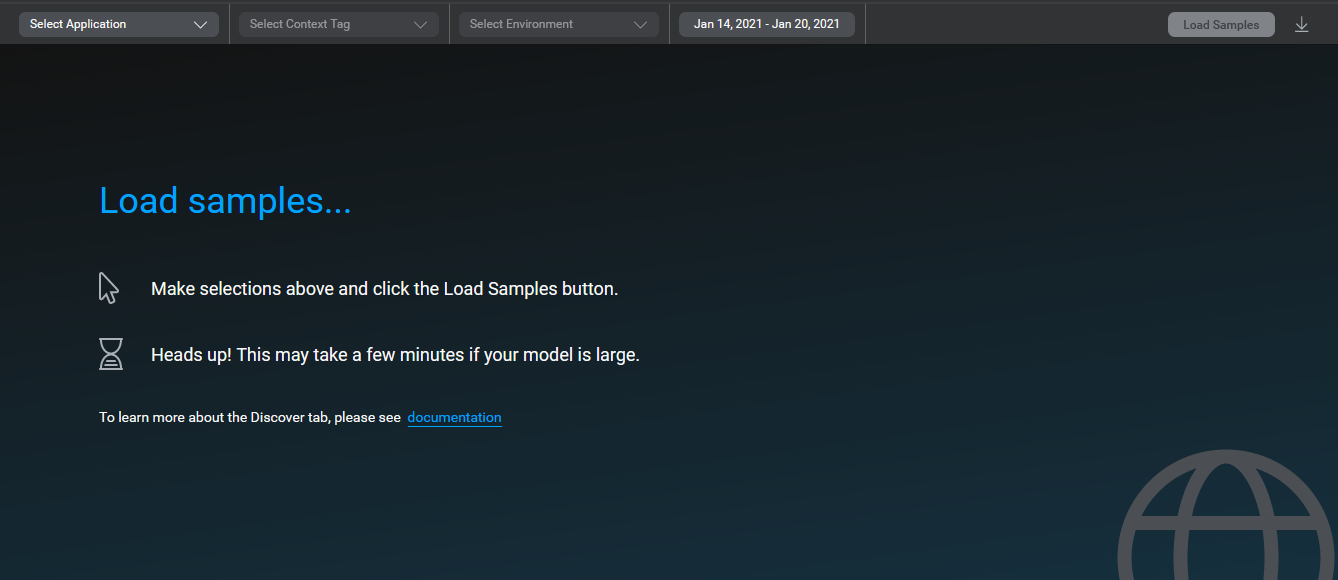
To access data for an application configuration within the Discover tab:
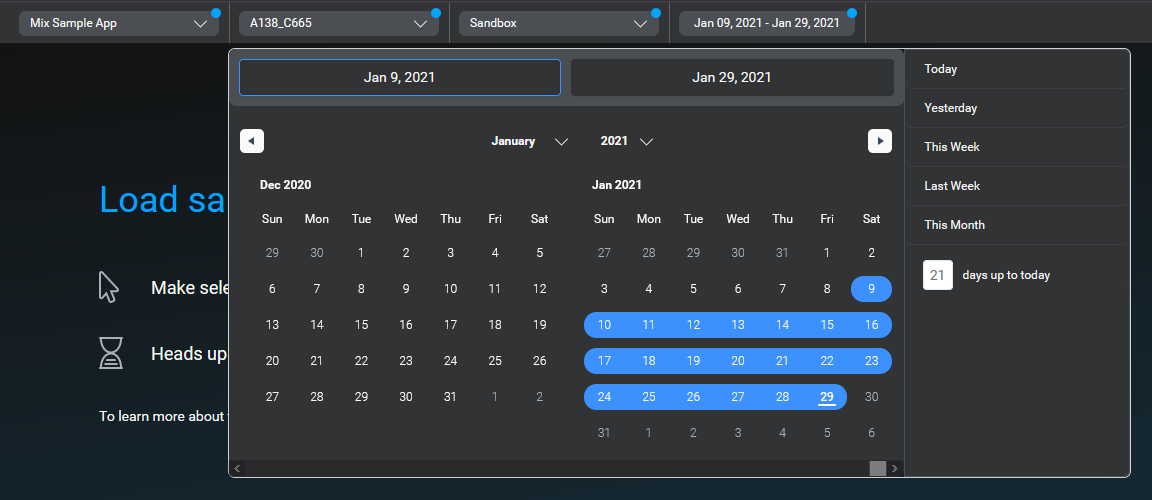
- Use the source selectors at the top of the tab to identify the source and time range from which to pull data. Select the application, associated context tag, environment, and date range using the selectors. This will specify an application configuration over the selected period of time. By default, date range will select the past seven days, but you can choose a custom date range using either a start and end date, a number of days, or one of the available preset range options.NOTE: The start date can be no more than 28 days prior to the current date.
- Click Load Samples.
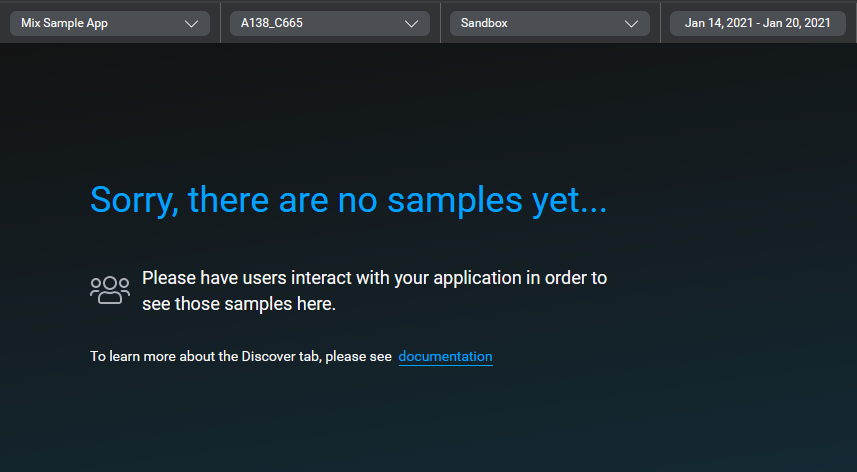
Mix.nlu will look for user sample data from the specified source and time frame. If there is data from the application in the selected time frame available to retrieve, it will be displayed in a table. The Load samples button becomes a Reload samples button.
Is there is no applicable data, you will see a no samples screen instead.
Refresh Discover data
Sometimes you might want to refresh the displayed data for the same application configuration and date range. For example, if the date range includes the current day, you might want to see the very latest user inputs. To refresh the loaded samples, click the Reload Samples button.
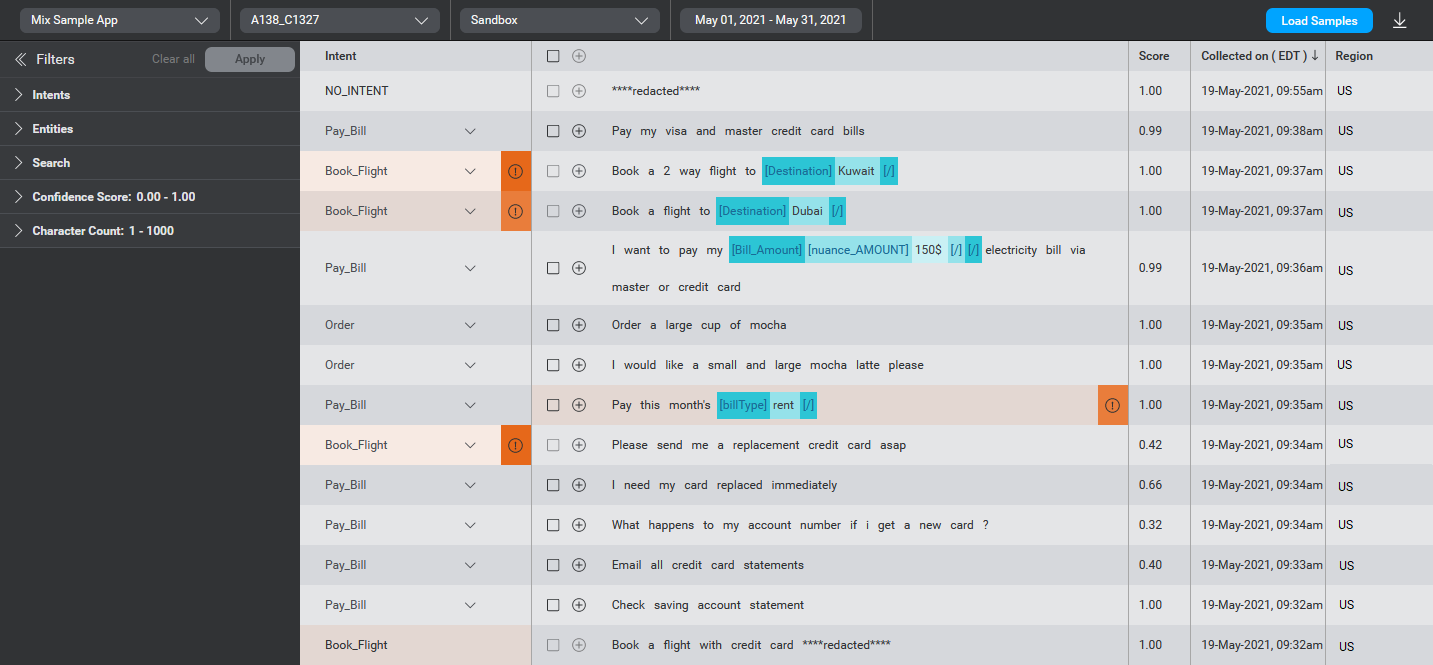
Discover tab contents
Within the Discover tab, you can view information on speech or text input from application users. The information is presented in tabular format, with one row for each sample.
Here is more detail about the contents for each column in the table.
| Column | Description |
|---|---|
| Intent | The intent identified by the model for the user input. If the model determines that the sample does not seem to fit any of the expected intents, it will show NO_MATCH. NO_MATCH cases can help you identify intents that were not considered before but which are important to users. These can be added to refine and improve the model. |
| Samples | The content of the user input, as text. The sample may include annotations attached by the model if (1) the model identified an intent, (2) the identified intent has entities defined, and (3) the model confidently identified entity values in the sample. Note: For entities marked as sensitive in the model underlying the application, the information will show up as ****redacted****. |
| Score | The model’s level of confidence in the inferred intent, as a decimal between 0.00 and 1.00. |
| Collected on | Date and time the input was collected in your time zone. |
| Region | Deployment region where the user interaction occurred. |
If there is a lot of user data, the data is presented in pages.
You can sort the rows by the values of the Intent, Score, Collected on, or Region columns. Click on the column title to sort. By default, the data is sorted on the Collected on column to show the data in chronological order. Clicking on a column header a second time will sort on that column in the opposite order.
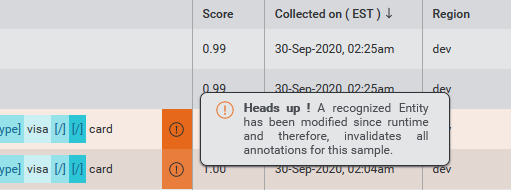
Invalid intents and entities
If you have changed the model ontology since last deploying your application configuration, and these changes impact the intents and/or entities interpreted for the samples, this is flagged in the table contents to remind you that the interpreted results are based on an outdated version of the model.
Intents and entities within the table will be visibly flagged with an orange marker if the intent or entity inferred by the application is no longer in the model ontology in Mix.nlu.

Filtering displayed data
As the usage of your application ramps up, and you get multiple pages of loaded user data, the amount of recent data displayed in Discover can become difficult to make sense of.
The Discover tab provides filters to help reduce the loaded and displayed samples down to a smaller subset of samples. To do this, use the filter panel beside the table.
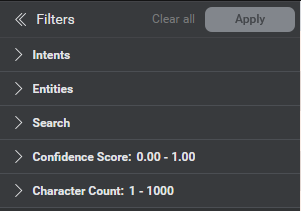
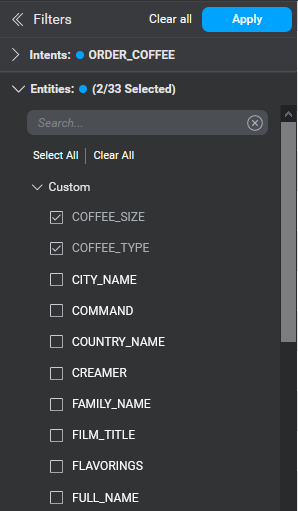
You can filter the samples on the following dimensions:
- Intents: On one or more intents
- Entities: On one or more entities
- Search: By search string or regex pattern. Note: If the string entered in the search field is a valid regex pattern, then it will be treated as a regex pattern. Otherwise, it will be treated as a regular search string.
- Confidence Score: By confidence score range for the samples
- Character Count: By range for the length of the samples in characters
For Intents and Entities, you can select multiple items to include in each filter by clicking the available checkboxes. Click once on a checkbox to select and a second time to deselect.
Filters for which at least one selection has been made are marked with a blue dot. When you select the first item, the filter value is displayed on the filter label. If you select more than one item, a simple count of how many are selected out of the total number of options is displayed.
Within the Intents and Entities filters you can click Select All to check all the checkboxes; this makes it easier to select all except by selecting all then deselecting the specific items you don't want to see. Clear All unchecks all the checkboxes for a filter.
Once you have chosen the filters you want to apply, click Apply in the filters header. The data displayed in the table will update to show only data corresponding to the filter values.
Clicking Clear all in the Filters header resets the selections in the filters to their original defaults and displays all samples.
You can hide the filter panel to free up space as needed and open it again to go back.
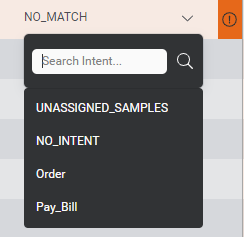
Change the intent for a sample
You can change the intent for a sample to one of the intents that are currently in the model ontology. This is useful if the model version used in the application interpreted the sample as an intent that is no longer in the model. This could happen, for example, if you have recently refactored your ontology.
To change the intent for a sample, open the intent menu and select the desired intent.
You can choose either one of the existing intents, or UNASSIGNED_SAMPLES.
The sample will be labeled with the updated valid intent, and the the intent column will be marked with a blue dot to indicate that the intent has been updated.
Hovering over the dot will reveal a tooltip indicating the originally inferred intent.

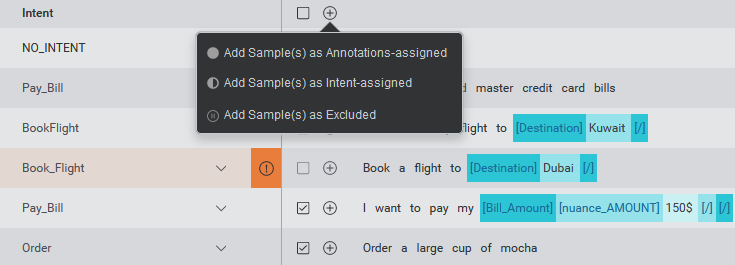
Add samples to the training set
From the Discover tab, you can add selected samples for valid intents directly to the training set.
There are two options available for this:
- Add an individual sample
- Add multiple samples with bulk-add
Samples can be added to the training set under one of three verification states:
- Intent-assigned
- Annotations-assigned
- Excluded
Note the following behaviors which apply to importing individual samples and bulk imports:
- If the intent is valid, and there are no flagged entities in the sample, the sample will be added to the inferred intent, along with any annotations, and set to the chosen verification state.
- If the intent is valid, but any of the entities in the sample are flagged, all entity annotations will be removed from the sample on import.
- If the intent is invalid, the sample cannot be selected for import as is. First you must first change the intent for the sample to a valid intent.
- If any of the content in a sample is redacted (due to sensitive information), you will not be able to select the sample to import.
- For samples with intent set to UNASSIGNED_SAMPLES, any entity annotations—even if they are all valid—will be removed from the sample on import.
Note that once a sample has been imported to the training set, the sample will remain in Discover.
Add an individual sample
To add a sample with a valid intent to the training set:
- Click the
 icon to open the add menu.
 - Select one of the verification state options from the menu to add the sample to the training set with the chosen verification state.

Add multiple samples using bulk-add
To save time adding multiple samples from Discover to your training set, you can select multiple samples at once for import, and then add the samples to the training set in a chosen verification state.
Checkboxes are provided beside each sample to select the samples. A checkbox in the header above the samples allows you to select all selectable samples on the current page.
A bulk-add samples button in the header allows you to choose the target verification state for the selected samples.
To add a selection of samples:
- Use the checkboxes to select samples.
- Select the desired state for the samples in the bulk actions bar above the samples.
Download bulk-add errors data
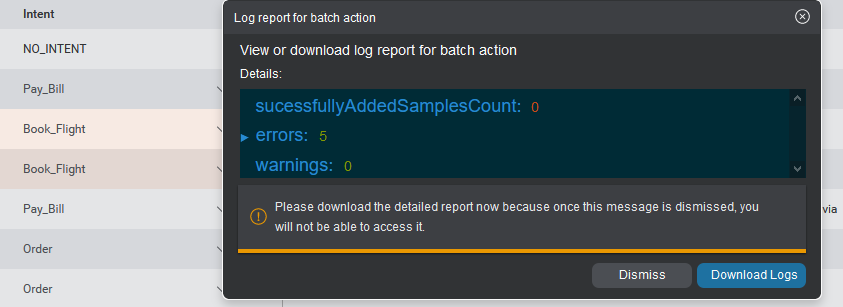
When bulk-adding multiple samples, it is possible that errors and warnings will be produced. A pop up appears when a bulk-add is completed, summarizing the results of the operation, including any errors and warnings. To read detailed error logs, you can download an errors log file in CSV format. A Download Logs button for the CSV file will be displayed in the popup. To download the file, click the button.
Download Discover data
You can download the currently selected loaded data from the Discover tab as a CSV file. This includes, for each sample, any entity annotations identified by the model and displayed in Discover.
If filters are currently applied, only the filtered portion of the data will be downloaded.
To download the sample data as CSV, click on the download icon ![]() above the table. You can then process the CSV data externally into a format that can be imported into Mix.nlu. For more information about importing data into a model, see Importing and exporting data.
above the table. You can then process the CSV data externally into a format that can be imported into Mix.nlu. For more information about importing data into a model, see Importing and exporting data.
If you change the application, associated context tag, environment, or date range using the source selectors, the download option is diabled until you press Reload Samples. Note that in this case this will clear any filters that were set.
Iterating your model
Using the insights gained from the Discover tab, you can refine your training data set, build and redeploy your updated model, and finally view the data from your refined model on the Discover tab. Rinse and repeat! You can improve your model (and your application) over time using an iterative feedback loop.
Optimize model development
The Optimize tab is a feature intended for advanced power users.
It provides advanced automation tools to help make it more efficient to develop larger or more complex projects and perform more sophisticated work on your NLU models.
For users new to Mix.nlu, the Develop tab is the best place to start developing models. The Develop tab is more appropriate for smaller DIY projects.
Optimize tab overview
Visible at the top of the screen are:
- Intents
- Entities
- Ontology
- Sample Sentences
- Project Properties
The Train Model button initiates training using the training data samples.
The Try panel, as in the Develop tab, allows you to interactively test the model by typing in a new sentence.
Sample Sentences panel
The Sample Sentences panel gives a unified view of all samples in the project for the currently selected language, of all intent types and all verification statuses.
The Optimize tab also gives a unified set of controls to perform operations on samples, whether for a single sample, or a chosen set of samples.
The data is displayed in a table, with one row for each sample and with data displayed for the following columns:
| Column | Description |
|---|---|
| Intent | Intent type for the sample. This can have one of the following values:
|
| Status | Indicates the sample status with an icon. This includes the same values used in the Develop tab.
|
| Sample | The text of the sample, along with any already assigned entity annotations, as well as:
|
The data in the table can be sorted by column values:
- Intent: Alphabetical order
- Status: From Excluded to Annotation-assigned. UNASSIGNED_SAMPLES are considered as Excluded for sorting purposes.
- Sample: Sample text in alphabetical order
Click on the column header to sort the samples by that column. Click again to sort in the opposite order.
As with the Develop tab, when there are a lot of samples, the contents will be divided into pages. Similar to the Develop tab, controls on the bottom of the table let you navigate between pages and change the number of samples per page.
Visibility toggles
The header bar above the Sample contents column has toggles to control the visibility of:
- Counts: The number of identical copies of the given sample in the training set.
- Annotations: Show or hide entity annotations in the displayed samples.

Filter displayed samples
By default, the Optimize tab displays all samples.
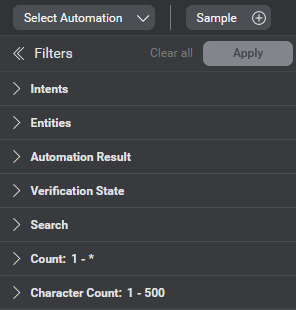
To filter the samples down to a smaller subset of samples, use the filter panel beside the table. You can filter the samples on these dimensions:
- Intents: Select one or more intents from a list of options. The options include user-defined intents, as well as new intents suggested by Auto-intent of the form AUTO_INTENT_01, AUTO_INTENT_02, and so on. When you filter by intents, the results will show samples assigned under the selected intents, as well as UNASSIGNED_SAMPLES whose Auto-intent suggested intent is one of the selected options.
- Entities: On one or more entities, including custom entities, predefined entities, and imported entities.
- Automation Result: Show samples with results from automation operations such as Auto-intent
- Verification state: Intent-assigned, Annotations-assigned, Excluded.
- Search: By search string or regex pattern. Note: If the string entered in the search field is a valid regex pattern, then it will be treated as a regex pattern. Otherwise, it will be treated as a regular search string.
- Count: By number of duplicates/weighting of samples. Select lower and upper limits to define a filter range. If no upper limit is specified, this will select all samples with a count greater than or equal to the lower limit.
- Character count: By range for the length of the samples in characters
Multiple items to include can be selected in the Intents and Entities filters by clicking the available checkboxes. Click once on a checkbox to select and a second time to deselect.
Filters for which at least one selection has been made are marked with a blue dot. When you select the first item, the filter value is displayed on the filter label. If you select more than one item, a simple count of how many are selected out of the total number of options is displayed.
Within the Intents and Entities filters you can click Select All to check all the checkboxes; this makes it easier to select all except by selecting all then deselecting the specific items you don't want to see. Clear All unchecks all the checkboxes for a filter.
Once you have chosen the filters you want to apply, click Apply in the filters header. The data displayed in the table will update to show only data corresponding to the filter values. If there are enough samples fitting the filter criteria, they will be displayed in pages.
Clicking Clear all in the filters header resets the selections in the filters to their original defaults and displays all samples.
You can hide the filter panel to free up space as needed and open it again to go back.
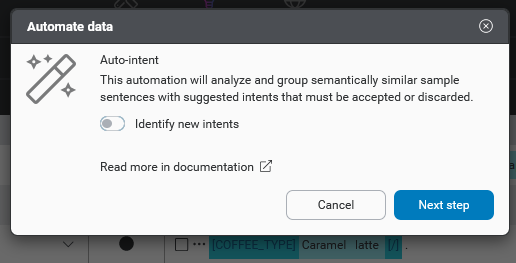
Apply automation
The Automate data menu appears in the samples actions bar above the samples. Automate data provides options for automating basic tasks of grouping and annotating samples. Currently this menu supports one automation task, Auto-intent. In future releases, additional automations will be added.
Clicking Automate data launches an Automate data popup module. Here, the chosen automation can be selected (Currently Auto-intent is the only available automation).
Note: Automation can also be applied when importing a file with samples, whether in the Develop tab of Mix.nlu or in Mix.dashboard. See the Import project data documentation for more details on file import options.
Auto-intent
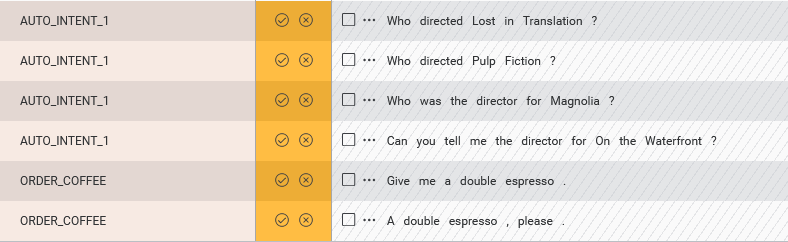
Auto-intent performs an analysis of UNASSIGNED_SAMPLES, suggesting intents for these samples.
Each previously unassigned sample is tentatively labeled with one of a small number of auto-detected intents present within the set of unassigned samples.
There are two options for Auto-intent:
- Group samples by existing intents. This is the default option.
- Identify new intents and group samples by existing or new intents.
If a sample is recognized as fitting the pattern of an already defined intent, Auto-intent suggests this existing intent.
In the second option, for groups of samples that appear related to each other, but which do not appear to fit the pattern of an existing intent, the samples are labeled generically as AUTO_INTENT_01, AUTO_INTENT_02, and so on.
Health checks
When an automation action is initiated, Mix.nlu runs a health check of the training sample, model, and data sent for automation. This involves a check of several things:
- Quantity of annotated samples: Whether there are sufficient annotated samples in your training. If not, you should add additional annotated samples for improved accuracy.
- Trained model available : Whether there is an existing trained model. If not, a model will be trained first.
- Model was trained on fairly recent project data: Whether the existing trained model is up to date with the project samples. If not, the model will be retrained first before running Auto-intent.
- Quantity of data sent for automation: This check is performed only if you are trying to identify new intents for Auto-intent. It indicates whether you have enough samples to effectively detect new intents. If not, you should add additional samples for the automation run.

These checks assure that you have a robust, up to date model and that the Auto-intent run will give useful results when running automation. When the checks are done, results will be displayed visually in the Automate data pop-up module.
If the checks all pass, you will be able to proceed straightaway with automation using the existing trained model.
Consequences of failed health checks
If any of the checks do not pass, you will be informed and advised of how that impacts the next steps.
| Health check | Consequences if check fails |
| Quantity of annotated samples | Informs that adding a starting ontology and/or more annotated samples will improve performance of the predicted intents. |
| Model available | Informs that a trained model is needed and that a new one will be trained before running automations, adding additional latency. |
| Project data reflected in model | Informs that a new model will be trained due to the changes in the data, adding additional latency. |
| Quantity data sent for automation | Informs that the automation needs a sufficient volume of samples to be performant. Smaller uploads will have sub-optimal performance. |
If you don't have any UNASSIGNED_SAMPLES on which to apply Auto-intent, you will not be able to proceed with the automation.
If there are not enough annotated samples in your training set, you will be advised to add more. You can still continue with the Auto-intent request.
If there is no existing trained model or your model is out of date, Mix.nlu will train a new model before proceeding with the automation. This will add some time to the automation process.
Run Auto-intent on UNASSIGNED_SAMPLES
Note: To run Auto-intent, you need to have UNASSIGNED_SAMPLES.
To run Auto-intent:
- Choose Automate data from the actions bar above the table. This will launch a pop-up automation module
- Choose the automation to apply. Currently, Auto-intent is the only option and is pre-selected.
- Select Identify new intents for the Auto-intent run if needed, using the toggle.
- Click Next step. This will initiate health checks of the samples and model. Depending on the results of the pre-check, you may receive feedback.
- Click Automate or Train and automate to continue. (Train and automate appears if the health check reveals there is no trained NLU model or the model is out of date).

This initiates the Auto-intent process. When the run is finished, it returns a suggested intent classification for each previously unassigned sample.
Review Auto-intent suggestions
When the Auto-intent operation completes, you can view the suggestions. Initially, these suggestions are tentative, and from a verification perspective, they are in the status Intent-suggested. No intent is yet assigned.
If there are any newly identified intents, you should review the new intents to see if any of them need to be merged after the fact.
Accept or discard Auto-intent suggestions
You can next choose to accept or discard the Auto-intent suggestions.
Clicking the checkmark icon accepts a suggestion, while clicking the x icon discards the suggestion.
For a sample with a suggestion for an existing intent, accepting the suggestion assigns the sample to that intent and moves the sample from Intent-suggested to Intent-assigned. Discarding the suggestion moves the sample back to UNASSIGNED_SAMPLES. A toast icon will be displayed to confirm your choice has been applied.
For any individual samples that were misidentified, you can manually change the sample intent.
Rename a newly identified intent
For a sample identified as a newly identified intent (AUTO_INTENT_01, AUTO_INTENT_02...), you are prompted to rename the intent to a meaningful name when you try to accept the suggestion.
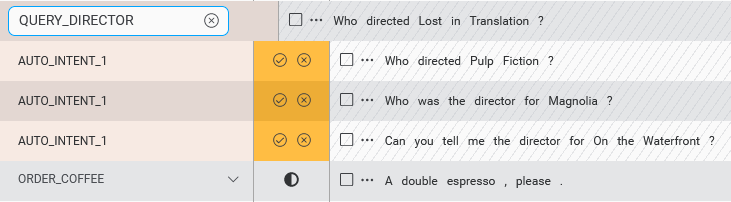
Enter a new name in the text field provided and press Enter.
Three things happen when you do this:
- The new intent is added to the ontology.
- The sample is added to the training set under the new intent, with the sample set to Intent-assigned.
- The intent suggestions for all the other samples tagged under the same new intent will update to reflect the new name, but remain in the Intent-suggested state. You still need to separately accept or discard each sample to either add to the training set or return to UNASSIGNED_SAMPLES.
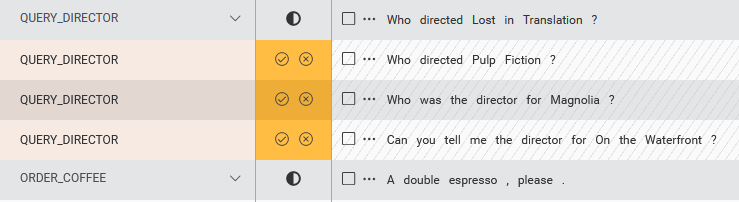
Merge two newly identified intents
You may find in some cases that Auto-intent will interpret multiple new intents that in reality represent the same intent. The Auto-intent algorithm inclines toward identifying "smaller" intents to give more flexibility to developers.
If you find that this has happened, it is relatively simple to merge the two newly identified intents.
First Rename one of the intents.
Then move the samples (for example, using bulk move intents) from the second new intent to the renamed intent.
Add multiple samples to an intent
A Samples editor provides an interface to create and add multiple new samples in one shot. This serves as a faster way to create new samples.
Samples are added as plain text without annotations. Individual samples can have up to a maximum of 500 characters. You can add up to 100 samples at one time using this editor.
To add samples:
- Select Sample from the actions bar above the table. An editor will launch with multiple lines to type in samples.

- Use the Select Intent dropdown to choose the intent to which you want to add new samples.
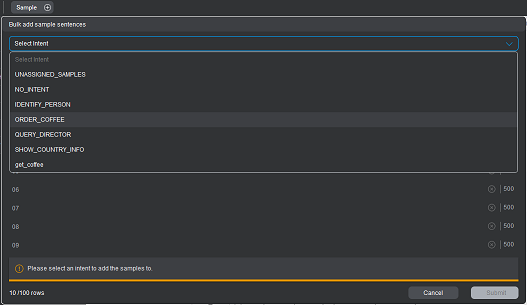 You can also select instead to apply Auto-intent to the new samples.
 - Enter samples in the editor. There are a few ways to do this:
- Type in a sample and press the Tab or Enter key or click the next line to enter another sample.
- Copy-paste a list of samples from a word processor or other text editor. The samples need to be separated with hard or soft returns in the source for the editor in Mix to correctly divide them into separate samples. The samples will appear in the editor on separate lines.
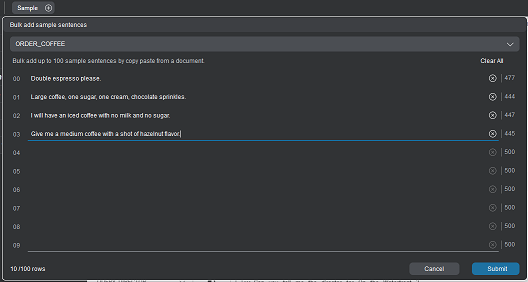
- Repeat as needed until you have entered all the samples you want to add.
- Once you have added your samples, click Submit to add the samples.
If you chose an intent for the samples, the new samples should now appear in Optimize and in Develop under the intent. You can annotate the samples in either of these tabs.
If you chose to apply Auto-intent to the samples, the samples will appear in the table of samples with intent suggestions. You can then proceed to rename any newly detected intents, accept or discard the suggested intents, and annotate the samples.
Upload samples with text file import
The file upload feature in Optimize is similar to that in Develop, allowing you to upload a text file with samples. The file upload in Optimize allows for additional functionality however. To add multiple samples at once via a text file upload:
- In the top bar, click the file upload icon. An Upload a file dialog will open.
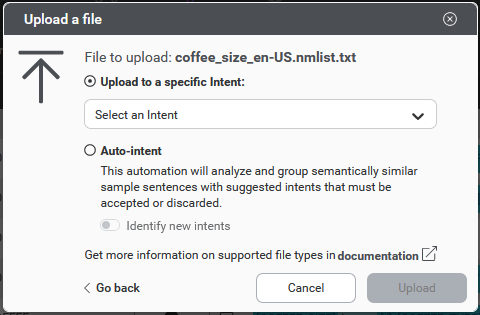
- Use the file picker to select a .txt file containing samples or drag a text file onto the dialog window. You will then be given two options on how to handle the file:
- Upload to a specific intent: Import samples under one existing intent.
- Auto-Intent: Import a set of samples and apply Auto-intent to suggest, for each sample. Auto-intent can either look only for existing intents or it can search for both existing intents and newly detected intents.
- Select the desired option.
- If uploading to a specific intent, select an intent as well.
- If you want to apply Auto-intent, select whether or not to try to identify new intents in the uploaded samples.
- Click to proceed.
- If you are uploading the samples to a specific intent, click Upload to initiate the upload, and you are done.

- If you are applying Auto-intent, click Next step and proceed to step 5.
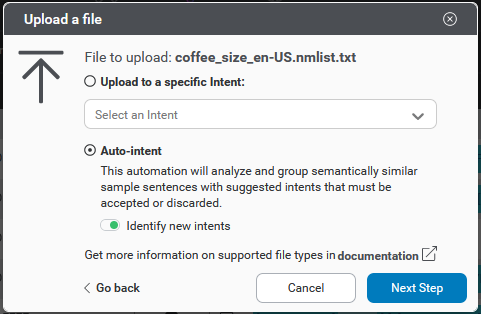
- If you are uploading the samples to a specific intent, click Upload to initiate the upload, and you are done.
- If you choose to apply Auto-intent to the uploaded samples, this will trigger a Health check of samples and model. The health check results may give you guidance on how to improve the performance of the Auto-intent. In some cases, particularly if your training set does not have a sufficient number of Intent-assigned samples, you will be blocked from proceeding until you remedy the issue. If you do not yet have a trained model in your project or the model is out of date, Mix.nlu will train a new model before proceeding with the Auto-intent. If there are no blocking issues, click Automate or Train and Automate as the case may be to proceed.
- When the upload and processing of the file are complete, a pop-up View Report window appears. This gives summary information about how successful the upload was. For more details, you can click Download logs to download a CSV log file.
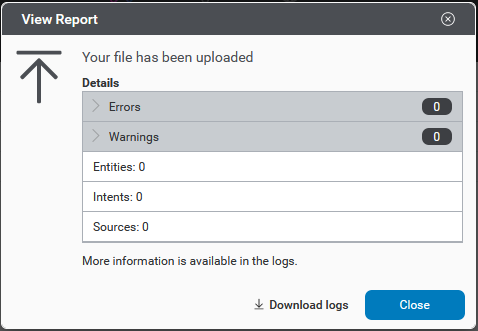
Samples uploaded to a specific intent are attached to that intent. You will want to go in and add annotations after uploading.
Samples uploaded with Auto-intent applied are added initially as UNASSIGNED_SAMPLES with the identified intents initially only suggestions. You will want to view suggested intents in Optimize and accept or discard those suggestions. See Auto intent for more details on Auto-intent.
Update individual samples
You can perform several actions on individual samples:
- Add or modify sample annotations
- Change sample status
- Change sample intent
- Exclude a sample from the training set or re-include
The controls and behavior for individual sample operations are mostly the same as those in the Develop tab.
Change sample intent in intent menu
An intent menu available in the Intent column of each sample allows an alternate means to change the intent for a sample.
To change the sample intent to an existing intent:
- Click to open the intent menu.
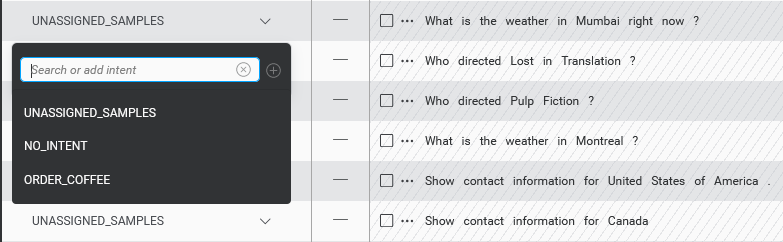
Select a new intent for the sample. There are multiple ways to do this:
- Scroll through the list of existing intents, and find the intent you want.
- If there are a lot of intents in your project, you can also use the search field to track down the intent you want more quickly.
Click on the intent name to select the intent.
Sometimes, you may realize that the sample does not fit any of the existing intents. In this case, you can create a new intent directly in the menu. With the intent menu open:
- Type in a new intent name in the search field. You will see no results in the search field and will be prompted to add the intent.
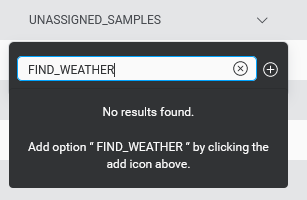
- Click the add icon
 in the intent menu
In both cases, the Move Samples menu will open to allow you to move the sample to the new intent and decide how you want to deal with any entities in the sample.
Perform bulk operations
As in the Develop tab, you can perform bulk operations on a selected subset of multiple samples at the same time. The behavior for bulk operations in the Optimize tab is similar to that for bulk operations in the Develop tab, as described in Bulk operations. The key differences are that In the Optimize tab:
- Operations can be carried out on samples from more than one intent at once
- Additional operations are available
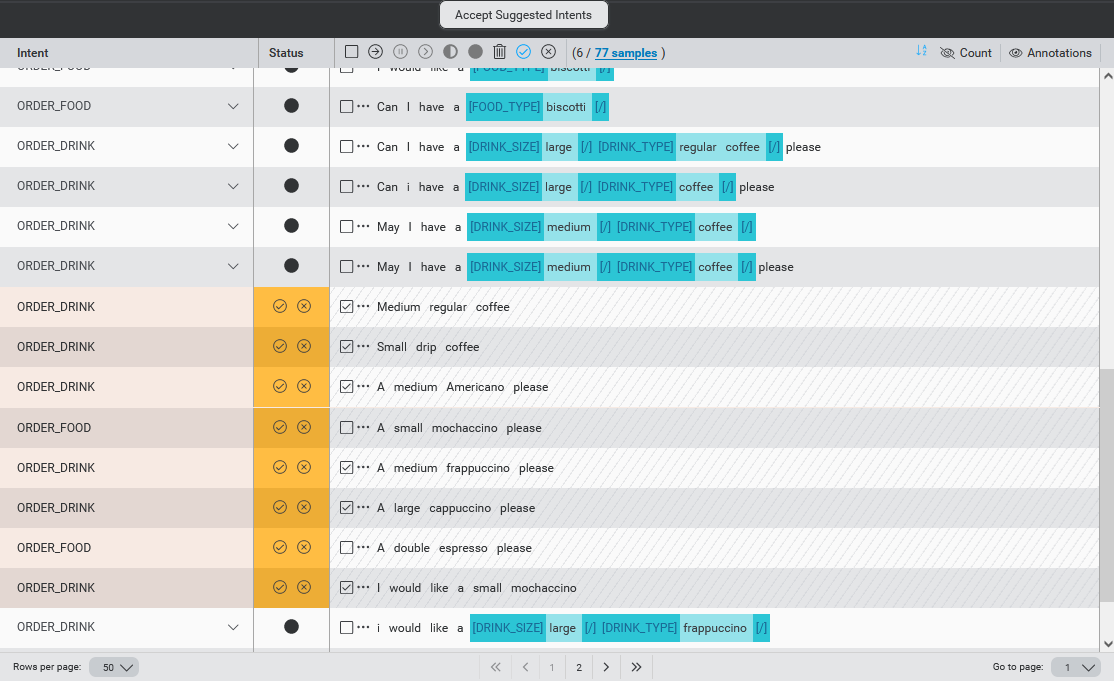
As in the Develop tab, you can select:
- A subset of samples on the current page using the checkbox selectors on each row
- All samples in the current page of the current filter view using the checkbox selector in the columns header
- All samples for the current filter view by clicking on the samples total in the header.
As described in the Develop tab bulk operations discussion, making any changes to the samples will deselect any selected samples. This includes all the types of sample changes mentioned under Develop. For the Optimize tab specifically, this also includes:
- Add multiple samples
- Accept or discard Auto-intent suggestions
Once you have selected the subset of samples, click an icon on the header bar to apply one of the available operations:
- Move samples to another intent
- Exclude samples
- Include samples
- Set samples as Intent-assigned
- Set samples as Annotation-assigned
- Delete samples
- Accept Auto-intent suggestions
- Discard Auto-intent suggestions
Bulk accept and discard suggested intents
The icons for accepting and discarding suggested intents on selected samples will only be active if at least one of the selected samples has a pending auto-intent suggestion. In addition, bulk accept/discard can only be chosen if the selected samples are on the same page in the current filter view. If you want to more efficiently perform bulk accept/discard, it is a good idea to filter by Automation result first to aggregate and see only those samples.
Clicking the bulk accept icon opens a window summarizing the selected samples with samples grouped by suggested intent. For newly identified intents, you need to choose a global rename for the intent. Only once all newly identified intents have been renamed can you click to accept the suggestions.
Coming attractions
Additional functionality will be added to the Optimize tab in future releases. This includes:
- Ability to suggest annotations for unannotated samples belonging to a specified intent
- Find and replace across samples
Handling sensitive information
Sometimes when building an NLU model for your application, you will need to handle user inputs that contain sensitive personally identifiable information (PII). Sensitive PII is personal data, not generally easily accessible from public sources, that alone or in conjunction with other data can identify an individual.
Sensitive PII includes data such as:
- Full name
- Social Security Number or Social Insurance Number
- Driver’s license
- Full mailing address
- Credit card details
- Passport details
- Financial information
When collecting such information during an interaction with a user, it is important to mask this data in logs to protect the users.
Mix.nlu allows you to mark any entity as Sensitive in the Entities panel. Once an entity has been marked as sensitive, user input interpreted by the model as relating to the entity at runtime will be masked in call logs.
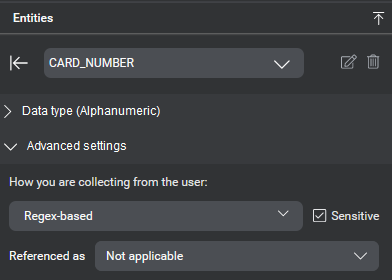
Similarly, entities and contents of variables can be marked as Sensitive in Mix.dialog and are then handled the same at runtime.
Ontology
In natural language understanding, an ontology is a formal definition of entities, ideas, events, and the relationships between them, for some knowledge area or domain. The existence of an ontology enables mapping natural language utterances to precise intended meanings within that domain.
In the context of Mix.nlu, an ontology refers to the schema of intents, entities, and their relationships that you specify and that are used when annotating your samples, and interpreting user queries.
Intents
An intent identifies an intended action. For example, an utterance or query spoken by a user expresses an intent to order a drink. As you develop an NLU model, you define intents based on what you want your users to be able to do in your application. You then link intents to functions or methods in your client application logic.
Here are some examples of intents you might define:
- ORDER_COFFEE: For example, if a user said "I'd like an iced vanilla latte."
- GET_INFO: For example, if a user asked "What's in the espresso macchiato?"
- CANCEL_ORDER: For example, if a user remarked "I've changed my mind, cancel that."
Intents are often associated with entities to further specify particulars about the intended action.
Entities
An entity is a language construct for a property, or particular detail, related to the user's intent. For example, if the user's intent is to order an espresso drink, entities might include COFFEE_TYPE, FLAVOR, TEMPERATURE, and so on. You can link entities and their values to the parameters of the functions and methods in your client application logic.
If an entity applies to a particular intent, it is referred to as a relevant entity for that intent. The idea of relevant entities is important:
- When annotating a sample, if you have provided an intent, the suggested entities are limited to those relevant for that intent. This greatly simplifies the annotation process.
- The NLU models interpret and return only entities that are relevant to the intent of the query.
Mix.nlu supports the following user-defined entity collection methods:
Mix.nlu also supports two classes of predefined types:
Mix.nlu also provides some mechanisms to modify, combine and refer to the existing types:
Collection method and data type
Your options for collection method will depend on your chosen data type for the entity. For more details see Data type and collection method compatibility.
List entities
An entity with list collection method has possible values that can be enumerated in a list. For example, if you have defined an intent called ORDER_COFFEE, the entity COFFEE_TYPE would have a list of drink types that can be ordered. Other examples of entities using list collection might include song titles, states of a light bulb (on or off), names of people, names of cities, and so on.
Literals and values
A literal is the range of tokens in a user's utterance or query that corresponds to a certain entity. The literal is the exact literal written or transcribed spoken text. For example, in the query "I'd like a large t-shirt", the literal corresponding to the entity SHIRT_SIZE is "large". Other literals might be "small", "medium", "large", "big", and "extra large". When you annotate samples, you select a range of text to tag with an entity. For list-type entities, you can then add the text to the list for the entity. Lists of literals can also be uploaded in .list or .nmlist files. For more information, see Importing entity literals.
Literals can be paired with values. In comparison to literals, values are the canonical semantic meaning associated to a literal. A value specifies the entity and allows the system to act on the user's intent. For example, "small", "medium", and "large" can be paired with values "S", "M", and "L", respectively. Multiple literals can have the same value, which makes it easy to map different ways a user might say an entity into a single common meaning. For example, "large", "big", "very big" could all be given the same value "L".
Defining literal-value pairs per language
If your project includes multiple languages, you will want to support the various ways that users might ask for an item in their language of choice. List-based entities created in a project are shared across languages. The values and associated literals connected to the entity, however, are created and managed separately by language. This gives flexibility to handle situations where the value options vary by language and location.
When you add a value-literal pair, this pair will apply to the entity only in the currently selected language. The same value name can be used in multiple languages for the same list-based entity, but the value and its literals need to be added separately in each language.
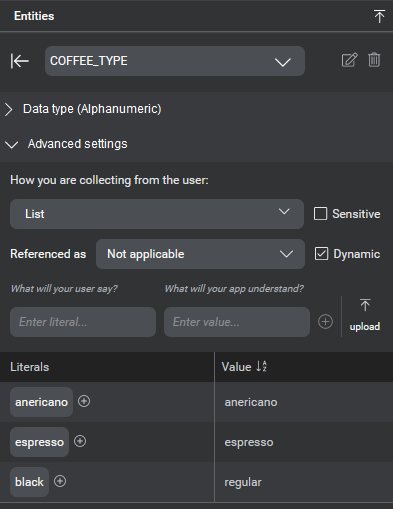
To add a new value and a literal for a list-based entity within the currently selected language, enter the literal and value in the Entity list pane where indicated and then click the plus (+) icon. The new value appears in the list along with the first literal. You can also click there to add new literals that map to the same entity value. Again, the literal-value pairs added will not be automatically added to the other languages in the project.
To remove a literal, click the delete icon ![]() next to the literal. You are asked to confirm the deletion. This removes the literal from the currently selected language.
next to the literal. You are asked to confirm the deletion. This removes the literal from the currently selected language.

Dynamic list entities
It is not always feasible to know all possible literals when you create a model, and you may need the ability to interpret values at runtime. For example, each user will have a different set of contacts on his or her phone. It is not practical (or doable) to add every possible set of contact names to your entity when you are building your model in Mix.nlu.
Dynamic list entities allow you to upload data dynamically in a client application at runtime. The data is uploaded in the form of a wordset using the Mix NLUaaS or ASRaaS API. Wordsets can either be uploaded and compiled ahead of time or uploaded at runtime. The ASRaaS or NLUaaS runtime can then use this data to provide personalization and to improve spoken language recognition and natural language understanding accuracy.
Defining dynamic entities
To define an entity with list collection method as dynamic, check the Dynamic box for this entity.
While the values for dynamic data are uploaded in the form of wordsets, it is still important to define a representative subset of literal and value pairs for dynamic list entities. This ensures that the model is trained properly and improves the accuracy of the ASR. Using our contact example, this means that you should include a representative subset of what you expect contact names to look like, and ensure that you have samples with the proper annotation.
When naming your dynamic entities in each model, keep in mind that they are global per application ID (across languages and deployed model versions).
Relationship entities: isA and hasA
An entity with relationship collection method has a specific relationship to one or more existing entities, either an "isA" or a "hasA" relationship.
isA relationship entities
An isA relationship states that ENTITY_X is a type of ENTITY_Y. The definition of Y is inherited by X, such as Y's list of literals, as well as any applicable grammars and relationships. Note that while the definition of the child entity is the same as the parent entity, the child entity picks up differences because of its different role in your samples.
For example, say you have a train schedule app and you want to accept queries such as "When is the next train from Boston to New York." Both "Boston" and "New York" are instances of the STATION entity. If you annotated the query using STATION for both cases, then you would have no way of determining which is the origin and which is the destination. To resolve this, you could instead define two list-type entities, FROM_STATION and TO_STATION, and associate each with the same list of literals. This would, of course, be time consuming and difficult to manage. The better solution is to define one list-type entity STATION with an associated list of cities/stations, and then define FROM_STATION isA STATION, and TO_STATION isA STATION. Now, you only have one list of stations to manage. The model interprets queries and returns FROM_STATION or TO_STATION as appropriate for the roles they play in the query, and returns literals and values from the list associated with the STATION entity.
You can also make isA relationships to predefined entities. For example, AGE is a nuance_CARDINAL_NUMBER.
In Mix, an entity can only have an isA relationship with one entity.
hasA relationship entities
A hasA relationship states that ENTITY_Y is a property or a part of ENTITY_X. That is, ENTITY_X has a ENTITY_Y. For example, the entity FULL_NAME might have the sub-entities GIVEN_NAME and FAMILY_NAME as part of it. The entity DRINK might have COFFEE_TYPE and SIZE as part of it. Note that unlike an isA relationship, an entity can have multiple hasA relationships.
You would use hasA relationships if the entities in your queries have structure. However, Nuance recommends that you use hasA relationships only if you have a definite need, since they can be tricky to work with, and the complexity means the NLU models may be less accurate than desired. An example of a definite need is to be able to interpret a query like "put the red block into the green box".
In this case you need a way to associate the color red with the block and the color green with the box. Without using hasA relationships the JSON object returned would be flat and you would not know which color went with which object. Using hasA, you would define an OBJECT that has a COLOR and SHAPE. Then the following annotation becomes possible: "put the [OBJECT][COLOR]red[/][SHAPE]block[/][/] into the [OBJECT][COLOR]green[/][SHAPE]box[/][/]".
Essentially, isA creates a subclass sort of relationship, while hasA creates a relationship of composition.
Note that hasA relationships are not supported in Mix.dialog, so your should avoid using hasA if you will be building a dialog project.
Create a new relationship entity
- Create a new entity and give it a name.
- Click on the new entity in the Entities panel to open the editor.
- Set the data type and set the collection type to Relationship.
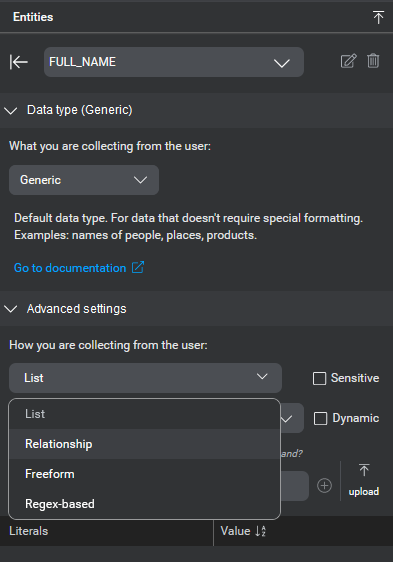 A relationships definition editor appears underneath.
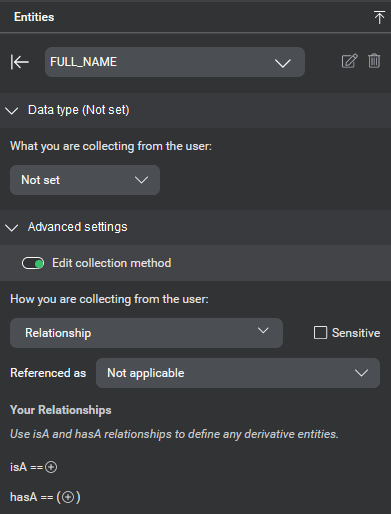
- Click the + icon for the type of relationship entity you want to create, isA or hasA. A dropdown will open allowing you to pick from the existing custom and predefined entities. For isA, you can only select one entity here, while for hasA you can select multiple entities
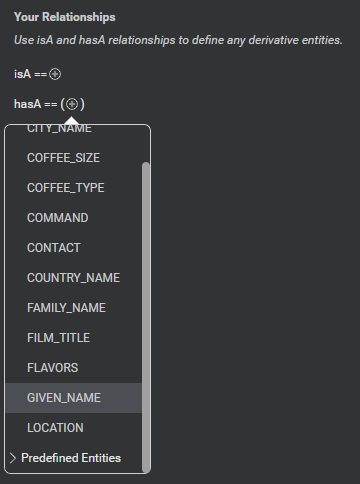
- Select one of the sub-entities to which your new entity is related.
- Repeat steps 4 and 5 for any other sub-entities in the relationship definition.
The relationship is now defined.
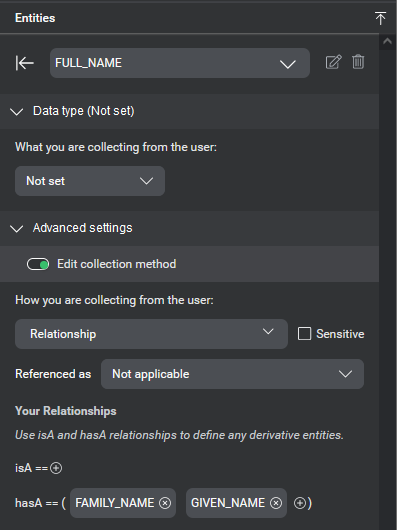
Annotate a sample sentence with a hasA entity and its related component entities
- Go to the Develop tab and open the intent containing the sentence.
- Click to select the portion of the sentence containing the (outer) hasA entity.
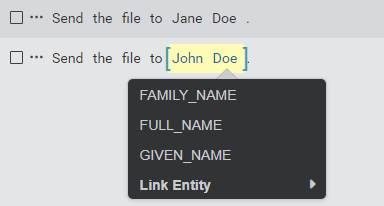 In the entity selection menu that appears, you can see both the outer, hasA entity, as well as the sub-entities to which it is related by a hasA relationship.
 - Select the hasA entity from the menu. The outer entity will be annotated.
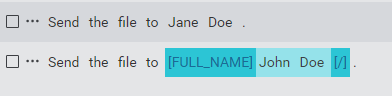
- For each of the inner sub-entities, select the portion of the sentence containing the entity, and select the entity from the menu.
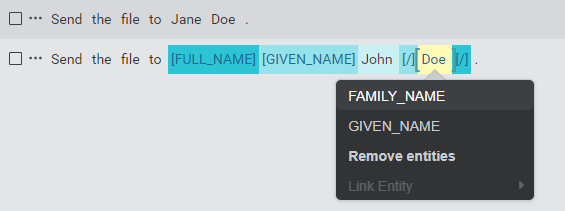
The sentence is now fully annotated.

Relationship entities and sensitive flag
Note that an entity defined in relationship to custom entities via isA or hasA does not automatically inherit the sensitive flag from the original entities. You need to separately mark the new entity as sensitive.
Regex-based
An entity with regex-based collection method defines a set of values using regular expressions. For example, product or order values are typically alphanumeric sequences with a regular format, such as gro-456 or ABC 967. Both of these examples, and many more codes with the same general pattern, can be described with the regex pattern:[A-Za-z]{3}\s?-?\s?[0-9]{3}
Similarly, you might use entities with regex-based collection to match account numbers, postal (zip) codes, confirmation codes, PINs, or driver's license numbers, and other pattern-based formats.
Creating regex-based entities
To use a regular expression to validate the value of an entity (for example, an order number as shown below), enter the expression as valid JavaScript.
In this example the user is creating a regex-based entity called ORDER_NUMBER, which will match order numbers in the form gro-456, COF-123, sla 889, and so on (three characters + an optional hyphen and/or space + three digits).

To save the pattern, click Download project and save regex-based entity.
Before the entity-type is created (or modified), Mix.nlu exports your existing NLU model to a ZIP file containing a TRSX file so that you have a backup. Creating (or modifying) a regex-based entity requires your NLU model to be re-tokenized, which may take some time and impact your existing annotations. You receive a message when the entity is saved successfully.
Mix.nlu validates the search pattern as you enter it and alerts you if it is invalid. Invalid expressions (including empty values) are not saved.

Notes and cautions
Note the following points when creating regular expressions for entities with regex-based collection method:
- The escape character is a single backslash (\).
- Include [A-Za-z] in all regexes to cover both upper and lowercase characters. Sentences may be changed to lowercase during normalization, for example, PROD9997 is changed to prod9997, so your regular expressions should be case insensitive to cover these variants in case.
- A regex definition may not exceed 255 characters.
- Mix.nlu supports a single regex definition per entity.
- You can change a regex-based entity to any other entity type. However, the definition is not saved. Make a note of complex patterns should you wish to use (or recreate) them again.
- Dynamic regex entities are not supported.
- Regex entities have limitations around detecting numeric and alphanumeric values from speech input. Regex patterns which look for digits as part of the pattern should only be used for text input.
Capture groups
Be careful when using parentheses in a regular expression, for example to quantify a sub-pattern with +, *, ?, or {m,n}. Enclosing in parentheses creates a capture group. In general programming, matching a regex pattern with capture groups on a string returns both the full pattern, and the individual capture groups, in order, packaged as an array.
With Mix.nlu specifically, however, an entity expects a single value. When you use a regex with capture groups, Mix.nlu will return the result from the first capture group only rather than the full pattern. This is to allow extra flexibility for developers; for example if you want to recognize a date pattern, but only need the month to fulfill the user's intent. If you need to use a parenthetical group, but want the full pattern match as the value returned for the entity, there are two options:
- Wrap the entire regex pattern in parentheses.
- Use non-capturing groups with (?: ) instead.
Anchors
Avoid using a caret (^) to denote the beginning of a regular expression, or a dollar sign ($) to denote the end, as doing so will cause the NLU engine to expect the expression at the beginning, or end, of a sentence. Consider this phone number regex-based entity (any phone number of format 123-456-7890):
(?:\+\d{1,2}\s)?\(?\d{3}\)?[\s.-]\d{3}[\s.-]\d{4}$will be matched successfully, if the phone number occurs at the end of the sentence (note $ at end of expression) such as in the case of "My telephone number is 123-456-7890". It will not, however, match "123-456-7890 is my phone number"^(?:\+\d{1,2}\s)?\(?\d{3}\)?[\s.-]\d{3}[\s.-]\d{4}will match "123-456-7890 is my phone number" but not "My telephone number is 123-456-7890"^(?:\+\d{1,2}\s)?\(?\d{3}\)?[\s.-]\d{3}[\s.-]\d{4}$will match "123-456-7890" but not the above(?:\+\d{1,2}\s)?\(?\d{3}\)?[\s.-]\d{3}[\s.-]\d{4} will match all of the above scenarios
Annotating with regex-based entities
Annotating with regex-based entities means identifying the tokens to be captured by the regex-defined value. At runtime the model tries to match user words with the regular expression.
For example:
What's the status of order [ORDER_NUMBER]COF-123[/]
Rule-based
An entity with rule-based collection method defines a set of values based on a GrXML grammar file.
While regular expressions can be useful for matching short alphanumeric patterns in text-based input, grammars are useful for matching multi-word patterns in spoken user inputs. A grammar uses rules to systematically describe all the ways users could express values for an entity.
Creating rule-based entities
To create an entity using the rule-based collection method:
- Prepare the grammar file. See Understanding grammar files and GrXML file rules below for more details on filename conventions and the required format of the file.
- (As required) In Mix.nlu select the language from the menu near the name of the project. (GrXML files are language-specific.)
- Create a new entity and name it appropriately, keeping in mind the requirements described in the link above.
- Select a data type for the entity.
- Under How you are collecting from the user, select: Rule-based.
- Browse to upload the grammar file that you have prepared.
- Click Download project and save rule-based entity.
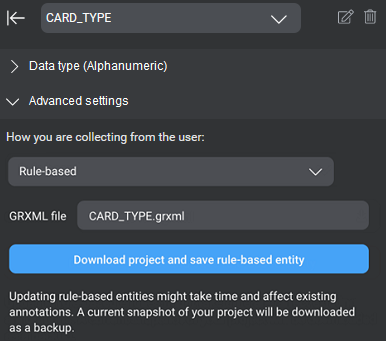
- If your project includes multiple languages, upload separate grammar files, one for each language. See the note below.
Before the new entity is saved (or modified), Mix.nlu exports your existing NLU model to a ZIP file (one ZIP file per language) so that you have a backup of your NLU model. Creating (or modifying) a rule-based entity requires your NLU model to be retokenized, which may take some time and impact your existing annotations. You receive a message when the entity is saved successfully.
At any time you can use the download button to view the contents of the GrXML file.
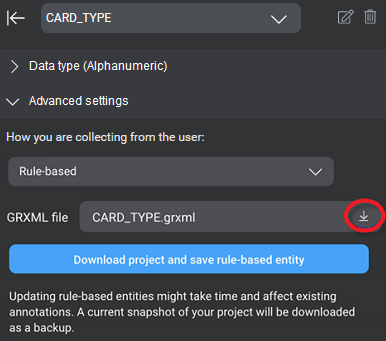
Note the following additional points when creating entities using rule-based collection method:
- You can change a rule-based entity to any other entity collection method. The associated GrXML file, however, is not retained; it is completely removed from the project.
- Dynamic rule-based entities are not supported.
- A GrXML file must have the .grxml extension.
- The name of the rule-based entity must match the grammar root and rule ID of the GrXML file. See GrXML file rules for details.
- You cannot rename a rule-based entity due to the requirement described above.
- The grammar must return a value.
Understanding grammar files
Example GrXML file:
<?xml version='1.0' encoding='utf-8'?>
<grammar xml:lang="en-US" version="1.0" root="DP_NUMBER" xmlns="http://www.w3.org/2001/06/grammar">
   <meta name="swirec_normalize_to_probabilities" content="1"/>
   <meta name="swirec_enable_robust_compile" content="1"/>

   <rule id="DP_NUMBER" scope="public">
      <one-of>
         <item>
            <ruleref uri="#S"/>
            <tag>DP_NUMBER = S.V</tag>
         </item>
         <item>
            <ruleref uri="#EMIR"/>
            <tag>DP_NUMBER = EMIR.V</tag>
         </item>
      </one-of>
   </rule>

   <rule id="S">
      <item repeat="1-16">
        <one-of>
            <item>
              <ruleref uri="#DIGIT"/>
              <tag>V = V ? V + DIGIT.V : DIGIT.V</tag>
            </item>
            <item> <ruleref uri="#dash"/> </item>
        </one-of>
      </item>
   </rule>

   <rule id="EMIR">
         seven eight four <tag><![CDATA[V = "784"]]> </tag>
         <item repeat="0-1"> <ruleref uri="#dash"/> </item>
         <one-of>
            <item> nineteen <tag><![CDATA[V=V+"19"]]></tag> </item>
            <item> twenty <tag><![CDATA[V=V+"20"]]></tag>  </item>
         </one-of>
         <one-of>
            <item>
               <ruleref uri="#DIGIT"/> <tag>V = V ? V + DIGIT.V : DIGIT.V</tag>
               <ruleref uri="#DIGIT"/> <tag>V = V ? V + DIGIT.V : DIGIT.V</tag>
            </item>
            <item> eighty <tag><![CDATA[V=V+"80"]]></tag> </item>
            <item> eighty one <tag><![CDATA[V=V+"81"]]></tag>  </item>
            <item> eighty two <tag><![CDATA[V=V+"82"]]></tag>  </item>
            <item> eighty three <tag><![CDATA[V=V+"83"]]></tag>  </item>
            <item> eighty four <tag><![CDATA[V=V+"84"]]></tag>  </item>
            <item> eighty five <tag><![CDATA[V=V+"85"]]></tag>  </item>
            <item> eighty six <tag><![CDATA[V=V+"86"]]></tag>  </item>
            <item> eighty seven <tag><![CDATA[V=V+"87"]]></tag>  </item>
            <item> eighty eight <tag><![CDATA[V=V+"88"]]></tag>  </item>
            <item> eighty nine <tag><![CDATA[V=V+"89"]]></tag>  </item>
         </one-of>
         <item repeat="0-1"> <ruleref uri="#dash"/> </item>
         <ruleref uri="#DIGIT"/> <tag>V = V ? V + DIGIT.V : DIGIT.V</tag>
         <ruleref uri="#DIGIT"/> <tag>V = V ? V + DIGIT.V : DIGIT.V</tag>
         <ruleref uri="#DIGIT"/> <tag>V = V ? V + DIGIT.V : DIGIT.V</tag>
         <ruleref uri="#DIGIT"/> <tag>V = V ? V + DIGIT.V : DIGIT.V</tag>
         <ruleref uri="#DIGIT"/> <tag>V = V ? V + DIGIT.V : DIGIT.V</tag>
         <ruleref uri="#DIGIT"/> <tag>V = V ? V + DIGIT.V : DIGIT.V</tag>
         <ruleref uri="#DIGIT"/> <tag>V = V ? V + DIGIT.V : DIGIT.V</tag>
         <item repeat="0-1"> <ruleref uri="#dash"/> </item>
         <ruleref uri="#DIGIT"/> <tag>V = V ? V + DIGIT.V : DIGIT.V</tag>
   </rule>

   <rule id="DIGIT" scope="private">
      <one-of>
         <item> <ruleref uri="#zero"/> <tag><![CDATA[V="0"]]></tag> </item>
         <item> <item>one</item>  <tag><![CDATA[V="1"]]></tag> </item>
         <item> <item>two</item>  <tag><![CDATA[V="2"]]></tag> </item>
         <item> <item>three</item>  <tag><![CDATA[V="3"]]></tag> </item>
         <item> <item>four</item>  <tag><![CDATA[V="4"]]></tag> </item>
         <item> <item>five</item>  <tag><![CDATA[V="5"]]></tag> </item>
         <item> <item>six</item>  <tag><![CDATA[V="6"]]></tag> </item>
         <item> <item>seven</item>  <tag><![CDATA[V="7"]]></tag> </item>
         <item> <item>eight</item>  <tag><![CDATA[V="8"]]></tag> </item>
         <item> <item>nine</item>  <tag><![CDATA[V="9"]]></tag> </item>
         <item> double <ruleref uri="#zero"/> <tag><![CDATA[V="00"]]></tag> </item>
         <item> double <item>one</item>  <tag><![CDATA[V="11"]]></tag> </item>
         <item> double <item>two</item>  <tag><![CDATA[V="22"]]></tag> </item>
         <item> double <item>three</item>  <tag><![CDATA[V="33"]]></tag> </item>
         <item> double <item>four</item>  <tag><![CDATA[V="44"]]></tag> </item>
         <item> double <item>five</item>  <tag><![CDATA[V="55"]]></tag> </item>
         <item> double <item>six</item>  <tag><![CDATA[V="66"]]></tag> </item>
         <item> double <item>seven</item>  <tag><![CDATA[V="77"]]></tag> </item>
         <item> double <item>eight</item>  <tag><![CDATA[V="88"]]></tag> </item>
         <item> double <item>nine</item>  <tag><![CDATA[V="99"]]></tag> </item>
         <item> triple <ruleref uri="#zero"/> <tag><![CDATA[V="000"]]></tag> </item>
         <item> triple <item>one</item>  <tag><![CDATA[V="111"]]></tag> </item>
         <item> triple <item>two</item>  <tag><![CDATA[V="222"]]></tag> </item>
         <item> triple <item>three</item>  <tag><![CDATA[V="333"]]></tag> </item>
         <item> triple <item>four</item>  <tag><![CDATA[V="444"]]></tag> </item>
         <item> triple <item>five</item>  <tag><![CDATA[V="555"]]></tag> </item>
         <item> triple <item>six</item>  <tag><![CDATA[V="666"]]></tag> </item>
         <item> triple <item>seven</item>  <tag><![CDATA[V="777"]]></tag> </item>
         <item> triple <item>eight</item>  <tag><![CDATA[V="888"]]></tag> </item>
         <item> triple <item>nine</item>  <tag><![CDATA[V="999"]]></tag> </item>
      </one-of>
   </rule>

   <rule id="dash" scope="private">
      <one-of>
         <item> dash </item>
         <item> minus </item>
      </one-of>
   </rule>

   <rule id="zero" scope="private">
      <one-of>
         <item> zero </item>
         <item> null </item>
         <item> oh </item>
      </one-of>
   </rule>

</grammar>
Shown here is an example GrXML file. This grammar file is designed to recognize a specific account number type in conjunction with a rule-based entity called DP_NUMBER.
From the attributes of the grammar element, we know the language for the grammar is United States English (xml:lang="en-US")
Notice that the header of the file identifies "DP_NUMBER" (the same name as the rule-based entity) as the root rule (root="DP_NUMBER").
Below this, we see the root rule definition (<rule id="DP_NUMBER" scope="public">).
This rule itself consists of a one-of list with two options representing two possible formats for the account number. Each of these options refers to a sub-rule appearing further on in the file via a ruleref element. The first option refers to a rule entitled "S" (<ruleref uri="#S"/>). The second option refers to another rule entitled "EMIR" (<ruleref uri="#EMIR"/>). These sub-rules themselves reference additional rules "DIGIT", "dash", and "zero" used by both.
At runtime, Mix.nlu compares what the user says with the patterns defined in the different sub-rule branches. If the user utterance matches a pattern, this activates that branch. The code in the tag element of the branch assigns the appropriate value to the DP_NUMBER variable and returns this value.
If the user utterance doesn’t match an option from any of the rules with reasonable accuracy, the rule-based entity and any intents using the entity will not match with significant confidence.
<rule id="zero" scope="private">
  <one-of>
   <item> zero </item>
   <item> null </item>
   <item> oh </item>
  </one-of>
</rule>
<rule id="S">
  <item repeat="1-16">
    <one-of>
      <item>
        <ruleref uri="#DIGIT"/>
        <tag>V = V ? V + DIGIT.V : DIGIT.V</tag>
      </item>
      <item><ruleref uri="#dash"/></item>
    </one-of>
  </item>
</rule>
For more information on GrXML, refer to the standard at Speech Recognition Grammar specification.
GrXML file rules
The filename for the GrXML file must have from 1-128 characters, and may include upper and lowercase letters, 0-9, - (hyphen), and _ (underscore).
A rule grammar file has this format:
The file must be a valid GrXML file that defines the pattern of the entity using <rule> and other standard GrXML elements.
Only one rule-based entity may be defined per GrXML file.
Within the GrXML file, the grammar root and rule ID must match the name of the entity that uses it. In the GrXML sample, notice that both
root="DP_NUMBER"andrule id="DP_NUMBER"take the same value, which reflects the name of the associated entity, DP_NUMBER.
Tip: The "normalize to probabilities" and "robust compile" parameters are recommended in all rule grammar files. The first parameter improves recognition accuracy, while the second allows missing pronunciations to be ignored during grammar compilation (without this parameter, the compilation fails if a pronunciation cannot be found).The variable in the return tag must also match the entity name, for example:
<tag>DP_NUMBER = S.V</tag>The file may not reference any other GrXML files so any dependencies should be included within the file itself.
Troubleshooting GrXML errors
Here are some notes that may help if you encounter problems creating rule-based entities.
| Issue | Description |
|---|---|
| Invalid file extension | The file is not a GrXML file. If you are creating a rule-based entity, you must upload a GrXML file with the *.grxml extension. |
| Invalid file name | The filename must not exceed 128 characters and is limited to upper and lowercase letters, 0-9, - (hyphen), and _ (underscore). |
| Grammar root value | The grammar root in the GrXML file must be the entity name. For example:<grammar ... root="DP_NUMBER" ...> |
| File contains GrXML errors | There are format errors in the file’s GrXML markup. For example, check that the grammar root, the rule ID, and the return tag all use the entity name: <grammar... root="DP_NUMBER" ...><rule id="DP_NUMBER" ...><tag>DP_NUMBER = S.V</tag> |
| Grammars may not reference other files | The grammar file may not include references to other files; for example, this is not supported: <ruleref uri="acct_num.grxml#emir"/> Any related rules required by the grammar must be included in the file being uploaded. |
Freeform entities
An entity with freeform collection method is used to capture, as a single block, user input that you cannot:
- Enumerate in a list
- Specify with a regex pattern
- Specify with a rule-based grammar
- Express in terms of other entities using an isA or hasA relationship
Take the example of an intent for sending a text message to a specified user. A text message body could be any sequence of words of any length. In the query "send a message to Adam hey I'm going to be ten minutes late", the phrase "hey I'm going to be ten minutes late" becomes associated with a freeform entity MESSAGE_BODY.
An important aspect of an entity with freeform collection method is that the meaning of the literal corresponding to the entity is not important or necessary for fulfilling the intent. In the example of sending a text message, the application does not need to understand the meaning of the message; it just needs to send the literal text as a string to the intended recipient.
Having difficulty determining which type to use? See the examples below.
Example sports application – List type
Consider a sports application, where your samples would include many ways of referring to one sports team, for example, the Montreal Canadiens:
- [SPORTS_TEAM]Montreal Canadiens[/]
- [SPORTS_TEAM]Canadiens[/]
- [SPORTS_TEAM]Habs[/]
Since you could enumerate each option, you would make this a list type and annotate it accordingly. Additionally, the NLU engine would learn about the entity from these different ways of referring to the Canadiens. You would not have to enumerate every possible sports team or every possible way to refer to the Canadiens.
Example SMS app message recipient – regex or rule-based type
Consider an SMS messaging application, where samples include the destination phone number. There are billions of possible phone number combinations, so clearly you could not enumerate all the possibilities, nor would it really make sense to try. However, phone numbers would not be considered freeform input, since there is a fixed, systematic structure to phone numbers that falls under a small set of pattern formats. These patterns can be recognized either with a regex pattern (for typed in phone numbers) or a grammar (for spoken numbers). Another problem with handling a phone number as a freeform entity is that understanding the phone number contents will be necessary to properly direct the message.
Example SMS app message contents – Freeform type
When your sample entity includes text that does not have well-defined many-to-one relationships and that cannot be fully enumerated or described with rules or patterns, use the freeform entity type. Consider an SMS app, where it is impossible to list or specify every way that a user may say something to your app. The body of an SMS message could be literally anything. Here is an example of what those annotations might look like:
- Send a message to adam [MESSAGE_BODY]are you coming soon we’re waiting for you[/]
- Reply with [MESSAGE_BODY]I saw your message and will pick up milk on the way home[/]
- Say [MESSAGE_BODY]what is up buddy[/]
MESSAGE_BODY would be a freeform entity because the contents of a message are unpredictable and cannot be fully enumerated. Moreover, understanding the contents is not necessary to send the message to its destination.
Notes on freeform entity annotation
Some important points to remember about annotating freeform entities:
- Be aware that any words inside the freeform entity annotation do not improve your NLU model. The text marked as the freeform part of the sample (and only that part!) is like a black box that won’t be further analyzed in training. Additionally, the ASR engine won’t be able to improve the recognition of these words as it would be able to do for words in a list type. Use the freeform type with care.
- You cannot annotate the entire contents of a sample sentence as a single freeform entity. Your samples must contain words leading into the freeform text or following it. This provides context that the NLU engine needs to detect that a chunk of text within a sentence should be recognized as a freeform entity.
Notes on freeform entity recognition
Some important points to remember about recognition of entities using freeform collection method:
- Mix does not support collecting completely freeform sentences, for example, by inviting the user to provide open-ended comments or feedback. If you want your application to support this sort of scenario, you must handle this outside the regular flow of the dialog or at least bypass NLU interpretation for that user input.
- The NLU engine may fail to recognize a freeform text block as a freeform entity if the text contains content that fits a predefined entity such as a date, a number, or a distance.
- When working with the NLU interpretation results related to a freeform entity, you should use the literal rather than the string value.
Best practice
Be careful not to overuse freeform entities, especially when a large base grammar already exists for the information you want to collect, such as SONGS or CITIES. Avoid using a freeform entity to collect this type of information—the NLU engine has already been trained on a huge number of values, and you won't benefit from this if you use a freeform entity.
Predefined entities
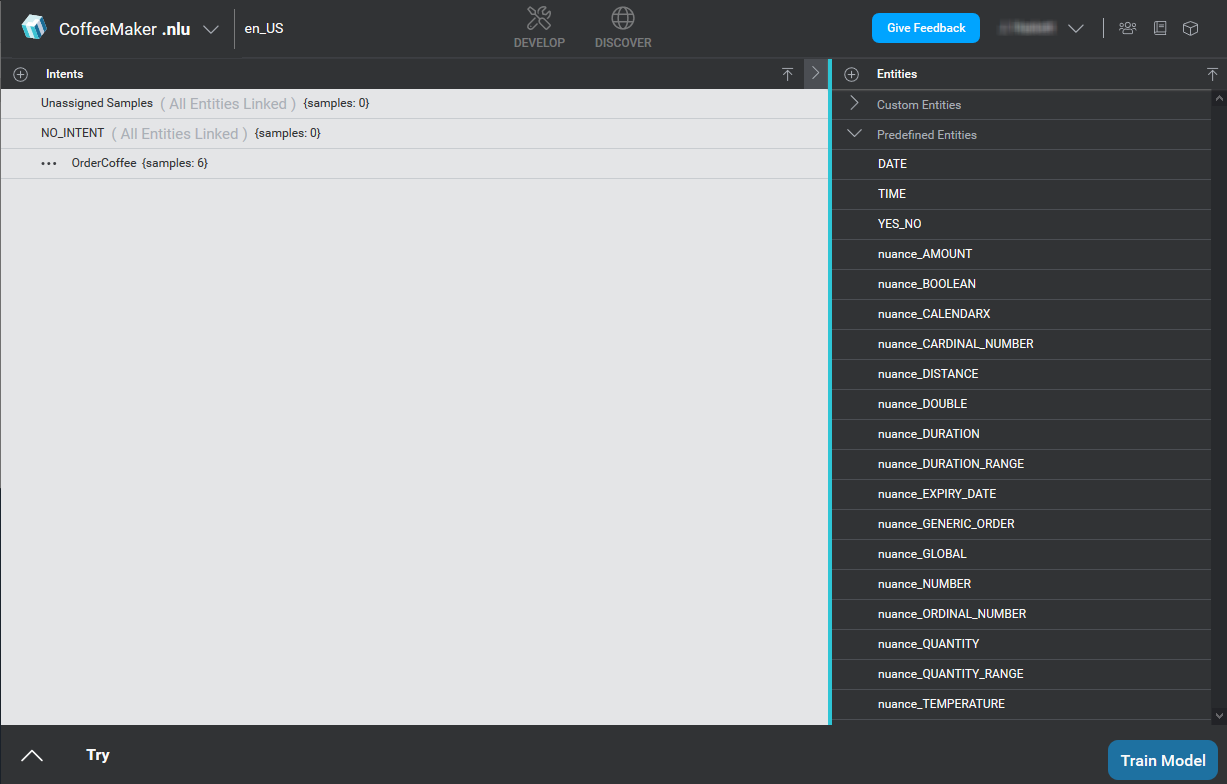
Mix.nlu includes a set of predefined entities that can be useful as you develop your own NLU models. Predefined entities save you the trouble of defining entities that are generally useful in a number of different applications, such as monetary amounts, Boolean values, calendar items (dates, times, or both), cardinal and ordinal numbers, and so on.
A predefined entity is not limited to a flat list of values, but instead can contain a complete grammar that defines the various ways that values for that entity can be expressed. A grammar is a compact way of expressing a vast range of possible constructions.
For example, within the nuance_DURATION entity, there is a grammar that defines expressions such as "3.5 hours", "25 mins", "for 33 minutes and 19 seconds", and so on. It would simply not make sense to try to capture the possible expressions for this entity in a list.
Some notes:
- All Nuance predefined entities are namespaced with "nuance_", including all subnodes.
- You cannot rename, edit, or delete predefined entities.
- Some predefined entities may not be available in all languages.
- Mix.dialog does not directly support predefined entities. To use any predefined entity in Mix.dialog, you must define a custom entity with an isA relationship to the desired predefined entity.
For more information, including on specific predefined entities, see Predefined entities.
Dialog predefined entities
Mix.nlu adds a default set of entities to simplify your Mix.dialog applications. These dialog entities are isA entities that refer to predefined entities. Dialog entities have shorter, more descriptive names than predefined entities. This can make it easier to develop and maintain your Mix.dialog application while taking advantage of the convenience of predefined entities.
For example, DATE is a dialog predefined entity that is defined as an isA entity for nuance_CALENDARX. If your Mix.dialog application processes dates, use the DATE entity instead of nuance_CALENDARX.
Like the predefined entities prefaced with nuance_, you cannot rename dialog predefined entities, delete them, or edit them.
Dialog entities appear in the Predefined Entities section of the Entities area. Mix adds them when you create your project.
This table briefly describes the purpose of each dialog predefined entity.
| Dialog entity | isA predefined entity | Description |
|---|---|---|
| DATE | nuance_CALENDARX | Calendar date |
| TIME | nuance_CALENDARX | Time of day |
| YES_NO | nuance_BOOLEAN | Yes or no |
Note: The following dialog entities are deprecated and, therefore, may appear in the Custom Entities list. These dialog entities can be edited, renamed, and deleted.
| Dialog entity | isA predefined entity | Description |
|---|---|---|
| CC_EXP_DATE | nuance_EXPIRY_DATE | Credit card expiry date |
| CREDIT_CARD | nuance_CARDINAL_NUMBER | Credit card number |
| CURRENCY | nuance_AMOUNT | Monetary amount |
| DIGITS | nuance_CARDINAL_NUMBER | String of digits |
| NATURAL_NUMBER | nuance_CARDINAL_NUMBER | Round number with no decimal point |
| PHONE | nuance_CARDINAL_NUMBER | Telephone number |
| SSN | nuance_CARDINAL_NUMBER | Social Security Number |
| ZIP_CODE | nuance_CARDINAL_NUMBER | Postal zip code |
Tag modifiers
A tag modifier modifies or combines entities in a sample by adding a logical operator: AND, OR, or NOT. You specify tag modifiers by annotating samples.
Your Mix.nlu model can use the AND and OR modifiers to connect multiple entities. It can use the NOT modifier to negate the meaning of a single entity.
For example, "a cappuccino and a latte" would be annotated as [AND][COFFEE_TYPE]cappuccino[/] and a [COFFEE_TYPE]latte[/][/]. The AND modifier applies to the two COFFEE_TYPE annotations.
The literal "no cinnamon" would be annotated as [NOT]no [SPRINKLE_TYPE]cinnamon[/][/]. The NOT modifier applies to the SPRINKLE_TYPE annotation.
Note how you do not simply annotate the literals "and" and "no" as an entity or tag modifier. Instead, tag modifiers are the parents of the annotations that they connect or negate.
Anaphoras
An anaphora is defined as "the use of a word referring back to a word used earlier in a text or conversation, to avoid repetition" (from Lexico/Oxford dictionary).
An anaphora often occurs in dialogs and makes it difficult to understand what the user means. For example, consider the following phrases:
- "Find a map of Montreal"
- "Find me a restaurant there"
In this example, "there" is an anaphora for "Montreal".
- "Find Bob's phone number"
- "Send him the message: I'm on my way"
In this example, "him" is an anaphora for "Bob".
Tagging anaphoras
In Mix.nlu, you can:
- Define how entities may be referred to, for example, whether they are referring a person (Contact, "him") or a place (City, "there").
- Annotate samples that contain anaphoras, such as "Call him" or "Drive there".
This will help your dialog application determine to which entity the anaphora refers, based on the data it has, and internally replace the anaphora with the value to which it refers. For example, "Drive there" would be interpreted as "Drive to Montreal".
The four types of anaphora entities are:
- REF_PERSON: References a person. For example, "him", "her", "them".
- REF_PLACE: References a place. For example, "there", "here", "that place".
- REF_THING: References a thing. For example, "it".
- REF_MOMENT: References a time. For example, "then", "at that time".
Identify an entity as referable
First, you want to identify the entity as referable.
- In the Entities area of the Develop tab, select the entity.
- In the Referenced as field, select the correct anaphora type for this entity.
For example, for a location, select REF_PLACE:
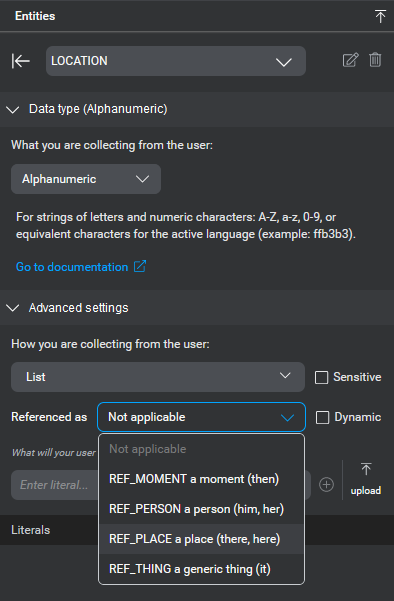
Annotate a sample containing an anaphora
Once the entity has been identified as referable, you can annotate a sample containing an anaphora reference to that entity.
- In the Develop tab, open the intent containing the sample.
- Locate the sample containing an anaphora reference to the referable entity, and click the reference word.
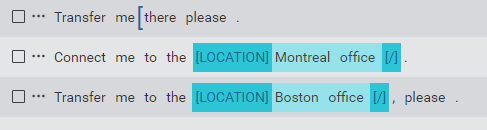
- An entity selector menu will open. You should see as options both the referable entity, as well as the corresponding anaphora entity type (REF_xxxx) to which the entity is referable. Select the anaphora entity type from the menu.
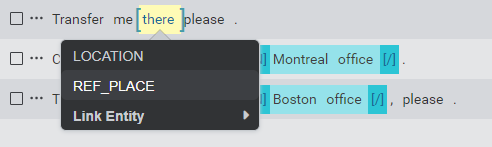
The sentence is now annotated as containing an anaphora reference.
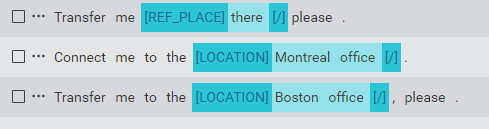
Language support
The Nuance Mix Platform offers a growing number of languages. To determine the languages (locales) available to your project, go to the Mix.Dashboard, select your project, and click the Targets tab. For more information, see Build resources.
For the complete list of supported languages, see Languages.
Change log
2022-11-16
Adding notice about relationship collection entities and sensitive data status. For more details, see Handling sensitive information.
2022-10-26
Minor updates to content in Rule-based. A new Expert organization role opens up permissions to access rule-based entity functionality in Mix. Previously this was only available to Nuance Professional Service users.
2022-10-19
Minor updates to content in Discover what your users say to clarify behavior of download Discover data functionality in relation to source selectors and filters.
2022-09-28
Adding ability to set a data type for entities indicating the type of contents the entity will contain. Data types form a contract between Mix.nlu and Mix.dialog, allowing dialog designers to use methods and formatting appropriate to the data type of the entity in messages and conditions. For more details see Add entities to your model.
2022-08-25
Updates to Train your model. The format of the CSV log produced when there are issues in training has been updated. The log now also includes warning information as well as error information. The log also contains clearer messages about the sources of any issues.
2022-06-22
Updates to Bulk operations under both Develop and Optimize. When the number of samples is large and samples are displayed in pages, you can now select all samples on all pages to apply bulk operations.
2022-05-04
Minor updates to Roll out your model.
2022-03-23
The Develop tab file upload module has been re-skinned, and a new file upload option has been added to the Optimize tab. The Develop tab file upload gives a simplified interface to upload samples under a single intent via a text file. The Optimize file upload offers the same, but with additional functionality for power users, allowing for Auto-detection of sample intents, including detection of previously unseen intents.
2021-11-11
Updates to Apply automation.
- When performing Auto-intent, you can decide whether to look for new intents, or only try to suggest existing intents.
- When initiating an Auto-intent request, a health checker will check several factors to see whether the Auto-intent run will produce good results, and gives advice for improving performance.
2021-11-03
Updates to Freeform entities to reflect conventions for values for freeform entities.
2021-10-27
Adding new section Handling sensitive information.
2021-09-29
Updates to Change intent to reflect changes to the move sample intents flow.
2021-09-15
- Updates to Annotate your samples. Some modifications to annotations behavior for previously annotated text.
- Updates to Edit an intent name and Edit the sample text. Keyboard shortcuts added.
2021-08-25
- Minor update to behavior of count filter in Optimize filter. The previous default upper limit of 1000 for counts in the filter has been removed. If no upper limit is specified, all samples with count greater than or equal to the minimum will be included.
2021-08-04
- Updates to behavior of intents filter in Optimize tab. You can now filter by newly suggested intents, and results for existing intents will include samples for which the intent is suggested by Auto-intent.
- Adding ability to download a Training error log file.
2021-06-09
- Adding ability to Add multiple samples using bulk add from the Discover tab into the training set.
- Update to functionality of Load samples button in Discover. Clicking the button again will now Refresh Discover data displayed.
2021-04-21
- Adding new section Apply automation to Optimize tab documentation. This release adds a new Select automation menu to the Optimize tab which will hold automation tools to facilitate model development. This release enables an Auto-intent feature which suggests intents for UNASSIGNED_SAMPLES.
- Updates to Add multiple samples to an intent in the Optimize tab. In the Samples editor, you can now select to run Auto-intent on the added samples.
- Updates to Add samples. You can now apply Auto-intent when importing multiple samples in a .txt file from the Develop tab.
2021-03-31
- Update to Discover tab to document new search filter. This allows for filtering data based on keyword or regex pattern search.
2021-03-03
Updates to Optimize tab.
- Adding new filters for sample count and character count.
- Adding ability to sort data on sample verification status.
- Adding ability to add multiple new samples at once.
2021-02-03
- Update to Discover tab to document 28 day limit for accessing past user data.
- Update to Display status information to highlight that all visibility toggles are now in one place.
- Update to Update individual sample sentences, describing how to change a sample intent in Optimize, including changing to a new intent created on the fly.
2021-01-27
- Updates to Discover tab to document the ability to add samples from Discover into the training set and the ability to filter displayed sample data.
2020-12-14
- Updates to Add entities section to document new sensitive entities flagging for entities containing personally identifiable information (PII). Entities flagged as sensitive are masked in call logs.
2020-12-02
- Adding new Optimize tab. The Optimize tab provides advanced tools to help advanced power users more efficiently develop larger or more complex projects.
2020-11-25
- Adding section on Rule-based entities. Rule-based entities are recognized using GrXML grammar files. This feature is only available to some users.
- Updating Relationship entities: isA and hasA and Anaphoras sections to clarify how to work with these entities.
2020-10-14
Update to Discover tab enabling export of data as .csv.
2020-09-03
Update to Verify samples to enable bulk operations changing the verification state of multiple samples at the same time.
2020-09-02
Adding new Discover tab. The Mix.nlu Discover tab allows you to see what users are saying to your deployed application, giving you the opportunity to refine your NLU models based on actual data. For now the data is read-only; additional functionality will be added in future releases, such as ability to export data, assign intents, annotate the data, and add selected samples to your training set.
2020-08-30
Update and refactoring of Modify samples and Verify samples sections to reflect updates to the UI of the Develop tab samples view and changes in functionality.
- Clearer verification state names.
- Enhanced verification status indicators and simplified state changes.
- Filtering of sample sentences by verification state.
- Verification state memory for excluded samples.
2020-08-11
Updated Verify samples to reflect the following functionality changes:
- When you start annotating a sample with the status Intent verified, its state automatically changes to Fully verified.
- Any change to that annotation, or even the complete removal of all annotations from that sample, will not change the state. You can always assign the sample to another state (such as back to Intent verified or to Excluded) using the ellipsis icon.
- If you move a Fully verified sample to another intent, its status changes to Intent verified.
Updated List entities. For multilingual Mix projects (projects that have more than one language), literal and value pairs are now language specific. If you add a literal (or literal + value pair) to a list-based entity, this data will now be specific to the language where the operation was performed. Similarly, if you delete a literal (or literal + value pair) this change will only impact the languagee where the deletion was performed. This change will also apply to all existing literal and value pairs.
Update in Regex-based to clarify behavior of regex-based entities with capture groups.
Update in Annotate your samples to clarify how to annotate entity literals spanning multiple words.
2020-07-17
Added additional information to Verify samples to explain the impact of the new "intent verified" and "fully verified" states.
Note that action is required to approve (fully verify) entity annotations. This crucial step ensures that models are built with the correct data.
2020-07-14
- Added Verify samples.
- Updated Regex-based to note that project snapshot is backed up to a ZIP file, which contains the TRSX file.
2020-06-11
- Added Multiple language support.
- Updated screenshots to reflect changes to entity panels such as shown in Defining literal-value pairs per language.
2020-05-04
Updated screenshots.
2020-03-31
- Added Regex-based.
- Moved the "Predefined entities" section to a new location, Working with data packs, including added additional examples for data pack version 9.x and changes from version 6.x.
- Revised Dialog predefined entities to note deprecated dialog entities.
- Replaced some images.
2020-02-19
- Added more information on anaphora (entities referenced as a moment, person, place, or thing) and on classifying entities as having NO_INTENT.
- Modified documentation to reflect transfer of dialog predefined entities from Custom Entities list to Predefined Entities list in the Mix.nlu user interface.
- Updated screenshots to reflect UI changes.
- Other minor improvements.
2020-01-22
Updated predefined entities section.
2019-12-18
- Added Tag modifier.
- Updated Annotate your samples to include tag modifiers.
- Added Dialog predefined entities.
- Moved Technical requirements.
2019-12-02
Updated occurrences of the term "concept" with "entity."
2019-11-15
Below are changes made to the Mix.nlu documentation since the initial Beta release:
- Added Change intent.
- Updated Test it with clearer content.
- Updated Language support.
- Removed NLU result objects section. See the NLUaaS documentation instead.
- Removed obsolete information on persistent user data.
- Minor corrections.