
Import project data
You can import the following data in your project:
Importing prebuilt domains
The Domains tab lists the prebuilt domains that are available to use in your project.
Domains represent areas of knowledge or activity, for example, TV, Weather, or News. When you import a prebuilt domain, the intents, samples, entities, and so on, that the domain contains become part of your model. (The data in the prebuilt domain comes from a TRSX file stored on the Nuance cloud.)
You can select prebuilt domains to import by language.
Customizing the domain
Once a domain is imported into your project, you can customize it just as you would your own project. Because you'll see the full ontology of the prebuilt domain in your project, you'll be able to:
- Work on defined intents and entities as you normally would
- Add new samples to an imported intent
- Link a new entity to an imported intent
- Add new intents and use imported entities in these intents
- Delete any intent or entity (even from the imported data)
At runtime
It's likely that prebuilt domains will include some of the same samples, similarly-worded samples, or both as the samples assigned to your intents.
In the case of exact match of a sample that occurs in multiple intents, your own data will be given priority over prebuilt data. For example, the Nuance Dragon TV prebuilt domain might have the intent
nuance_tv_page_upand the sample "page up." Your own model might have a similar intenttv_page_up_or_downas well as the sample "page up." In response to the utterance "page up," the model would return your intent:tv_page_up_or_down.Alternatively, in the case when a variation of a sample is uttered that is not explicitly in the data, for example, “please page up,” the model logic is designed to select the intent based on a complex algorithm. The algorithm takes into account various statistics, including the relative frequency of the sample data. The selected intent is likely to be the prebuilt intent
nuance_tv_page_up(unless you've added a lot of samples). This ambiguity between models can potentially affect model accuracy.
Import a prebuilt domain
To import a prebuilt domain in your project:
- In Mix.dashboard, click the Projects icon, select the project, and click the Domains tab.
The list of available domains is displayed. You can filter the list by typing in the Search field or selecting a category. - Click the checkbox for the domain(s) you want to import.
- Click Add Domains.
Note: If you select a very large domain, you might see a warning that you'll exceed the limit for number of samples in your model, a warning that you'll exceed the number of Literals, or both warnings (see Limits below).
The domains added are now listed in the Details tab, under Sources. You can use the intents and entities in the Mix.nlu models.
In Mix.nlu, on the Develop tab, under Intents > Mix Domain Intents, you'll see the intents and entities from the prebuilt domain that you imported. You can work with these intents and entities as you'd work with the intents and entities that you defined in your model.
Before training your model, especially if it's large, see the options described below about Training Time. You can save time by selecting which, if any, imported domain(s) you want to train with.
Training time
Some prebuilt domains are quite large and complex. It's important to be aware of the size of the prebuilt domain and its impact on the size of your model.
Training a large domain can take a while. However, to have a rapid turnaround while working on your own intents, you can selectively exclude a prebuilt domain from training. Then when you're ready to test everything together, you can include the prebuilt domain.
If you've imported a prebuilt domain, before you train your model a pop-up will display a list of imported prebuilt domains; use the checkboxes to include or exclude prebuilt domains to train with. See Train your model for the procedure.
Note that if you exclude a prebuilt domain from training, then the accuracy won't necessarily reflect the accuracy of your model in production, when all domains are included. This is because the NLU model will make decisions based on all of the data (prebuilt domains plus your own intents), so an utterance could be classified differently when all the data are considered compared to when only your intents are included.
Limits
This section was moved to Limits.
Importing and exporting data
The Mix project dashboard allows you to import and export data. The types of data that you can import and export include:
- A complete NLU model: An NLU model is exported to a TRSX file, which is an XML file that represents an entire model. A TRSX file can also be used to import intents, entities, literals, and samples with or without annotations. Any combination of these can be included in the TRSX file.
- NLU entity literals: You can import NLU entity literals in a LIST or NMLIST file. A LIST file contains literals to be added to a list-type entity, while an NMLIST file contains literals and their corresponding values to be added to a list-type entity.
- NLU samples: You can import samples in a TXT file.
- Rule-based grammars: You can import rule-based grammars in a GrXML file.
- Dialog application (JSON file): A dialog application is exported to a JSON file, which represents an entire dialog application. A dialog JSON file can also be used to import a complete dialog application.
Export data
You can export NLU data and dialog data.
Export NLU data
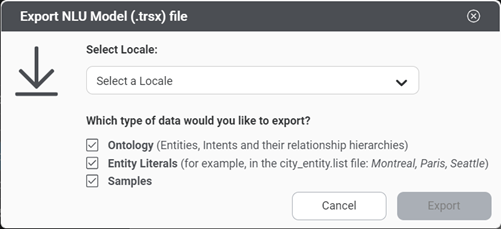
When exporting NLU data, you can export the complete NLU model or export your NLU ontology, entity literals, and samples separately.
You can export either:
- The TRSX file only
- A ZIP file that contains:
- The TRSX file
- (If applicable) The GrXML files for the rule-based grammars specified in the TRSX file
If your project includes multiple languages, one file is created per language.
To export NLU data:
- Click the download icon
 for the Mix.nlu TRSX or ZIP file.
 - Select the locale for which to export data.
To export data for all locales, select All locales. - Select the data to export and click Export.
One file is created per locale specified, with the following naming convention:
projectID_date_projectname_locale.trsx/zip
For example:
- 22389_08Feb2022_coffee_app_en_GB.trsx
- 22389_08Feb2022_coffee_app_es_US.trsx
- 22389_08Feb2022_coffee_app_fr_FR.zip
Export dialog data
To export dialog data:
- In Mix.dashboard, select the project and click the Import/Export tab.
- Click the download icon for the Mix.dialog JSON file.
A single file is downloaded, even if your project includes multiple locales.The file has the following naming convention:
projectID_date_projectname.json
For example:
- 22389_20200604_Coffee_app.json
Import data
When importing data, first prepare the file to import according to the type of data to import. See the following sections for more information about how to format each type of data:
| Data type | Import file type |
|---|---|
| Complete NLU models | .trsx, .xml, .zip |
| Rule-based entities | .grxml |
| NLU entity literals | .list, .nmlist |
| NLU samples | .txt |
| Dialog application (JSON file) | .json |
If you are importing data for a project that contains multiple locales, you must prepare one file per locale.
Import NLU data
To import NLU data:
- In Mix.dashboard, select the project and click the Import/Export tab.
- Click the file type in the Import area.
For example, to import a complete NLU model, click the upload icon for an TRSX, XML, or ZIP file.
The Upload a file window appears. - Click to select a file from your computer or drag and drop the file on the file type.
- Select a locale for which to import data.
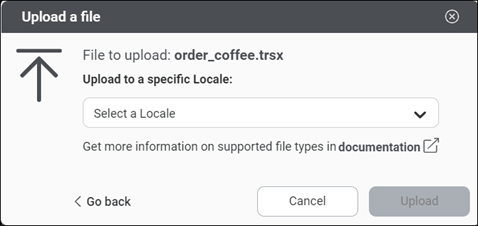
- Click Upload.
A message notifying you that your file was successfully uploaded or an error occurred with your import is shown. - (Optional) Click See report to see import information.
- Click Close to close the import window.
When importing a TRSX file or ZIP file, you will see two statuses in the import window:
- Processing — The TRSX or ZIP file is being processed, NLU data (intents, entities, samples) are being extracted from the .trsx file
- Uploaded or Failed — The TRSX or ZIP file imported successfully, or the import failed
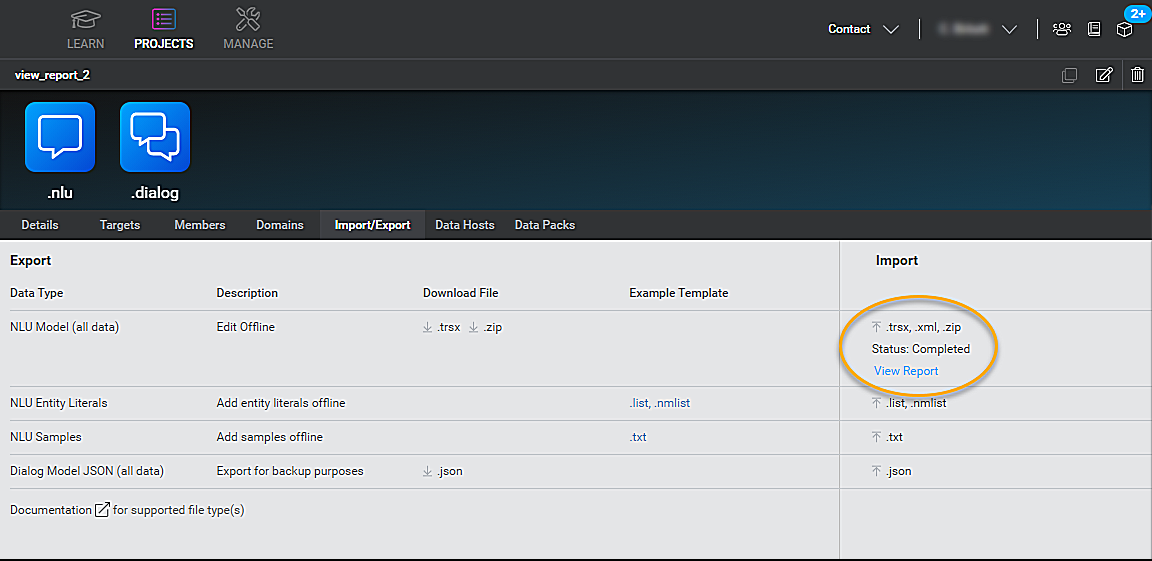
View import details
To see all import details, click View report. A report similar to the following is displayed:

The report provides the following information:
| Field | Description |
|---|---|
| errors | Number of errors, if any, that occurred during the import. Click the arrow to get details about the error. For the list of error and warning messages, see Import errors. Note: To see the whole import feedback, you must have 0 errors. |
| warnings | Number of warnings, if any, that occurred during the import. Click the arrow to get details about the warning. For the list of error and warning messages, see Import errors. Note: To see the whole import feedback, you must have 0 warnings. |
| entities | Number of entities imported. Click the arrow to get the names of the entities imported. |
| intents | Number of intents imported. Click the arrow to get the names of the intents imported. |
| sources | Number of sources imported. Click the arrow to get the names of the sources imported. |
Click ![]() Download logs to download import information. Download logs are in CSV file format.
Download logs to download import information. Download logs are in CSV file format.
Download logs contain the following information:
| Parameter | Description |
|---|---|
addedToExistingSampleCount |
Number of the samples imported that already existed in the project. |
errors |
Any errors in the import. |
sampleIncrementedCount |
Number of existing samples in the project that incremented the counter. |
samplesCount |
Number of new samples created during import. |
warnings |
Any warnings in the import. |
Import dialog data
To import dialog data:
- In Mix.dashboard, select the project and click the Import/Export tab.
- Click the upload icon for the JSON file.
The Upload a file window appears. - Click to select a file from your computer or drag and drop the file on the file type.
- Click Upload.
- Click Close to close the import window.
Importing complete NLU models (TRSX files)
TRSX (TRaining Set XML) is an XML-based file format that represents an entire NLU model in a single file. It can be used to upload a complete model or individual parts of a model. For example, you can upload a list of intents without any samples, new literals for an entity, or annotated samples for a single intent. Check out the TRSX Reference for more information and some samples.
To add data to an existing model, you can export either:
- The TRSX file only
- A ZIP file that contains:
- The TRSX file
- (If applicable) The GrXML files for the rule-based grammars specified in the TRSX file. See Importing rule-based entities for details.
If you are importing data for a project that contains multiple locales, you must prepare one TRSX file per locale.
When importing a TRSX file, note the following:
- Metadata will be linked to the model
- Intents will be created
- Entities will be created, and their types (List, Relationship, Freeform) will be assigned
- Entities will be linked to the appropriate intents
- Entity relationships will be created
- Literals will be associated with entities
- Samples will be created, both annotated and unannotated, and either included or excluded
- Samples that already exist will have their counts increased
Importing rule-based entities
To import rule-based entities:
- Prepare the grammar file as described in Understanding grammar files.
- Specify the name and relative location of the grammar in the TRSX file, in attribute
ruleGrammarFileNamefor the appropriate entity. - Prepare the ZIP file by including both the TRSX and GrXML files, making sure that the directory structure in the ZIP file matches the relative URL and name specified in the TRSX file.
For example, consider the CARD_TYPE.grxml grammar file, which is located in the /grammars/CARD_TYPE directory. This grammar file would be defined in the coffee_app.trsx file as follows:
<concept name="CARD_TYPE" ruleGrammarFileName="grammars/CARD_TYPE/CARD_TYPE.grxml"/>
These files would be packaged in the ZIP file as follows:
- coffee_app.trsx
- grammars/CARD_TYPE/CARD_TYPE.grxml
Importing entity literals
Entity literals are specific words or phrases that belong to a list-type entity. You can upload entity literals using one of the following types of files:
- A LIST file type uploads entity literals only
- An NMIST file type uploads entity literals and their corresponding values
When you import entity literals, you are asked to specify the entity to which the literals apply.
To import NLU entity literals:
- In Mix.dashboard, select the project and click the Import/Export tab.
- Click the import icon for a LIST or NMLIST file.
The Upload a file window appears. - Click to select a file from your computer or drag and drop the file on the file type.
- Click Next step.
- Under Upload to a specific entity, select an entity.
- Click Upload.
- Click Close to close the import window.
LIST - Standard list files
Sample flavors.list file
  vanilla
  chocolate
  cookies and cream
A LIST file is a newline-separated list of words or phrases, where the literal word or phrase and its value are the same.
For LIST files, this means that the literal and the value will both be assigned to the literal value. For example, consider sample flavors.list file to the right. The literal "vanilla" will get the value "vanilla" as well. If you want to assign a different value to these literals, use the NMLIST file type instead.
Please note that LIST files must be terminated with a newline character at the end of the file.
Download the sample flavors.list file
NMLIST - Named list files
Sample colors.nmlist file
  red|#f00
  green|#0f0
  blue|#00f
An NMLIST file is a newline-separated list of items, where the literal item and its value are pipe-delimited, as shown in the code sample.
Please note that NMLIST files must be terminated with a newline character at the end of the file.
Download the sample colors.nmlist file
Importing samples
Examples in a .txt file (one example per line)
  i would like 1 scoop of vanilla ice cream and some hot fudge
  i'll get a chocolate ice cream on a cone
  give me a strawberry smoothie
When developing an NLU model, you can import examples of the types of things your users might say to train the model. These examples, called samples, must be stored in a TXT file. The TXT file must have one sample per line. Each sample must not include more than 500 characters, otherwise you will get an error and the sample will not be imported.
Upon importing, you can select which intent you would like to assign these samples to. If you do not select an intent, they will be imported to Unassigned Samples. Don't forget to annotate these samples with entities before training your model!
To import NLU samples:
- In Mix.dashboard, select the project and click the Import/Export tab.
- Click the import icon for a TXT file.
The Upload a file window appears. - Click to select a file from your computer or drag and drop the file on the file type.
- Click Next Step.
- When uploading NLU samples, you have two options:
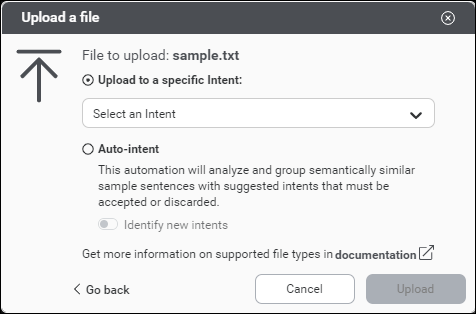
- Upload to a specific intent: Upload the samples to a specific intent
- Auto-intent: Import a set of samples and apply Auto-intent to suggest, for each sample, either an existing intent or a newly detected intent (by selecting Identity new intents). For more information on auto-intent, see apply automation.
- (If using Auto-intent) Click Next Step. When Auto-intent is initiated, Mix.nlu runs a health check of the training sample, model, and data sent for automation. For more information, see health checks.
- Click Upload (or Upload & automate if using Auto-intent). A report of the import appears.
- (Optional) Click Download logs to download import information.
- Click Close to close the import window.
If you are importing data for a project that contains multiple locales, you must prepare one TXT file per locale.
Download the sample sample.txt file
Importing complete dialog applications
A dialog model is stored in a JSON file. Importing a dialog model is useful when you want to reuse an existing dialog model. Simply export it first, and then re-import it in a new project.
Check out the Dialog Application Specification for more information and a sample.