
Exchange data with an external system
Data access server-side integration
Data access client-side integration
You may need to exchange data with an external system in your dialog application. For example, you may want to take into account information about the user's location from the client's GPS data, a user's stored preferences or contacts, or perhaps business-specific information such as their bank account balance or their flight reservations. It all depends on the type of application you're building.
For example, consider these use cases:
- In a coffee application, after asking the user for the type and size of coffee to order, the dialog must provide the price of the order before completing the transaction. It needs to query an external system to get the price and provide it to the customer.
- In a banking application, after having collected all the information necessary to make a payment (that is, the user's account, the payee, and the payment amount), the dialog is ready to complete the payment. In this use case, the dialog sends the transaction details to the client application, which can then process the payment and provide information back to the dialog, such as a return code and the account new balance.
Exchanging data is done through a Mix.dialog data access node. Data access nodes allow you to exchange information in two ways:
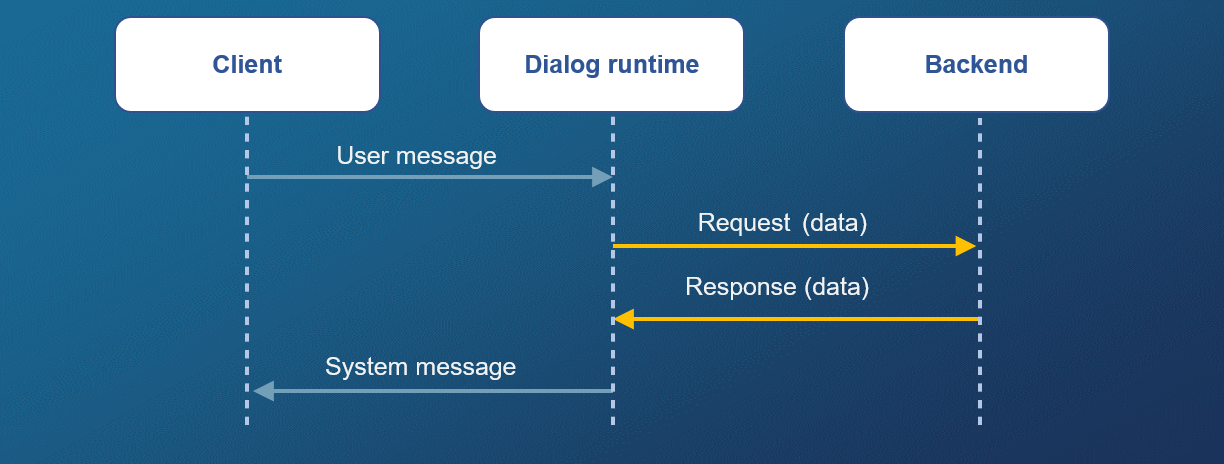
- Exchanging data from the dialog application (server-side integration): In this integration type, the dialog service interacts directly with a backend system to exchange data.
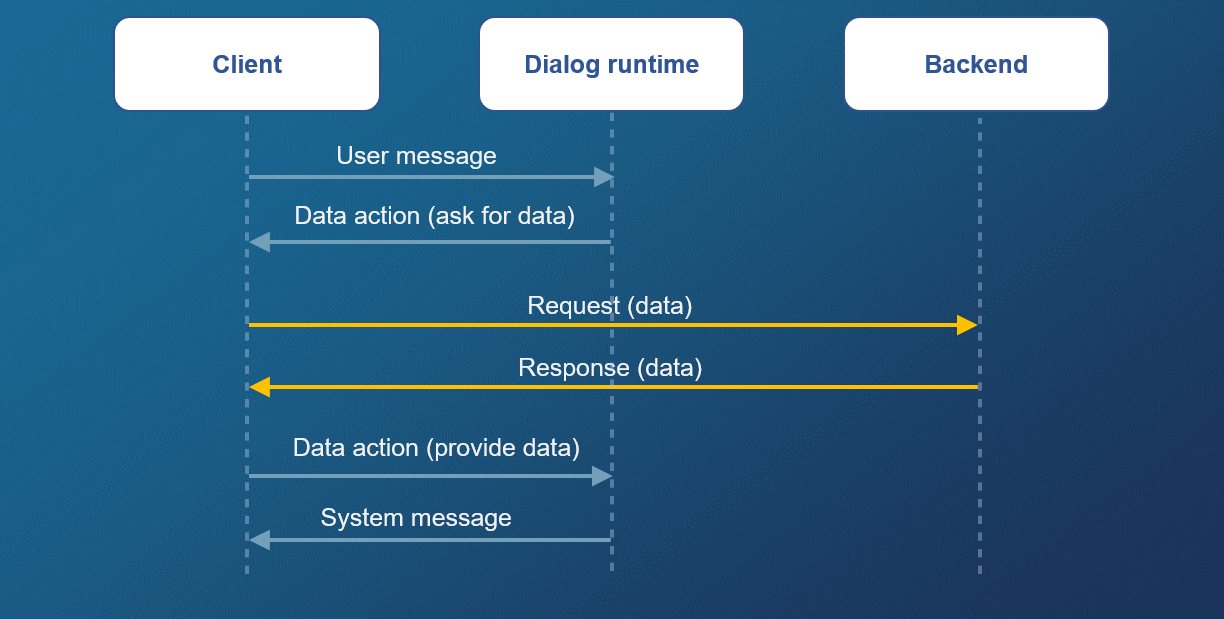
- Exchanging data with the client application (client-side integration): In this integration type, the dialog service requests data from the client application, using the DLGaaS API. The client application is responsible for obtaining the data from a backend system.
Example used in this section
To illustrate the process of exchanging data in your Mix.dialog application, this documentation uses a coffee application as an example.
This application has the following dialog:
- Dialog: Welcome to the coffee example! What can I do for you today?
- User: I want a medium cappuccino.
- Dialog: Your order is a medium cappuccino for 2.80$.
In this example, the following information is sent by the dialog application:
- Coffee size
- Coffee type
And the following information is retrieved from an external system:
- Coffee price
- Return code
Server-side vs. client-side integration
Exchanging data in Mix.dialog is configured in the data access node. To specify whether data is exchanged using a server-side integration or a client-side integration, set the Enable client-side fetching integration option as follows:
| Value | Example | Description |
|---|---|---|
| Enabled | 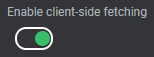 |
Client-side integration; data is exchanged between the dialog service and the client application, using the DLGaaS API. |
| Disabled | 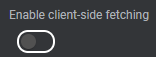 |
Server-side integration; the dialog service interacts directly with a backend system to exchange data. |
Exchanging data from the dialog application
In this option (server-side integration), Mix.dialog accesses a backend server through a set of REST HTTP API calls that are constructed by configuring the data access node.
For example, consider a backend web service hosted at https://coffee.app.com:443 that supports the following HTTP calls:
POST /coffee/price: Using as input the coffee type and coffee size, this endpoint returns the coffee pricePOST /coffee/calories: Using as input the coffee type and coffee size, this endpoint returns the number of calories in the coffee selected
Let's say that in your dialog application, after having collected the coffee type and size, you want to provide the price to the user for confirmation.
To implement this scenario, you configure the data access node to specify the following:
- Web service base URL
- Method name (for example,
POST) - URL extension (for example,
/coffee/price) - Body of the request, which consists of the data to send to the web server. The body values can be static (such as a hardcoded string) or dynamic (such as the entity values collected from the user); for example, this could be the values of the COFFEE_SIZE and COFFEE_TYPE entities
- Data expected from the web service, for example, coffeePrice
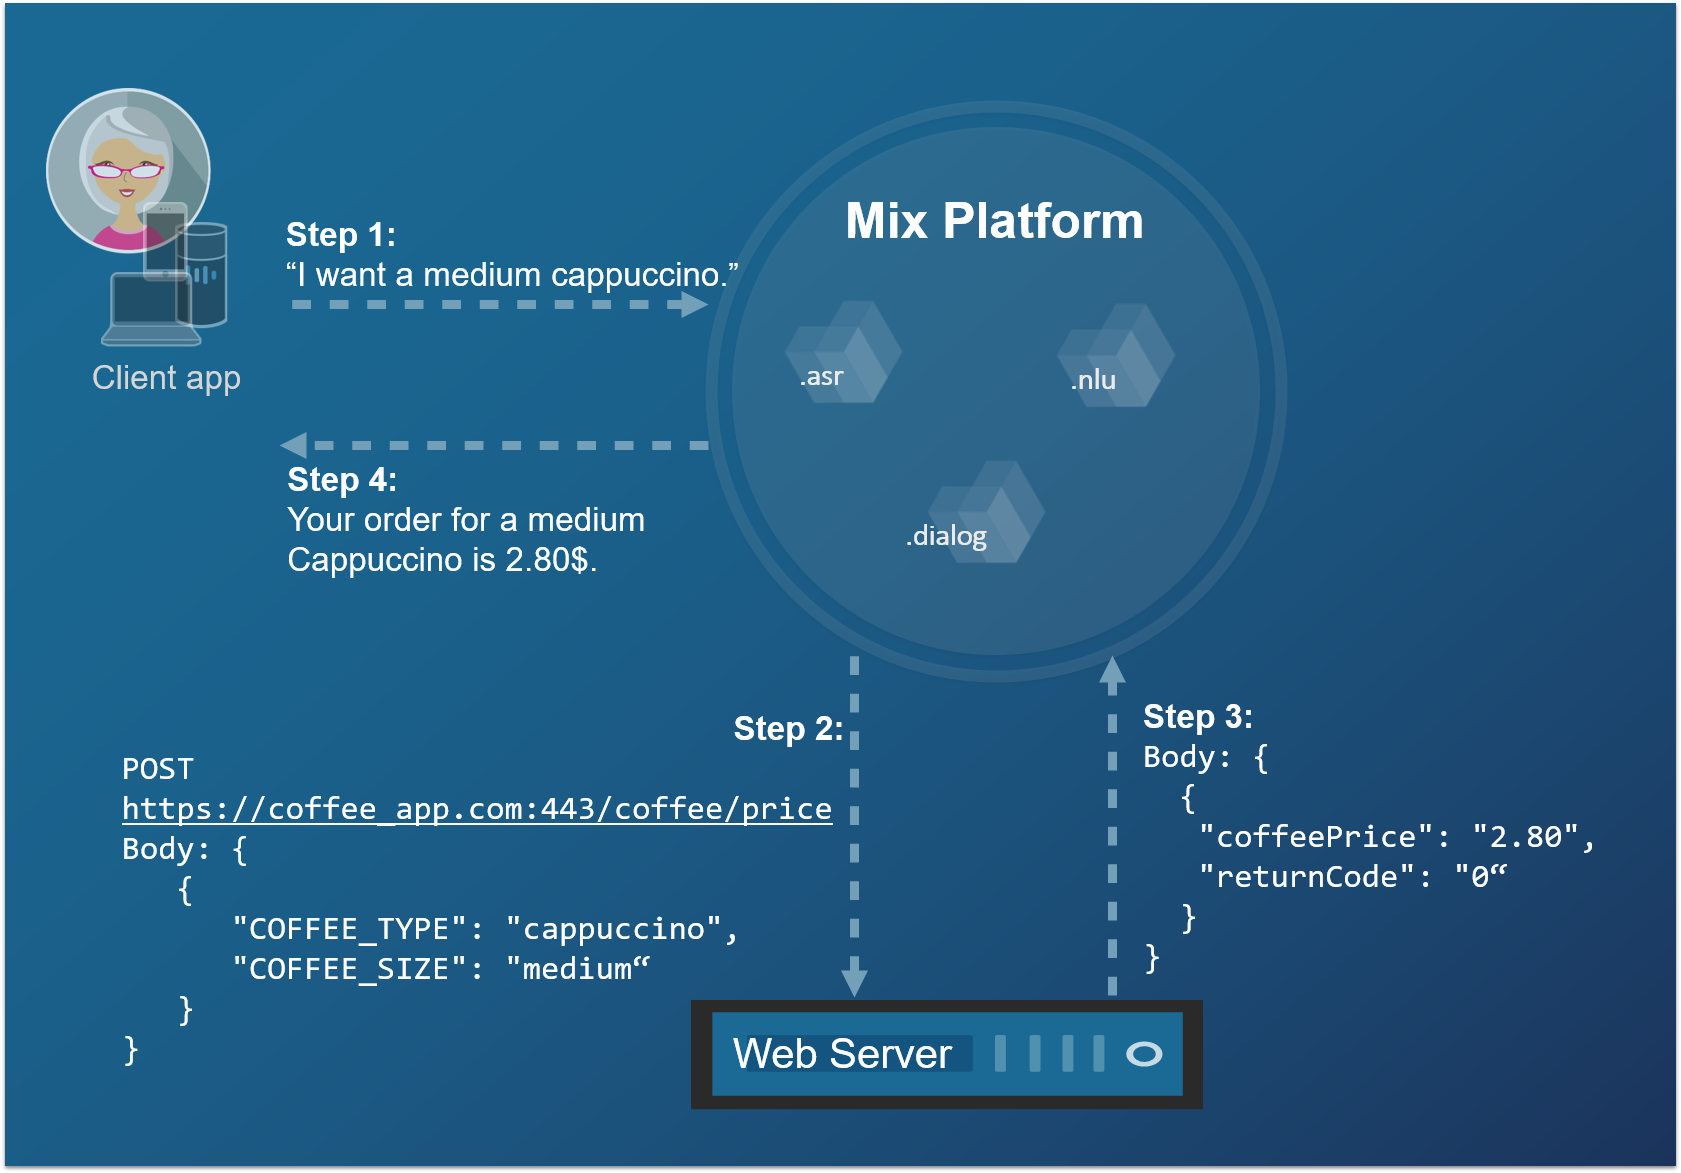
At runtime, the dialog engine creates an HTTP request from the data access node configuration and then executes that request, as shown in the following interaction:
- Step 1: The user says: "I want a medium cappuccino." This is sent to the Mix runtime environment, which performs ASR and NLU.
- Step 2: The dialog engine encounters the data access node, which indicates that it needs to resolve the coffee price through a server-side web service, so it builds and sends the configured HTTP request to the service.
- Step 3: The service returns the coffee price, based on coffee type and size.
- Step 4: The dialog engine returns the message to play: "Your order for a medium cappuccino is 2.85$."
Workflow: Exchanging data from the dialog application
To exchange data from the dialog application:
- Configure the base URL of the web service.
- Configure the data to exchange in the data access node
- Build and deploy the dialog application
- If latency messages are configured, handle them in the client application
Configure the base URL of the web service in Mix.dashboard
Sample Data Hosts tab for coffee app
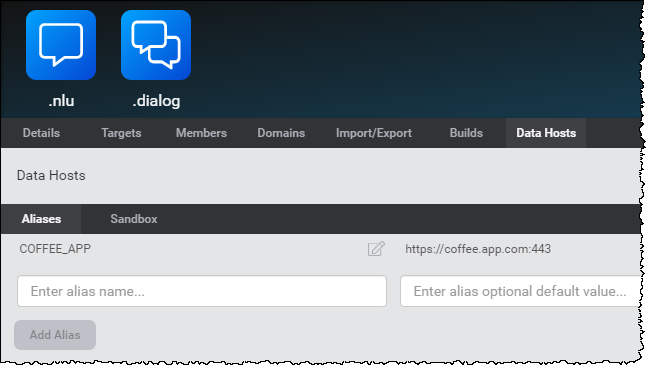
The Data Hosts tab lists the web services that are defined for a project. Server-side integration requires that the dialog runtime application has access to the backend server, so the URL of a web service may differ per environment.
The Data Hosts tab lets you specify an alias name to identify the web service, and you can set different URLs for this alias according to the environment, as appropriate.
By default, the Data Hosts tab has the following tabs:
- Aliases: This is where you define the alias name for the web service. You can also specify a default URL for this alias (optional).
- Sandbox: This is where you define the URL for the alias in the Sandbox environment.
If you have multiple environments (for example, QA, Production, etc.), a tab is available for each environment.
To add an alias and configure the base URL of the web service:
- In Mix.dashboard, select the project.
- Click the Data Hosts tab.
- Click the Aliases tab.
- For each web service:
- Enter the Alias name. For example, for the coffee app, you might enter COFFEE_APP.
- Enter the base URL for this Alias (Optional). For example, for the coffee app, this might be
https://coffee.app.com:443
- Click Add Alias.
- To specify a different URL for the Sandbox or any other environment (optional):
- Click the tab for the environment.
For example, click the Sandbox tab. - Click the Edit icon
 for the alias.
 - Enter the base URL and press Return.
- Click the tab for the environment.
Order of precedence for URL values
You can specify a URL for an alias in the following locations:
- In the Aliases tab, which sets a value by default
- In a specific environment tab (such as Sandbox), which sets a value for this environment. This value takes precedence over the default value set on the Aliases tab.
- When you create an application configuration, which sets a value for the environment where you deploy this application configuration. This value takes precedence over all other values.
Configure the data to exchange in the data access node
Example: Data access node for server-side integration
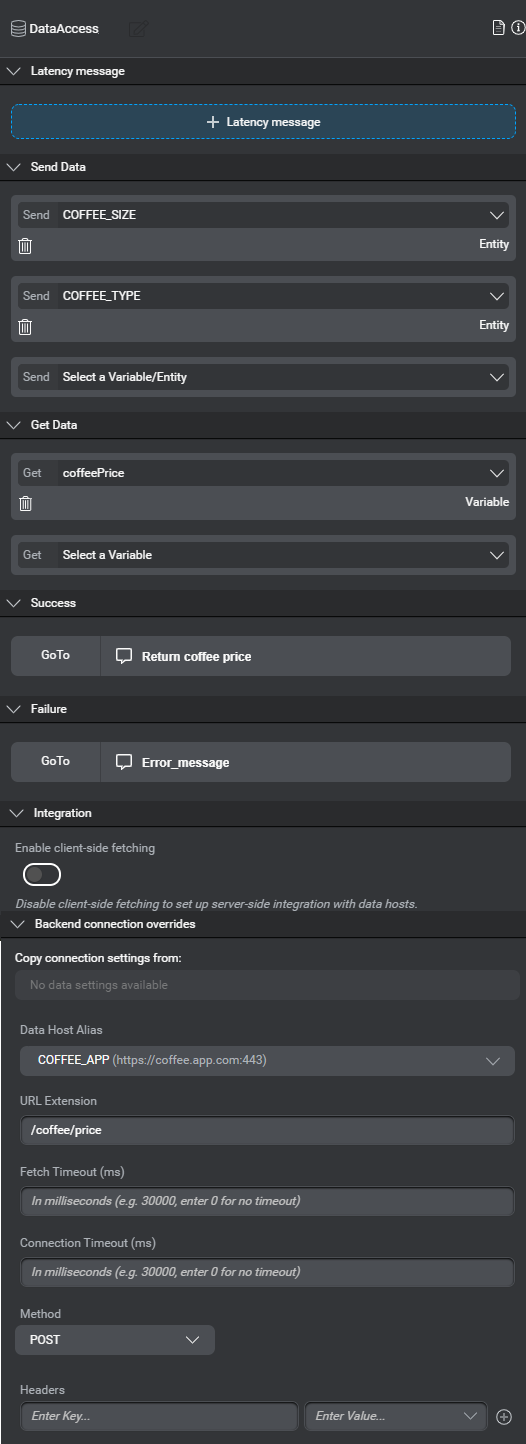
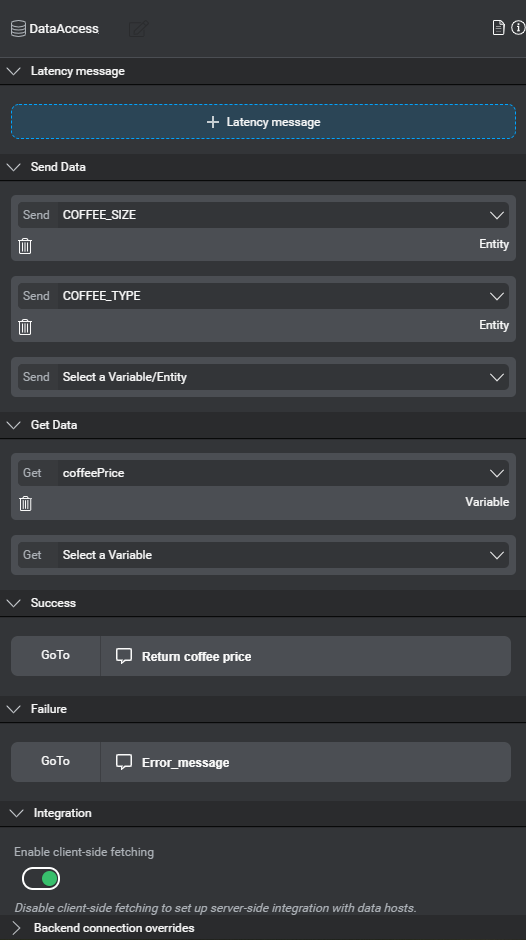
To configure the data to exchange for a server-side integration, create a data access node in Mix.dialog and specify the following fields:
| Field | Description |
|---|---|
| Latency message | Message played when a data access request is pending. See Handle latency messages in the client application. |
| Send Data | Data that will be sent to the client application, for example, coffee size and type. This can be a variable or an entity. |
| Get Data | Data that will be returned by the client application, for example, coffe price. This is a variable. |
| Success | Node to go to if the external system returns a success code; that is, a returnCode of "0". |
| Failure | Node to go to if the external system returns a failure code; that is, a returnCode that is not "0". |
| Integration | Disable the Enable client-side fetching option to indicate that the dialog service interacts directly with a backend system to exchange data. See Server-side vs. client-side integration. |
| Copy connection settings from | Lets you select default connection settings. See Configure default connection settings. |
| Data Host Alias | Alias configured in the Mix.dashboard to define the web service. For example, COFFEE_APP might refer to https://coffee.app.com:443. See Configure the base URL of the web service in Mix.dashboard. |
| URL Extension | Specifies the endpoint used to access the data; for example, /coffee/price and /coffee/calories. This is defined by the backend (maximum 2000 characters). |
| Fetch Timeout | Number of milliseconds allowed for fetching the data before timing out. |
| Connection Timeout | Connection timeout in milliseconds. |
| Method | HTTP method to use; supported values are POST and GET. This is defined by the web service. |
| Headers | List of key-value pairs providing the headers to send to the web service. To specify a dynamic value, click the arrow to the right of the value field and select the variable. Alternatively, you can enter a static value (maximum 2048 characters) directly in the field. Note: Do not specify reserved or special header names such as Accept, Accept-*, and Content-Type. While Mix does not prevent you from using them, they may generate errors. Custom headers and headers used to identify the client with the server, for authentication, to provide generic information, and so on, can be sent. |
For a detailed description of the data access node, see Set up a data access node.
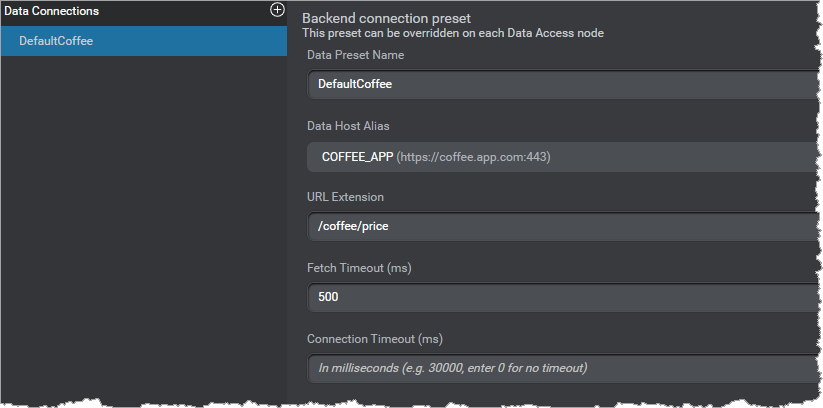
Configure default connection settings
You can configure default connection settings and use them in the data access node. This is useful if you plan to reuse them in multiple data access nodes.
To configure default connection settings:
- On the Mix.dialog toolbar, click Data.
- Click the + icon next to Data connections.
- Type a unique name for the data connection and press Enter.
- Enter the following information:
| Field | Description |
|---|---|
| Data Preset Name | Enter a name that defines this data connection. |
| Data Host Alias | Alias configured in the Mix.dashboard to define the web service. For example, COFFEE_APP might refer to https://coffee.app.com:443. See Configure the base URL of the web service in Mix.dashboard. |
| URL Extension | Specifies the endpoint used to access the data; for example, /coffee/price and /coffee/calories. This is defined by the web service (maximum 2000 characters). |
| Fetch Timeout | Number of milliseconds allowed for fetching the data before timing out. |
| Connection Timeout | Connection timeout in milliseconds. |
| Method | HTTP method to use; supported values are POST and GET. This is defined by the backend. |
| Headers | List of key-value pairs providing the headers to send to the web service. To specify a dynamic value, click the arrow to the right of the value field and select the variable. Alternatively, you can enter a static value (maximum 2048 characters) directly in the field. Note: Do not specify reserved or special header names such as Accept, Accept-*, and Content-Type. While Mix does not prevent you from using them, they may generate errors. Custom headers and headers used to identify the client with the server, for authentication, to provide generic information, and so on, can be sent. |
Build and deploy the dialog application
To test your application in the runtime environment, you need to build a new version and deploy it in an environment.
When you deploy the application, you can configure a new URL for the alias if necessary, as shown in the following diagram. This URL will take precedence over all other values previously defined.
Backend integration requirements
When implementing the REST web service for a server-side integration, please follow these guidelines.
Connection URL
For security considerations, outgoing traffic is only allowed on port 443, using https.
Please contact your Nuance representative if you need a different connection option.
Certificate
You must use a standard certificate when implementing the HTTPS REST service, for example, using Let's Encrypt. Otherwise, connecting to the web service from dialog will not be allowed.
Custom, private certificates cannot be used.
Supported methods
The Dialog server currently handles the following methods:
POSTGET
POST method
Java example for a POST method in a coffee app; uses the Spring framework
package com.nuance.coretech.dataaccess.controller;

import io.opentracing.Tracer;

import org.slf4j.Logger;
import org.slf4j.LoggerFactory;
import org.springframework.beans.factory.annotation.Autowired;
import org.springframework.stereotype.Controller;
import org.springframework.web.bind.annotation.PostMapping;
import org.springframework.web.bind.annotation.RequestBody;
import org.springframework.web.bind.annotation.RequestMapping;
import org.springframework.web.bind.annotation.ResponseBody;

import java.util.HashMap;
import java.util.Map;

/**
 * Returns coffee prices for testing
 */
@Controller
@RequestMapping("/coffee")
public class CoffeeController {
    private final Tracer tracer;
    private final Logger log = LoggerFactory.getLogger(CoffeeController.class);

    /**
     * Default constructor that gets autowired by springboot.
     * @param tracer Tracer to use.
     */
    @Autowired
    public CoffeeController(Tracer tracer) { this.tracer = tracer; }

    /**
     * Accepts POST requests with JSON body representing the coffee contents.
     * The values used are invented and not real data.
     *
     * @param body The request body must be a JSON map of objects
     * @return a JSON string representing a map of returned values.
     */
    @PostMapping("/price")
    @ResponseBody
    public Map<String,Object> execute(@RequestBody Map<String,Object> body)
    {
        Map<String,Object> response = new HashMap<>();

        String size = (String) body.get("COFFEE_SIZE");
        String type = (String) body.get("COFFEE_TYPE");

        if (size!=null) size = size.toLowerCase();
        if (type!=null) type = type.toLowerCase();

        // This is an example for nullpointer exceptions are not handled here
        switch (type) {
            case "cappuccino":
                switch (size) {
                    case "small":
                        response.put("coffeePrice", "1.95");
                        break;
                    case "large":
                    case "medium":
                    default:
                        response.put("coffeePrice", "2.85");
                        break;
                }
                break;

                ...more options...

            default:
                throw new RuntimeException("Coffee type "+type+" unknown");
        }

        // returning SUCCESS
        response.put("returnCode", "0");

        // logging for debugging and testing
        log.warn("Querying Coffee type {} with size {} resulted in the price: {}",
                type,
                size,
                response.get("coffeePrice"));

        return response;
    }

}
Input
The POST method requires as input a JSON map of objects. These are the variables that will be configured in the Send Data section of the data access node.
For example, for the coffee app, the request sent by the dialog application might look as follows:
POST /coffee/price HTTP/1.1
Host: coffee.app.com
Content-Type: application/json;charset=UTF-8

{
    "COFFEE_TYPE": "cappuccino",
    "COFFEE_SIZE": "medium"
}
Output
The POST method requires as output a JSON map of objects. These are the variables that will be configured in the Get Data section of the data access node.
The returned payload must include the following variable:
returnCode
This variable indicates whether the query was successful and will be used by the dialog flow, as follows:
- A
returnCodeof "0" indicates that the transaction was successful; the dialog flow will continue to the node specified in the Success section of the data access node. - Any value other than "0" indicates that the transaction failed; the dialog flow will continue to the node specified in the Failure section of the data access node.
For example, for the coffee app, the dialog application would expect a response similar to the following:
HTTP/1.1 200 OK
Content-Type: application/json;charset=UTF-8
Transfer-Encoding: chunked
Date: Thu, 21 May 2020 14:04:00 GMT
{
    "returnCode": "0",
    "coffeePrice": "2.85"
}
GET method
The GET method is used to retrieve information from the backend.
Nuance recommends that you use it as a standard GET method, that is:
- Input: You can send Mix.dialog variables as URL parameters; see Specify URL parameters for details. These variables must be configured in the Send Data section of the data access node.
- Output: As with the POST method, the GET method must return as output a JSON map of objects. See POST method output for details.
Specify URL parameters
You can pass Mix.dialog variables as URL parameters in a GET request by specifying the variable name in curly braces in the URL Extension field.
For example, to pass the values of the COFFEE_TYPE and COFFEE_SIZE variables, specify them in the URL Extension field of the data access node as follows:
/coffee/price?coffee_type={COFFEE_TYPE}&coffee_size={COFFEE_SIZE}
The dialog engine resolves the value of any variable in curly braces, so you can use variables in the endpoint path as needed. For example:
coffee/{myVar1}/{myVar2}coffee/price?{myVar1}={myVar2}coffee/{myVar1}/price?par1={myVar3}
The variable values will be URL-encoded when used as URL query parameters. For example, the variable value 7/31/2021 5:15pm will be automatically encoded to 7%2F31%2F2021%205%3A15pm by the dialog engine.
Handle latency messages in the client application
Continue action flow for latency messages
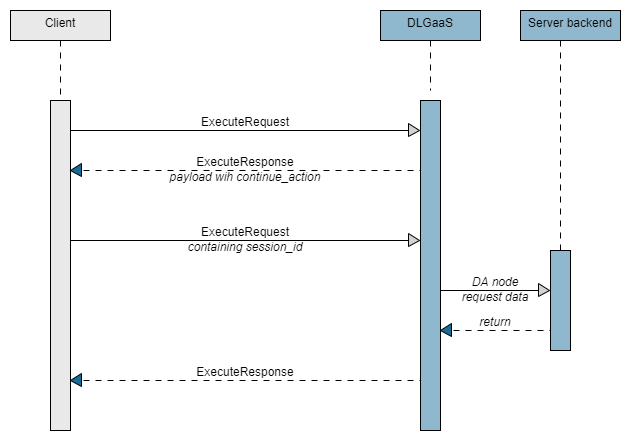
When latency messages are configured for a data access node, an additional step is required from the client application:
- The client application receives an ExecuteResponse with the queued messages from the Dialog service, as well as a
continue_actionobject with the latency message and properties. The Dialog service waits before proceeding. - To continue the flow, the client application sends an ExecuteRequest with the current
session_id. - The Dialog service then proceeds to retrieve the data from the backend server. In the meantime, the client application can play the latency messages to keep the user informed and engaged while waiting for the response.
For more information about handling continue actions in your client application, see Continue actions in the DLGaaS API documentation.
Exchanging data with the client application
In this option (client-side integration), variables are exchanged between the dialog service and the client application using the DLGaaS API. The variables to send and receive are configured in Mix.dialog in the data access node. This request gets translated as a data action, which tells the client app that the dialog expects data to continue the flow.
Workflow: Exchanging data with the client application
To exchange data with a client application:
Create a data access node in Mix.dialog
Example: Data access node for client-side integration
To configure the data to exchange for a client-side integration, create a data access node in Mix.dialog and specify the following fields:
| Field | Description |
|---|---|
| Latency message | Message played when a data access request is pending. |
| Send Data | Data that will be sent to the client application, for example, coffee size and type. This can be a variable or an entity. |
| Get Data | Data that will be returned by the client application, for example, coffe price. This is a variable. |
| Success | Node to go to if the external system returns a success code; that is, a returnCode of "0". |
| Failure | Node to go to if the external system returns a failure code; that is, a returnCode that is not "0". |
| Integration | Enable Enable client-side fetching to indicate that the data is to be exchanged with a client application. See Server-side vs. client-side integration. |
For a detailed description of the data access node, see Set up a data access node.
Use the data access action API in the client app
Data is exchanged between the dialog service and the client application throught the DLGaaS ExecuteRequest and ExecuteResponse gRPC API.
For details, see Data access actions in the DLGaaS API documentation.