Create a project
The first step is to create the project. There are two ways to create a project in Mix.dashboard:
Create a project using Quick Start
The Quick Start option allows you to select one of three ready-to-use project templates to quickly create a new project without having to customize project settings. Project templates are based on predefined channels in Mix. There are three projects templates:
- IVR project—An interactive voice response template for developing telephony applications.
- Web chat project—A text-focused digital virtual assistant template for web chat applications.
- Omnichannel project—A voice-focused digital virtual assistant template for all-purpose conversational applications.
To create a project using Quick Start:
- On the Projects bar, click the Add icon
 .The Create a new project window appears.
 - Under Quick Start, choose the desired project template.
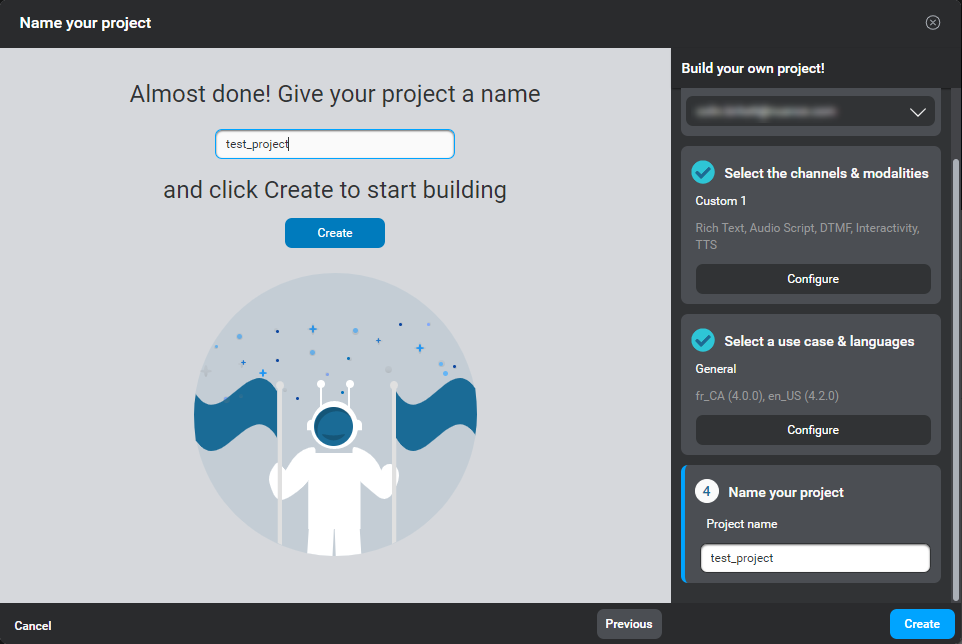
 The right-hand pane shows the channels and modalities from the selected template, and the default language for your Mix environment. You can click Configure under the parameters you would like to change—for example, to customize channels, or choose another use case and languages (see Build your own project for details).
Note: Project templates have a default General use case.
The right-hand pane shows the channels and modalities from the selected template, and the default language for your Mix environment. You can click Configure under the parameters you would like to change—for example, to customize channels, or choose another use case and languages (see Build your own project for details).
Note: Project templates have a default General use case. - Name your project.
- Click Create. The new project appears on your Mix dashboard.
Build your own project
Building your own project involves choosing channels and modalities, a use case, and languages.
To build your own project:
- On the Projects bar, click the Add icon .
The Create a new project window appears.
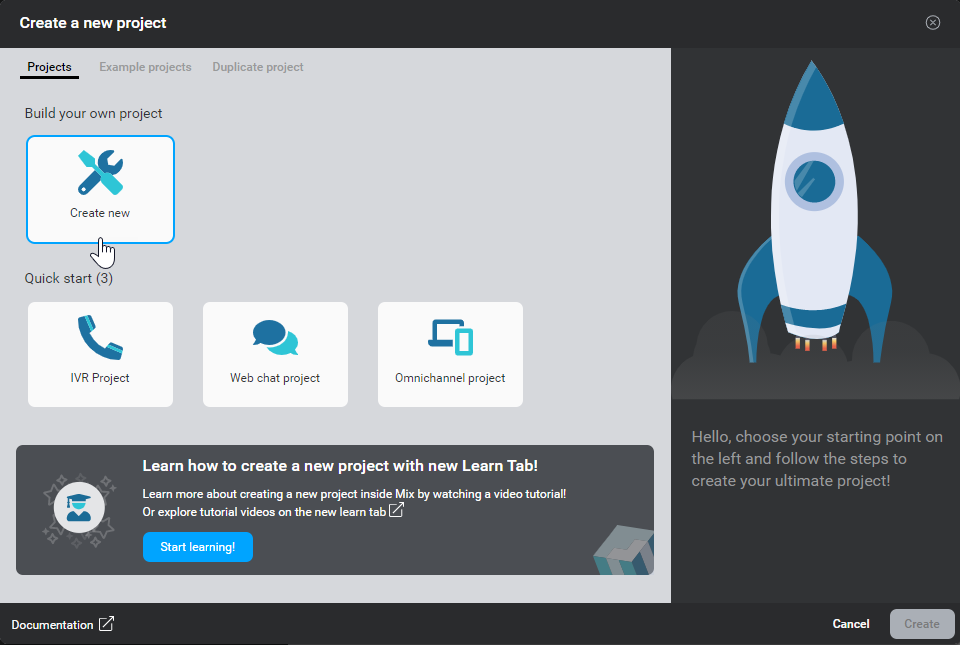
- Click Create new.
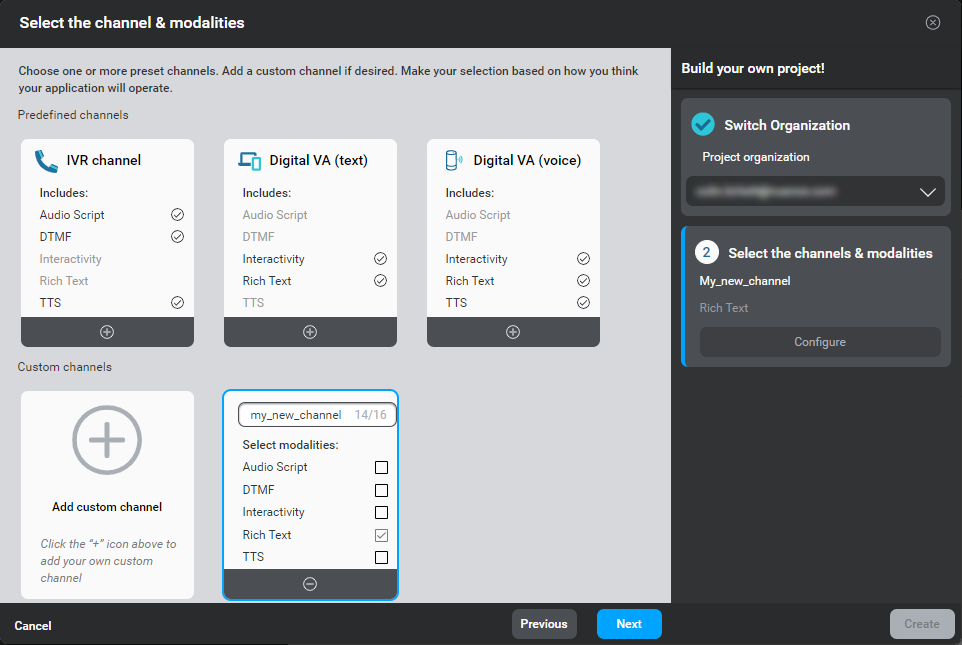
Select the channel and modalities appears.
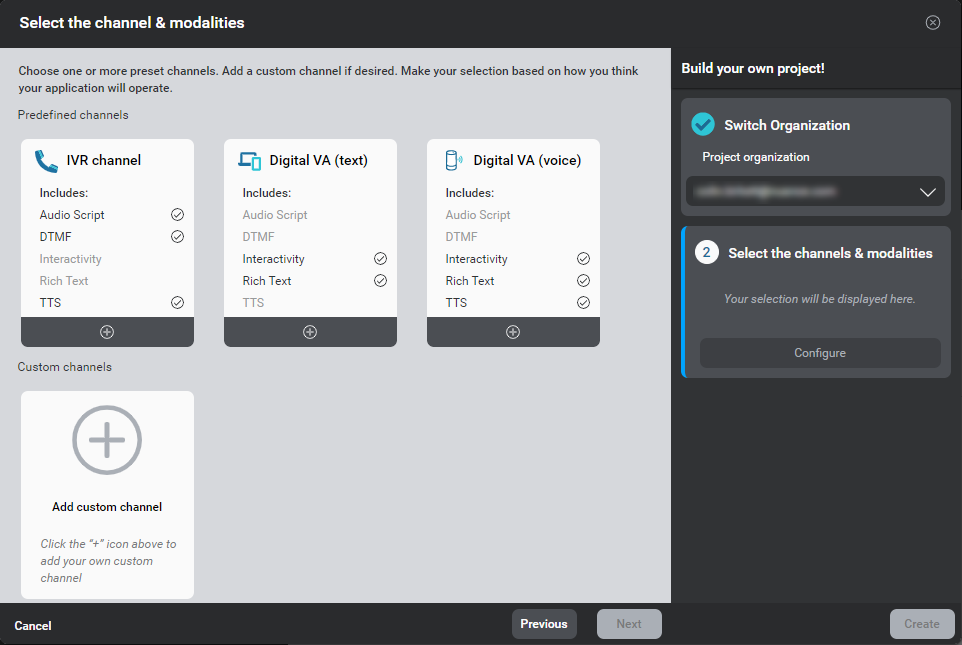
- Choose the desired organization if this project is meant to be shared with others.
- Select one or more predefined channels or add a custom channel.
- Click Next.
Select a use case & languages appears.
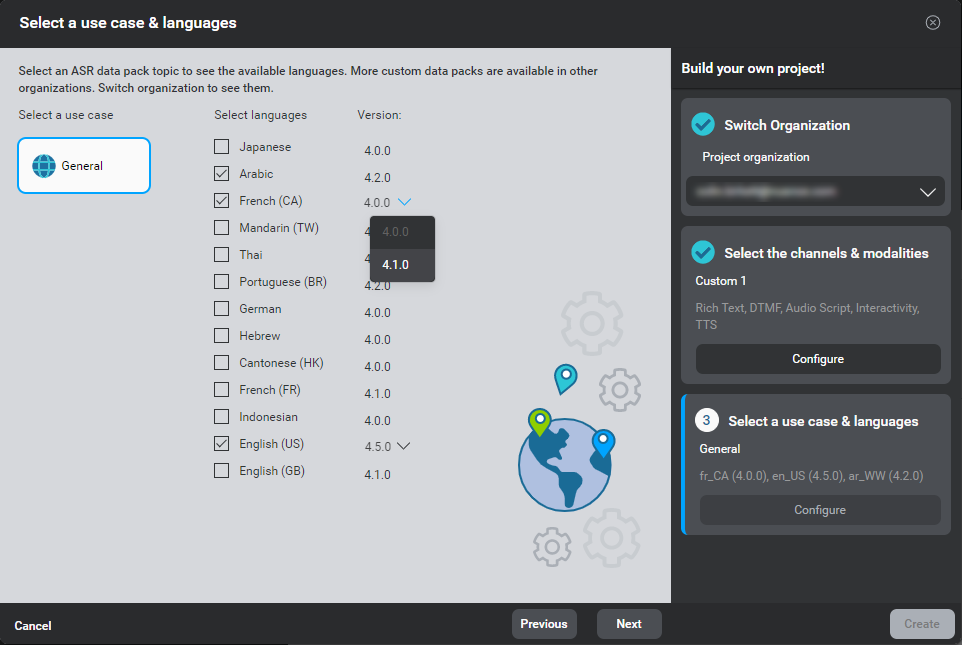
- (Optional) Select an engine pack. An engine pack is a set of pre-determined ASR, NLU, Dialog, and TTS engine versions that are compatible with each other. If engine packs are enabled for your organization, select the engine pack that will be used to create the project. To determine which engine pack to select for your project, see Manage engine packs and data packs.
- Select the desired use case, languages, and version for each language. A use case is a language model which has been trained to be used for a certain scenario. You can select the General use case that will contain information about the general language, or select a particular use case that will contain language tailored for a specific scenario, like Healthcare or TV & Media. Notes: The set of use cases available for selection depends on the data packs installed in your Mix environment, and on the organization specified for your project. When selecting languages for your project, a dropdown only appears next to languages with multiple versions available. The selected use case and languages appear in the right-hand pane.
- Click Next.
Name your project appears.
- Name your project.
- Click Create. The new project appears on your Mix dashboard.
Add a custom channel
To add a custom channel:
- Click the Add icon
 , above Add a custom channel.
 - Provide a name for your channel.
- Select the modalities for your channel. You must select at least one modality.
The selected channels appear in the right-hand pane.
Predefined channels
When creating a new project, you can select one or more predefined channels to quickly build your project. These predefined channels contain different sets of modalities that determine how your application will exchange information with its users. Predefined channels also provide the base settings of the Quick Start project templates. This table summarizes the predefined channels available when creating a project:
| Channel | Modalities | Description |
|---|---|---|
| IVR channel | Audio Script, DTMF, TTS | An interactive voice response channel for developing telephony applications that perform automated operations and transactions. |
| Digital VA (text) | Interactivity, Rich Text | A digital virtual assistant for web chat applications. |
| Digital VA (voice) | Interactivity, Rich Text, TTS | A digital virtual assistant for all-purpose conversational applications. |
Modalities
A modality specifies a format used to exchange information with the user, such as TTS, audio, text, and so on.
When you create a project, the following options are available:
- Rich text: Lets you specify text messages that can be displayed on any screen, such as SMS messages. It also provides the ability to include richer content in messages, such as HTML tags that can be used in a web chat.
- Audio Script: Lets you specify recorded audio files to play, as well as backup text to be rendered using text-to-speech (TTS) when the audio file is not available.
- TTS: Lets you specify text that can be spoken using speech synthesis. Applies to channels intended for TTS only. This modality allows you to use the DLGaaS TTS streaming feature.
- Interactivity: Lets you add interactive elements to the message, such as buttons and clickable links.
- DTMF: Lets you add support for Dual-Tone Multi-Frequency tones as user input.
Organizations
Projects created in an organization are shared with other users in that organization. Each user has a personal organization. Your personal organization name is usually your email address. You can add other users to your personal organization.
Organizations determine the use cases available to you, among those available in your Mix environment, when creating a project.
View project details
To see project details, click the Projects icon, select the project, and click the Details tab.
Information section
| Field | Description |
|---|---|
| Name | Name of the project. If it is too long, the name is truncated. Hover over the field to get the complete name. |
| Project ID | ID of the project. |
| Created | Date and time the project was created. |
| Last Modified | Date and time the project was last modified. |
| Organization(s) | Organizations for the project. |
| Latest Published Version | Most recent NLU/Dialog build that was successfully completed. |
| Channel(s) | Channels available for this project; for example, ivr and web. Hover over the number to get the channel names. |
| Locale(s) | Languages used in this project. If more than one language is used, hover over the string Multi to get the list of languages used. For the list of all supported languages, see Languages and Voices. |
| Domains | Number of prebuilt domains available in the project (either imported from the Domains tab or uploaded as .trsx files). Hover over the number to get the domain names. |
| NLU Sources | List of Mix prebuilt domains used in the project. Hover over the number to get the domain names. |
| Topic Domain | Speech recognition engine used for this project. |
| Data Pack Versions | Versions of the NDP and QNLP data packs used in this project. See Working with data packs. |
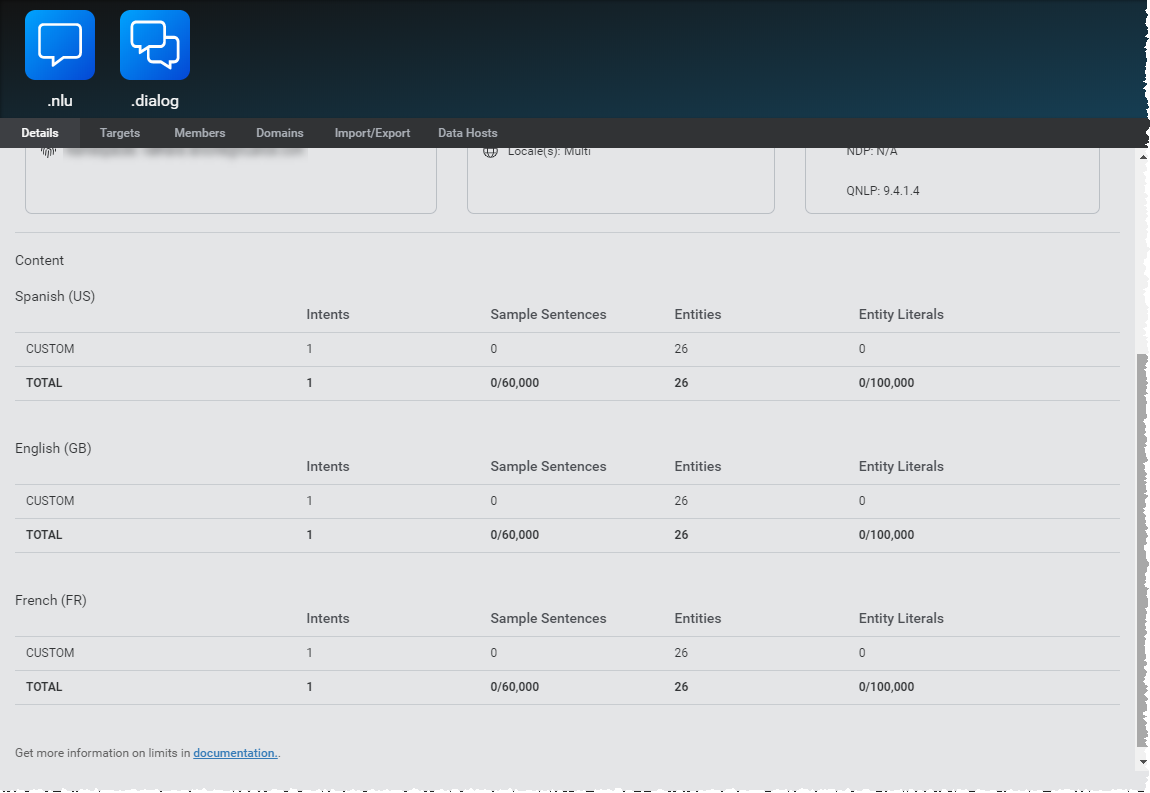
Content section
The Content section lists the number of intents, sample sentences, entities, and literals in the project. Depending on your project and the size of the prebuilt domains you are using, it's good practice to keep track of these values so that you do not exceed certain limits.
See Limits for more information.
The information is organized per locale. If you have more than one locale in your project, the Content section provides a sub-section with the content for each locale. For example:
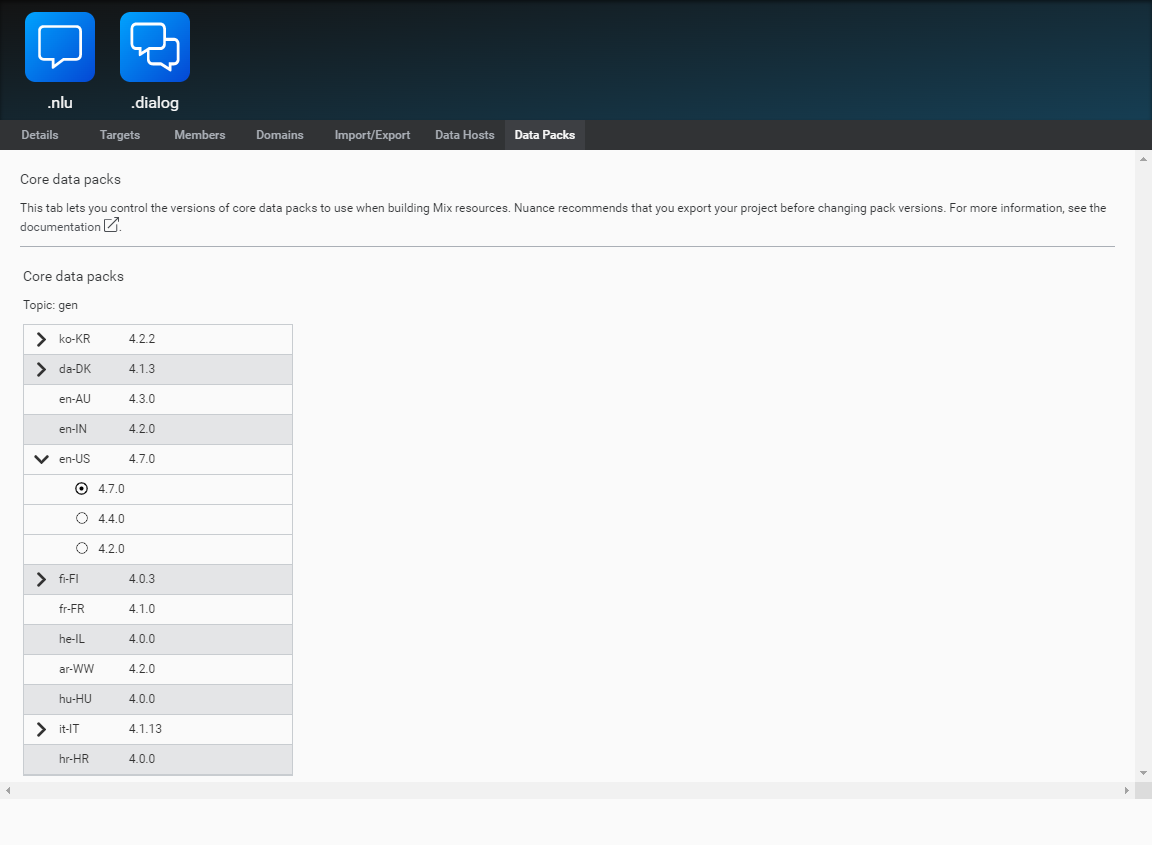
Manage data packs
The Data Packs tab lets you specify which versions of Nuance Data Packs (NDP) are used in a project. Core data packs are another term for Nuance data packs.
When you create a project, each locale used in the project is associated with the current data pack version. When you rebuild your model, each locale continues to use the same data pack version.
For example, if the version of the data pack is 4.7.0 for en-US and 4.1.0 for fr-CA when you create a new project, these data pack versions will continue to be used when you rebuild your model, even if the current data pack version available for a locale has increased.
In some cases, you may want to upgrade a data pack version to a new one or even revert to a previous version. For example:
- A new data pack version is available and you want to use it.
- Your Nuance representative has recommended that you install a specific data pack version.
Note: When you upgrade to a new version, the project corpus is retokenized.
Upgrade a data pack version
To change the data pack version for a locale in a project:
- In Mix.dashboard, select the project.
- Click the Data Packs tab. The locales in the projects are displayed under Core data packs along with their current versions.
- Next to the locale of the current data pack you want to upgrade, click
 and select the version to upgrade to. Note: Only locales that have multiple data pack versions available can be selected.
 - Click Confirm change. A final Confirm change for engine and data pack selections modal window appears. Note: Project members will be locked out from the project after an upgrade. We advise you to reach out to project members to notify them of the upgrade and restricted access.
- Click Confirm change Processing time for the upgrade is dependent on the size of the project.
- The version is updated and the following message is displayed: "NDP version was updated successfully for project example_project."
- Repeat this procedure for every locale that needs to be upgraded.
- Create a new build to use the new data pack version in your project.
Manage engine packs and data packs
The Engine & Core Data Packs tab lets you specify which engine pack and Nuance data pack (NDP) versions are used in a project.
Engine packs
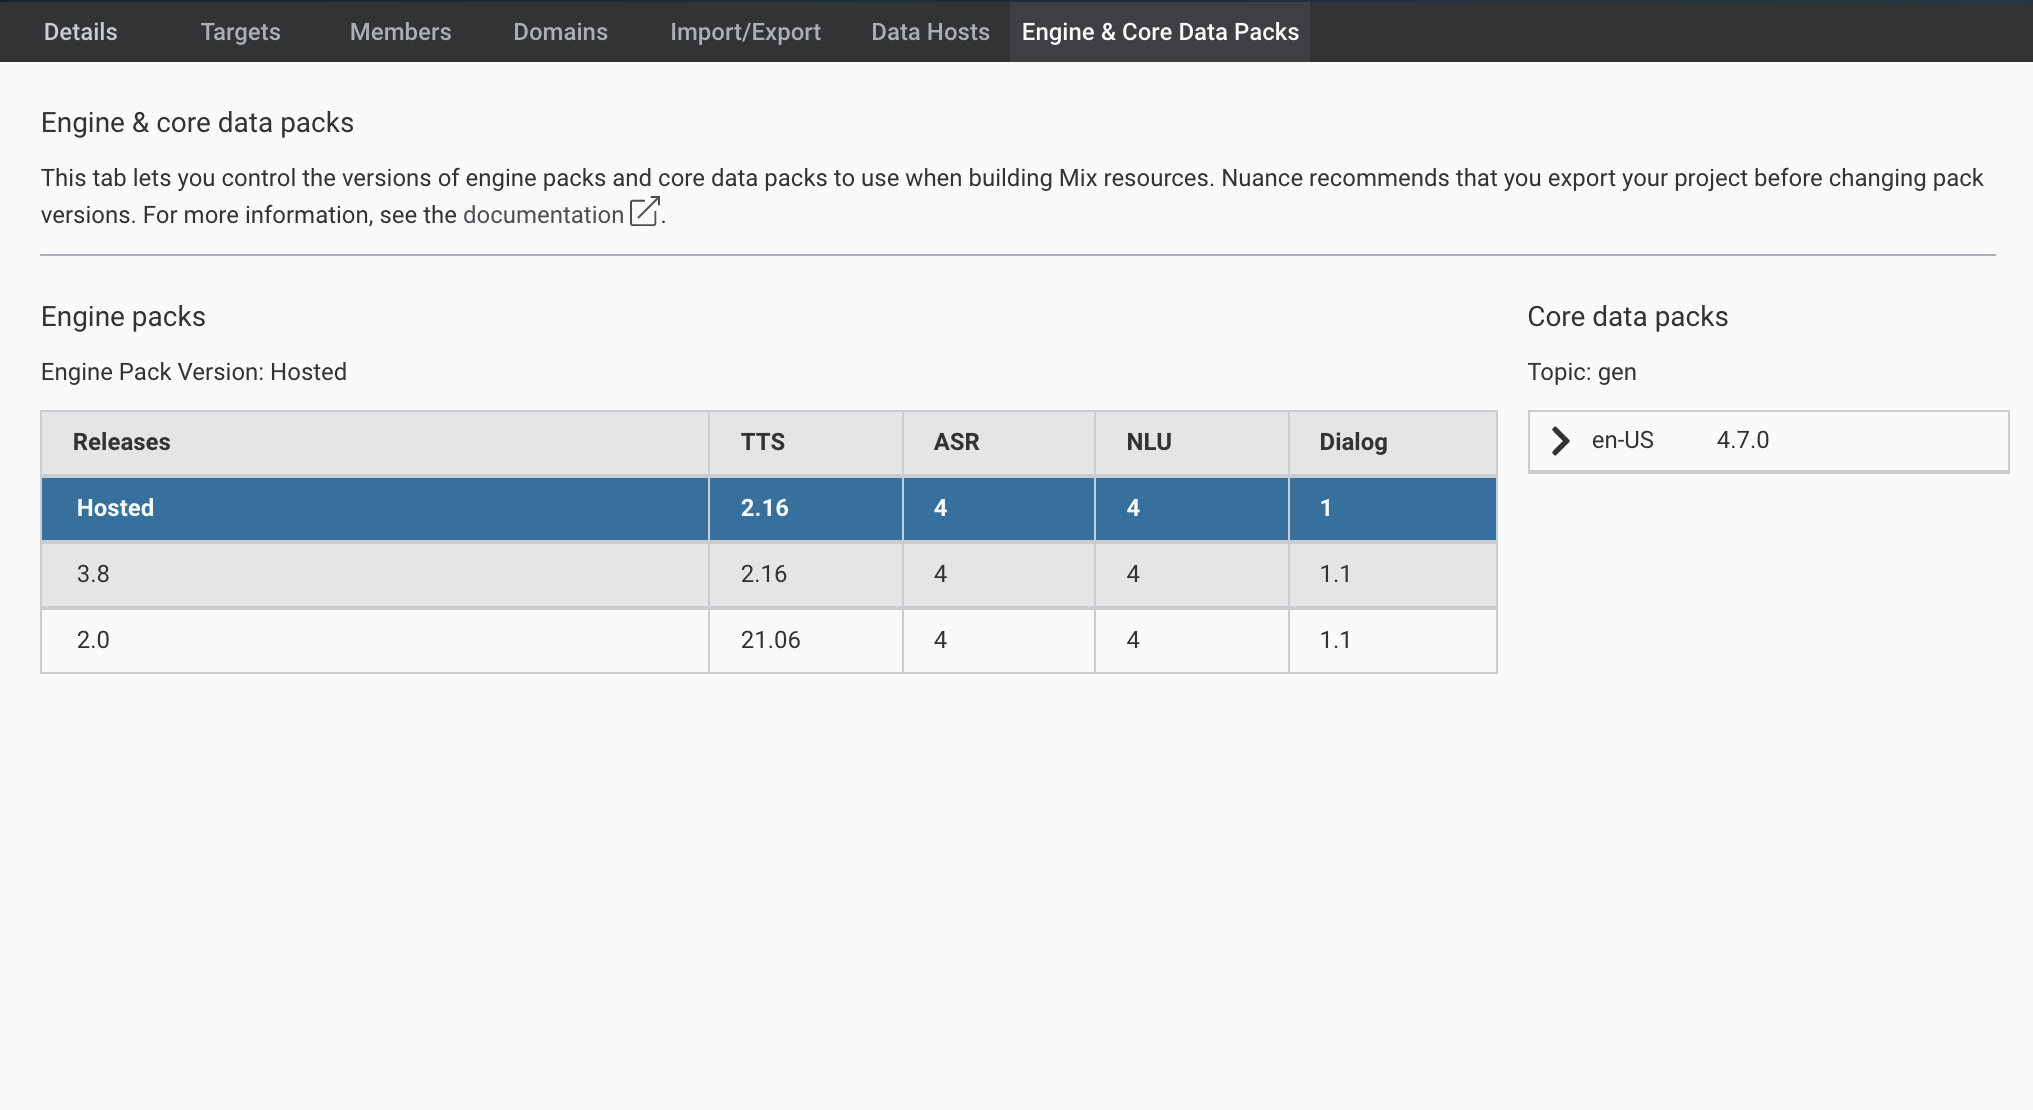
An engine pack is a set of pre-determined ASR, NLU, TTS, and Dialog engine versions that are compatible.
When you create a project, you select the engine pack version that corresponds to the engines that you have installed in your self-hosted environment. This ensures that the resources generated for your project (ASR DLMs, NLU models, and Dialog models) are compatible with the engine versions you have installed. The engine pack version also determines the tooling features you can access. In the Mix tools, features introduced in a later engine pack version will not be available. This ensures that changes introduced in any hosted engines in the Mix runtime environment will not impact existing projects.
There are three main releases of engine pack versions:
- Hosted: Engine pack version that corresponds to the latest ASR, NLU, TTS, and Dialog engines and tooling available in the Mix hosted environment.
- 2.x: Engine pack releases for Speech Suite deployments.
- 3.x: Engine pack releases for self-hosted Mix deployments.
The engine pack version to select depends on your use case.
Hosted
The hosted engine pack version applies to projects that use the hosted runtime Mix engines (ASRaaS, NLUaaS, TTSaaS, and DLGaaS). As such, projects created with the hosted engine pack version always have access to the latest Mix features.
Speech Suite
The 2.x engine pack release applies to Speech Suite 11 deployments, including hybrid mode.
The following table lists the engine pack versions that are currently available for Speech Suite deployments, the component versions that align with each engine pack version, and the features supported:
| Engine pack | ASR | NLU | TTS | Dialog | VoiceXML Connector | Speech Suite | Features |
|---|---|---|---|---|---|---|---|
| 2.0 | 4 | 4 | 21.06 (NVE) | 1.1 | 1.1 | 11.0.9 | N/A. First engine pack release. |
| 2.1 | 4 | 4 | 21.06 (NVE) | 1.2 | 1.2 | 11.0.9 | - Default concatenation behavior - Marking a question and answer node as sensitive |
For more information, see Engine packs in the Mix tips for IVR developers documentation.
Mix self-hosted
The 3.x engine pack release applies to Mix deployments that include one or more self-hosted Mix engines. The set of ASR, NLU, TTS, and Dialog engine versions installed in your self-hosted environment must correspond to a set defined in one of the engine pack versions.
The following table lists the engine pack versions that are currently available for Mix self-hosted deployments, the component versions that align with each engine pack version, and the features supported:
| Engine pack | ASR | NLU | TTS | Dialog | Features |
|---|---|---|---|---|---|
| 3.8 | 4 | 4 | 2 (NVC) | 1.1 | N/A. First engine pack release. |
| 3.9 | 4 | 4 | 2 (NVC) | 1.2 | - Default concatenation behavior - Marking a question and answer node as sensitive |
For example, to use engine pack version 3.8, if you wanted to install the TTS and Dialog engines, you could install only version 2 of NVC and version 1.1 of Dialog.
Feature documentation for self-hosted environments
All the features documented in the Mix documentation are available to hosted projects.
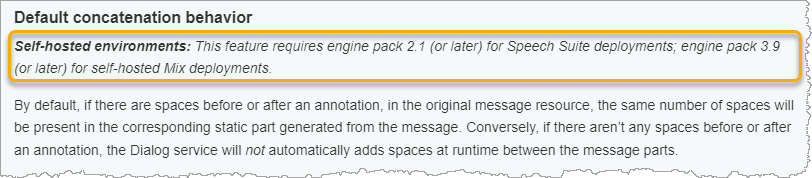
Some features require a specific engine pack version for Speech Suite and Mix self-hosted environments. In this case, they are identified with the Self-hosted environments tag and the required engine pack version. For example, the following image indicates that the default concatenation behavior feature requires engine pack 2.1 (or later) for Speech Suite deployments and engine pack 3.9 (or later) for self-hosted Mix deployments:
Upgrade an engine pack version: Procedure
- In Mix.dashboard, select the project.
- Click the Engine & Data Packs tab.
- Optional: It is recommended you export your project before upgrading an engine pack version. You cannot revert back to a previous version after upgrading.
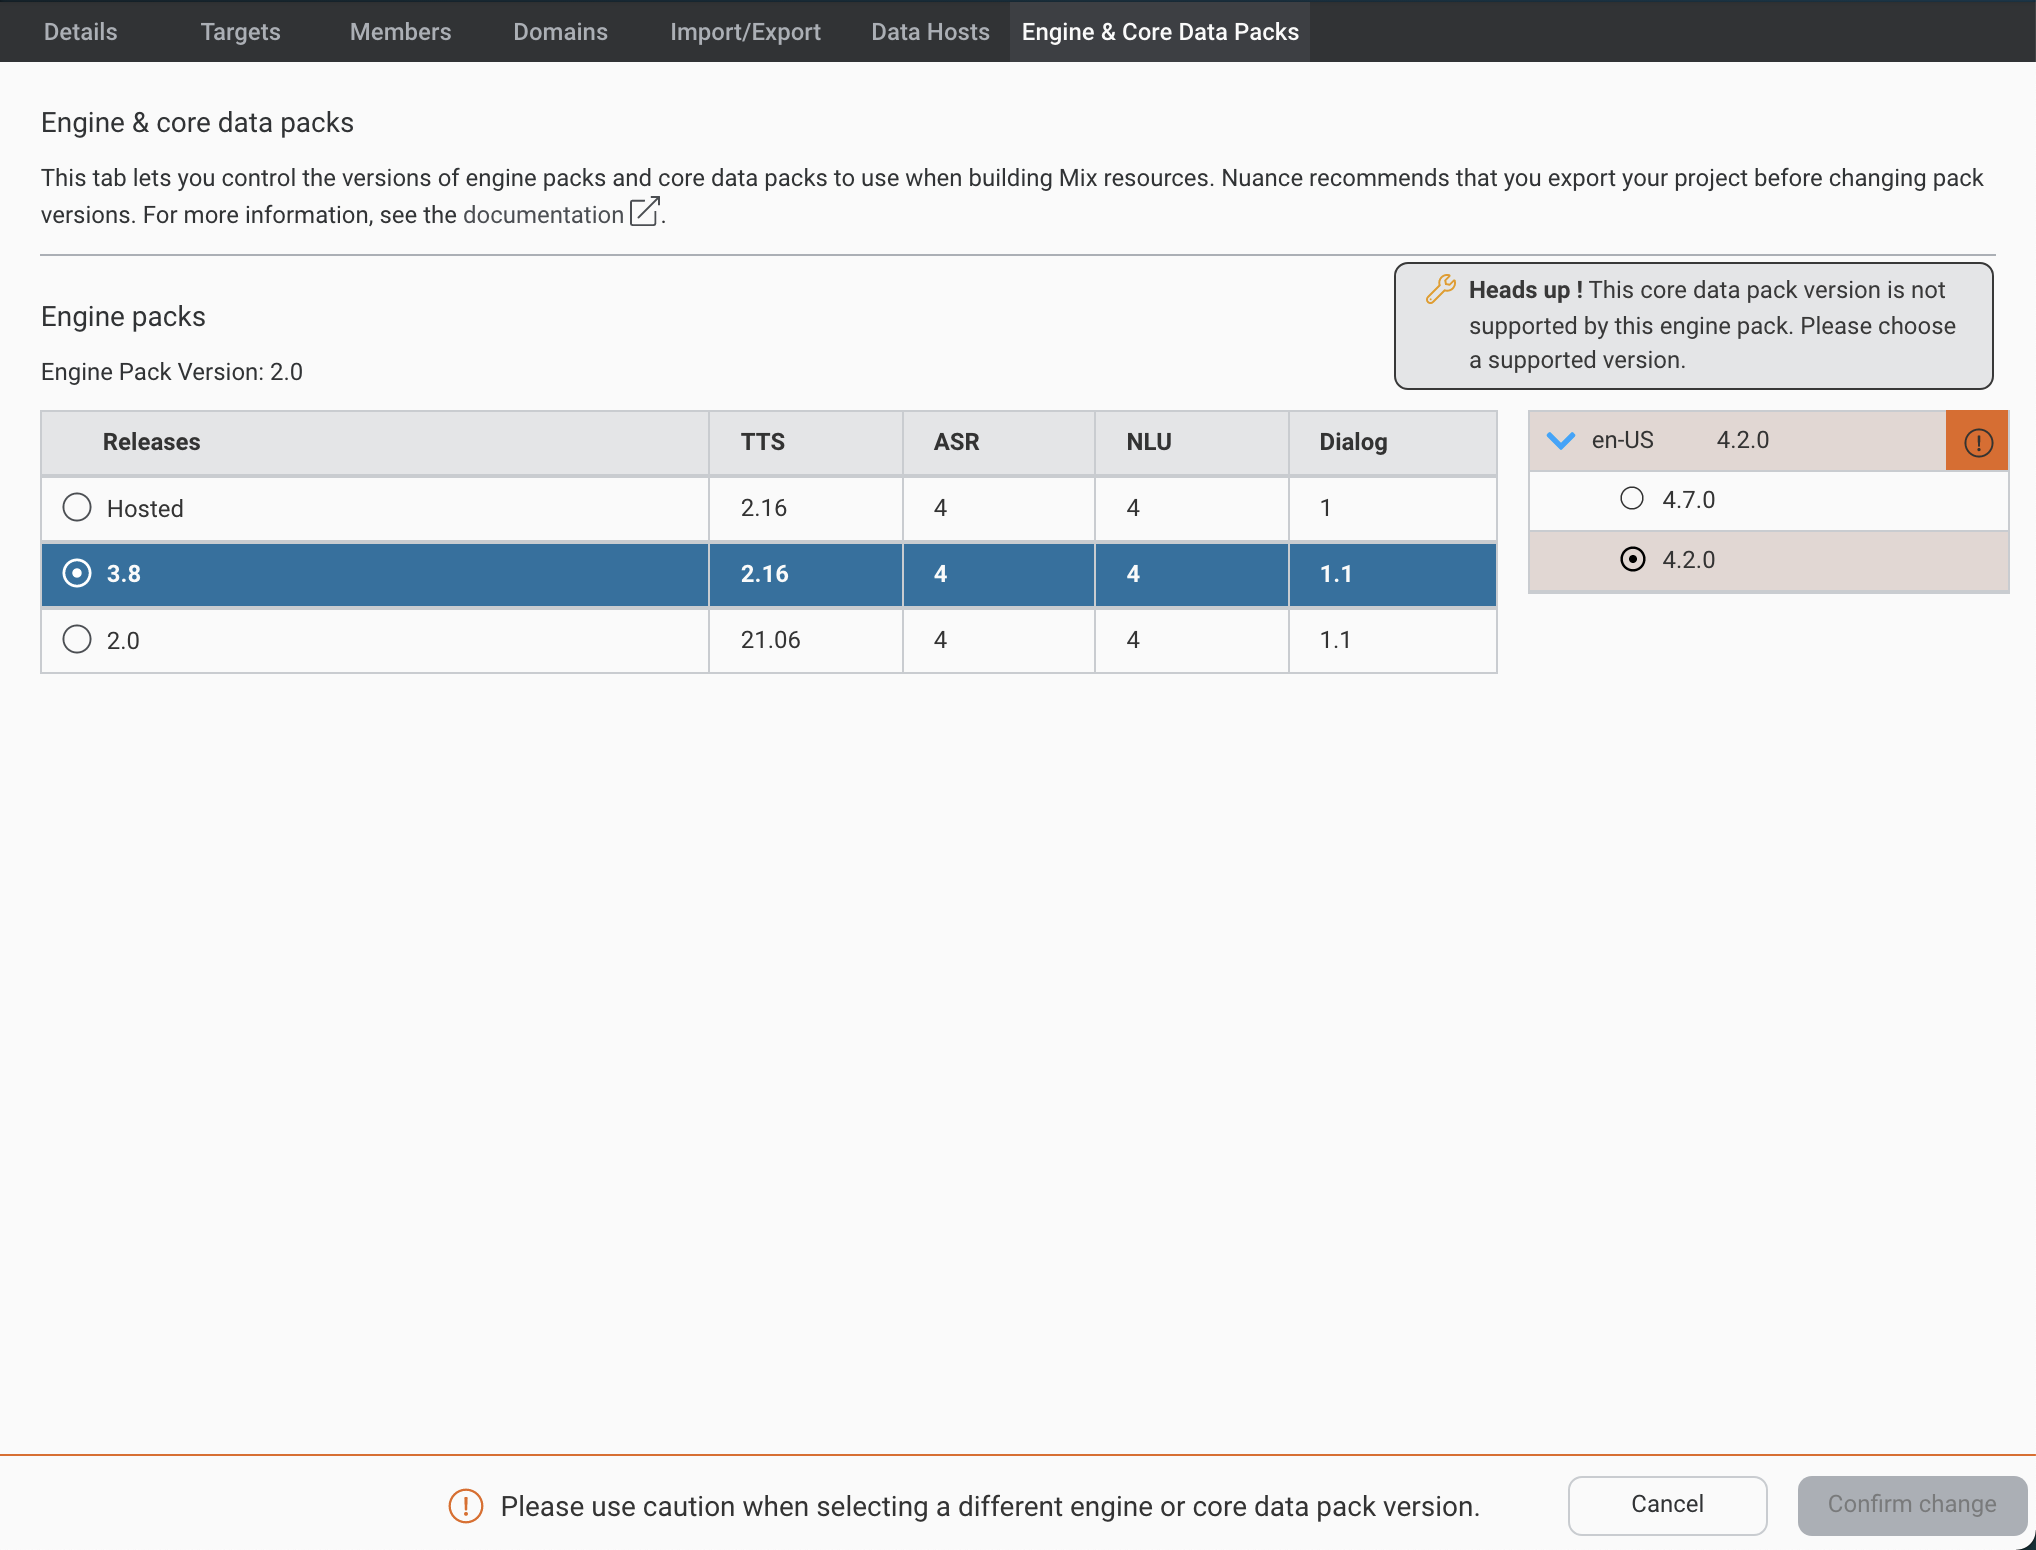
- Under Engine packs, select the engine pack you want to upgrade. The list of included engine versions (TTS, ASR, NLU, Dialog) are listed to the right of each engine pack version.
- Click Confirm change. A final Confirm change for engine and data pack selections modal window appears. Note: Project members will be locked out from the project after an upgrade. We advise you to reach out to project members to notify them of the upgrade and restricted access.
- Click Confirm change. Processing time for the upgrade is dependent on the size of the project.
Data packs
When you create a project, each locale used in the project is associated with the current data pack version. When you rebuild your model, each locale continues to use the same data pack version.
For example, if the version of the data pack is 4.7.0 for en-US and 4.1.0 for fr-CA when you create a new project, these data pack versions will continue to be used when you rebuild your model, even if the current data pack version available for a locale has increased.
In some cases, you may want to upgrade a data pack version to a new one or even revert to a previous version. For example:
- A new data pack version is available and you want to use it.
- Your Nuance representative has recommended that you install a specific data pack version.
Note: When you upgrade to a new version, the project corpus is retokenized.
Upgrade a data pack version: Procedure
- In Mix.dashboard, select the project.
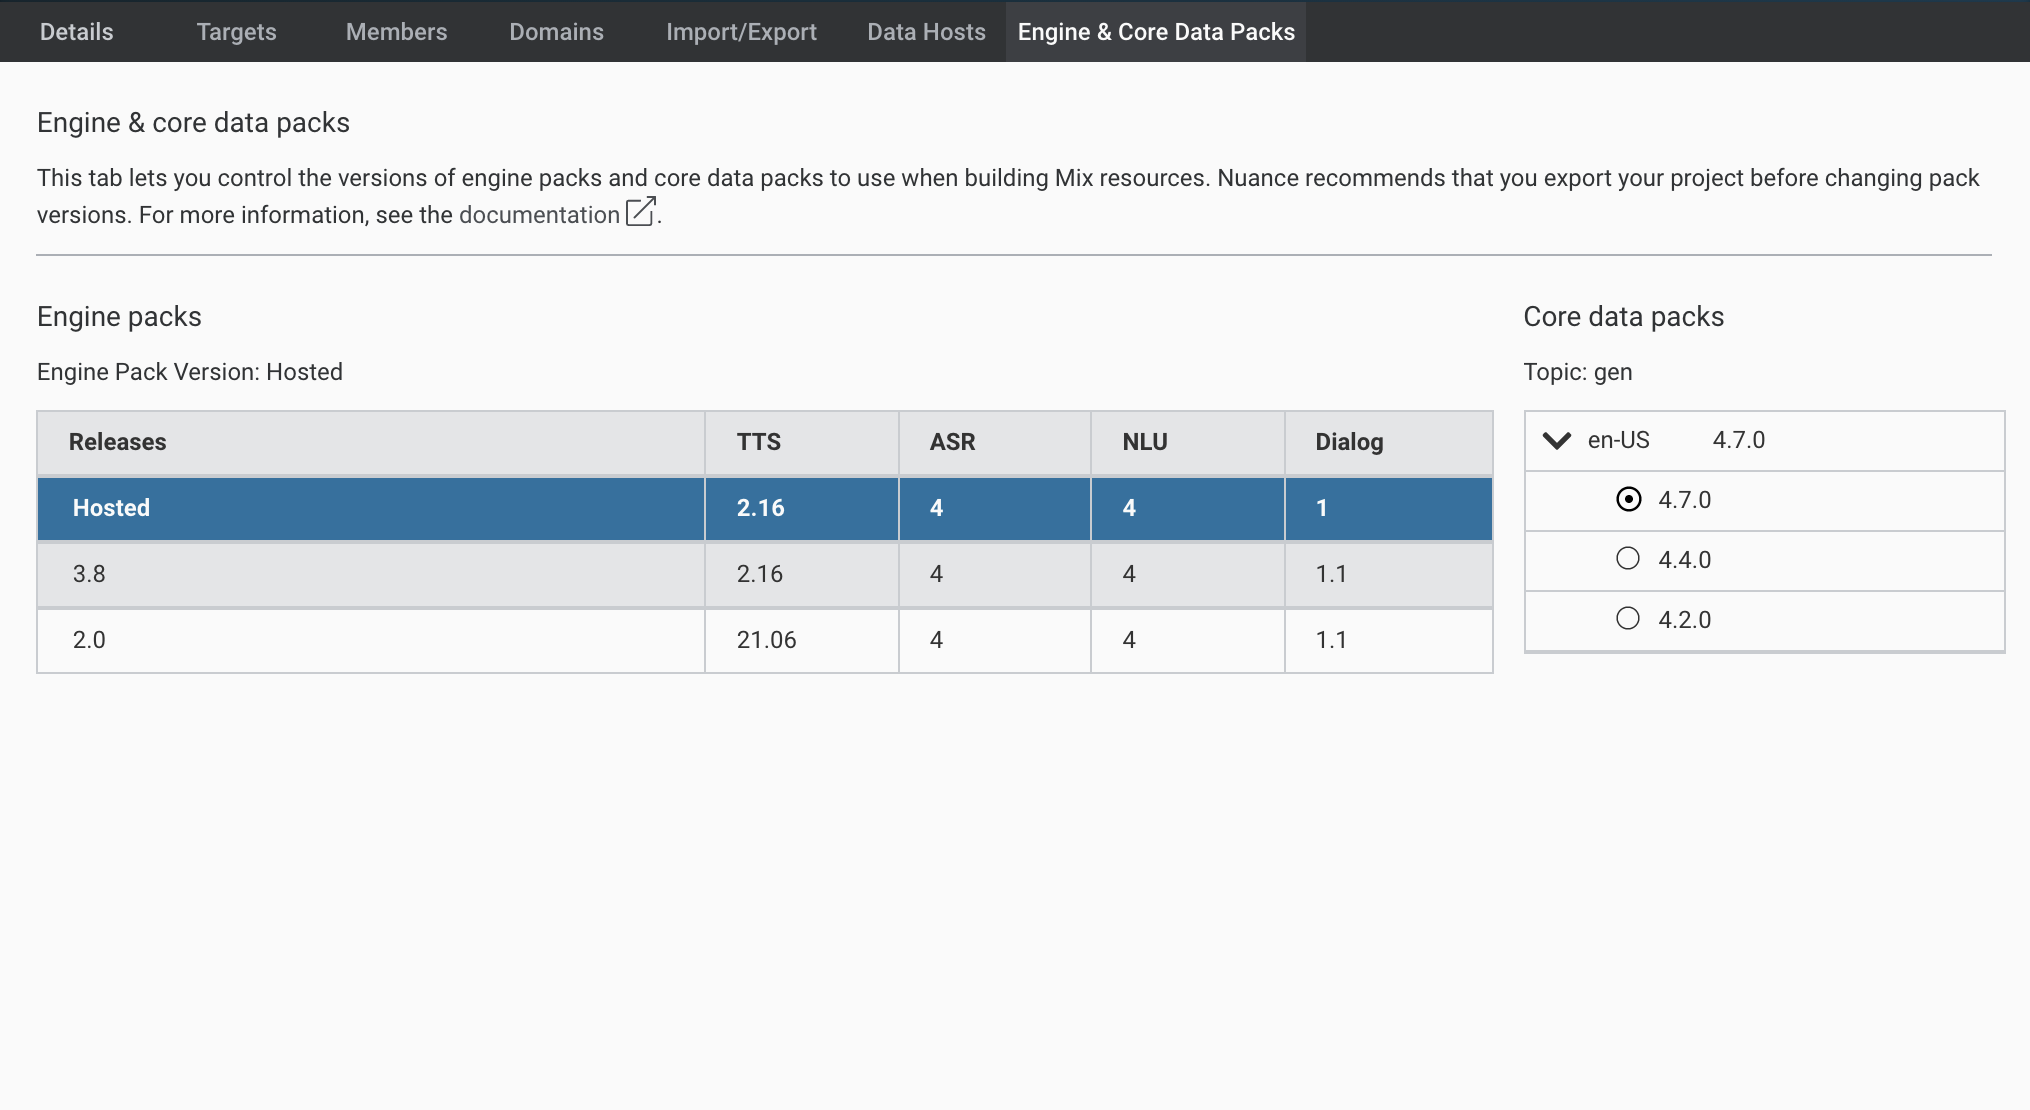
- Click the Engine & Data Packs tab. The locales in the projects are displayed under Core data packs along with their current versions.
- Next to the locale of the current data pack you want to upgrade, click and select the version to upgrade to. Note: Only locales that have multiple data pack versions available can be selected.
- Click Confirm change. A final Confirm change for engine and data pack selections modal window appears. Note: Project members will be locked out from the project after an upgrade. We advise you to reach out to project members to notify them of the upgrade and restricted access.
- Click Confirm change Processing time for the upgrade is dependent on the size of the project.
- The version is updated and the following message is displayed: "NDP version was updated successfully for project example_project."
- Repeat this procedure for every locale that needs to be upgraded.
- Create a new build to use the new data pack version in your project.
Manage targets
The targets tab provides information about the locales, channels, and modalities that are defined for a project.
This tab is currently read-only for channels and modalities. It will support additional functionality in the future.
Archive locales
You can archive locales so that they are no longer available from Mix. When you archive a locale:
- It is no longer available in Mix.nlu and Mix.dialog.
- The Details tab still lists the locale in the Locale(s) field, but the content area does not include details about this locale.
- You cannot import data in this locale.
- You cannot create builds with this locale.
- You cannot create application configurations for this locale.
To archive a locale:
- In Mix.dashboard, select the project and click the Targets tab.
- In the Locale(s) area, click the Archive switch for the language you want to archive.
The switch is greyed out.
If you need to use the locale in your project again, you can unarchive it.
Unarchive locales
To unarchive a locale:
- In Mix.dashboard, select the project and click the Targets tab.
- In the Locale(s) area, click the Unarchive switch for the language you want to unarchive.
The switch is displayed in green and the locale is now available from Mix.
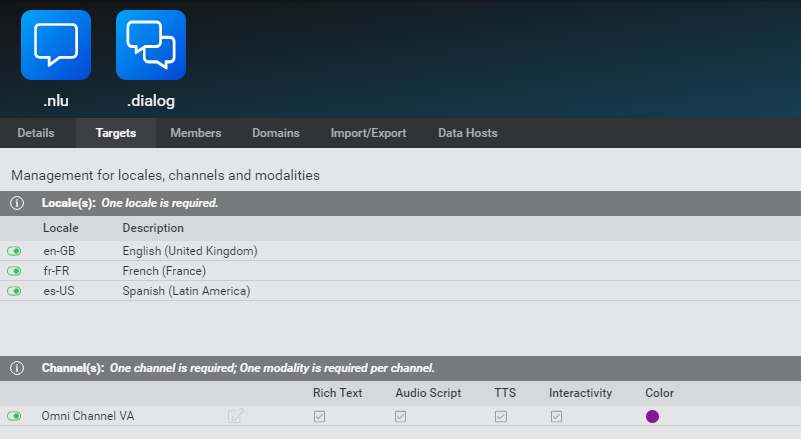
Channel settings
The Channels area provides information about the channels available in your project. You can see this area in the Targets tab on Mix dashboard for any specific target. The first columns specify the modalities available for the channel, and the last column represents the color associated with the channel.
Each type of channel, whether Omni Channel VA, IVR/Voice VA, Digital VA, or a Custom Channel is represented by a different color.
The main Mix channels are associated with the following colors:
- Omni Channel VA — Purple
- IVR/Voice VA — Orange
- Digital VA — Green
- Custom channel — Various colors for each new custom channel
These colors will be visible in Mix.dialog if you are undocking your channels to create channel-specific transitions. Colors help differentiate any channel-specific transitions between undocked channels on your Mix.dialog canvas.
The diagram shows how the colors are associated with each channel in the Channel Dock list, as well as with transitions between undocked channels in Mix.dialog:
![]()
Add a channel
To add a channel within the Targets tab:
- In Mix.dashboard, select the project and click the Targets tab.
- Under Channels, click the Add icon above Add a channel.
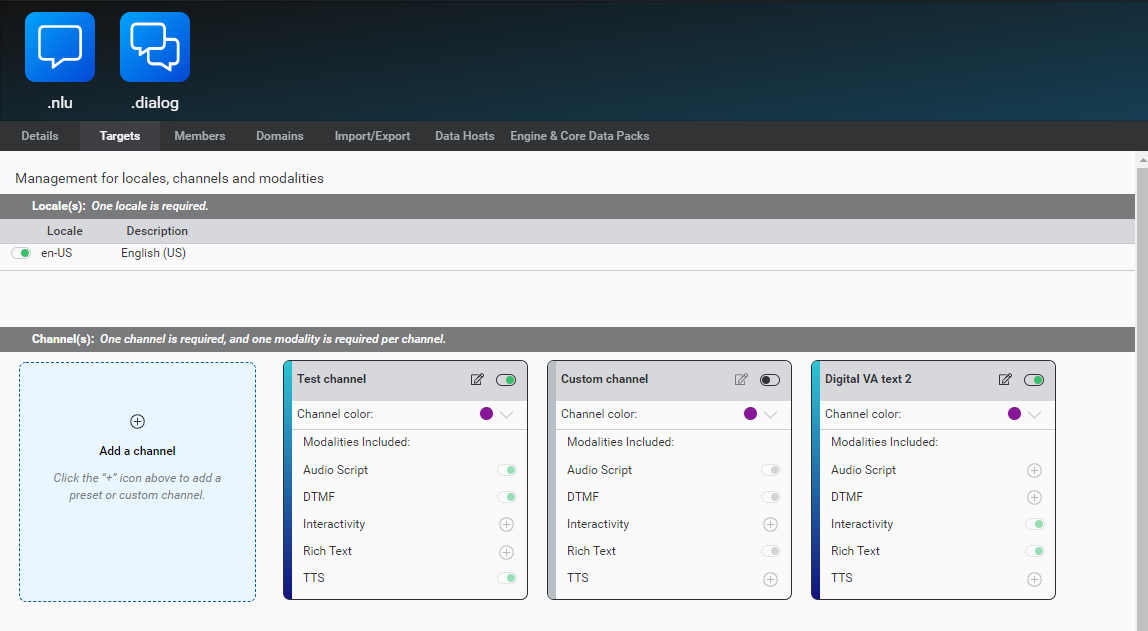
- Select either a predefined channel such as IVR Channel, Digital VA Text, Digital VA Voice, or add a Custom channel. See predefined channels for more information.
- (Optional) Choose a channel color.
- Edit the modalities of your new channel. See modalities for more information. Note: You cannot remove a modality once added. However, you can choose to disable the modality in the future if necessary.
- Edit the name for your new channel.
- Click Save. Your new channel is created. Newer channels are listed to the left of older channels.
Edit a channel
To edit a channel within the Targets tab:
- If your channel is disabled, enable it by clicking the (enabled) toggle
 .
. - Click the Edit icon
 .
. - (Optional) Choose a new channel color.
- Edit the modalities of your channel.
- Click Save.
Enable or disable a channel
To enable a channel within the Targets tab, click the (enabled) toggle ![]() of a disabled channel.
of a disabled channel.
Conversely, to disable a channel within the Targets tab, click the (disabled) toggle ![]() of an enabled channel.
of an enabled channel.
Manage your projects
Delete a project
To delete a project:
- Select it in Mix.dashboard.
- Click the Delete icon
 in the upper-right corner of Mix.dashboard.
 - Click Delete to confirm.
This action is permanent. You will not be able to recover your project once you have deleted it.
Note: If you get the error message: "An error occurred during the deletion of the project," make sure that no application configurations are deployed for this project. You cannot delete a project if it has one or more application configurations deployed.
Clone a project
Rename a project
To rename a project:
- Select it in Mix.dashboard.
- Click the Rename icon
 in the upper-right corner of Mix.dashboard.
 - Enter a new name for the project.
- Click the checkmark.
Lock a project
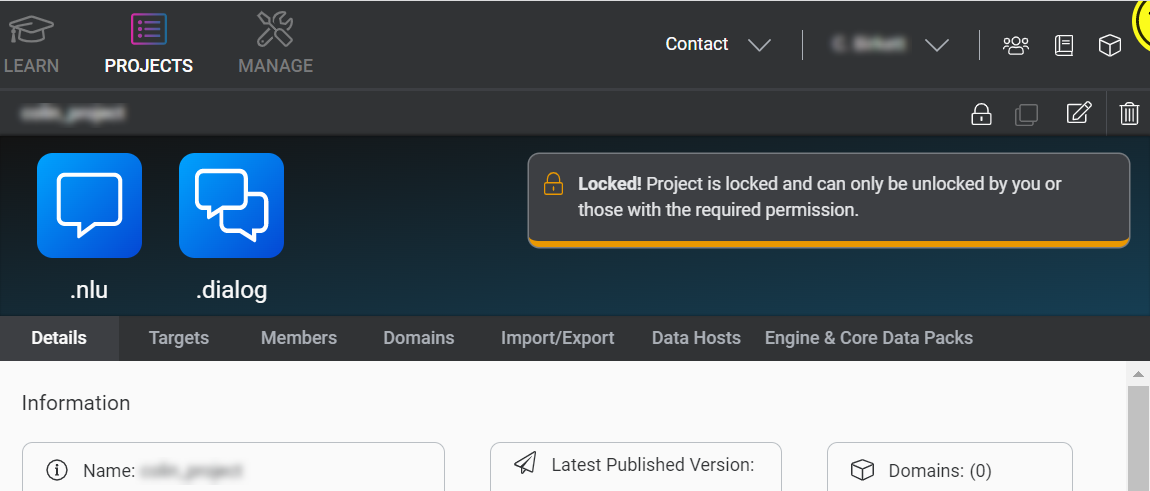
A user can lock a project to prevent others from modifying it. Users may want to lock a project to control its contents, so they know precisely what's in it for any important operations later such as creating builds, exporting content, and running tests. Once a project is locked, it is in read-only mode. In read-only mode, other project members can read the project but cannot modify it until it is unlocked by the lock owner or those with required permissions. Only the lock owner can modify a locked project. Once a project is unlocked by the lock owner or those with the required permissions, it becomes modifiable again to all members.
When other project members open a locked project in Mix.nlu or Mix.dialog, an information banner appears at the top of the screen. This banner indicates who locked the project. A lock icon on the top navigation bar of the application also appears beside the language selector.
To lock a project:
- Select it in Mix.dashboard.
- Click the Lock this project icon
 in the upper-right corner of Mix.dashboard.
A message appears prompting you to confirm you want to lock your project.
Note: Locking will automatically disable collaborators from modifying the project. Nuance recommends reaching out to your team members to inform them of the lock request before proceeding.
in the upper-right corner of Mix.dashboard.
A message appears prompting you to confirm you want to lock your project.
Note: Locking will automatically disable collaborators from modifying the project. Nuance recommends reaching out to your team members to inform them of the lock request before proceeding. - Click Confirm. A message in the upper-right corner confirms that your project is now locked. Projects that are locked have the lock icon next to the project name in Mix.dashboard. When a project is locked, it is in read-only mode. Please contact the lock's owner or administrator to access a locked project.
Unlock a project
To unlock a project:
- Select it in Mix.dashboard.
- Click the Unlock this project icon
 in the upper-right corner of Mix.dashboard.
A message appears prompting you to confirm you want to unlock your project.
in the upper-right corner of Mix.dashboard.
A message appears prompting you to confirm you want to unlock your project. - Click Confirm. A message in the upper-right corner confirms that your project is now unlocked.
Share project links
When sharing a project link with another user, the behavior of Mix.dashboard depends on the user's organizations:
- If the project resides in an organization that the user is a member of, the user's dashboard will switch to the project's organization
- If the project resides in an organization that the user is not a member of, the user's dashboard will switch to All organizations
The shared link will open to the project's Details in both cases.
See Manage your organizations for more information.
Add members
You add members to the project through the Members tab. Members can have one of the following default project roles:
- Owner: Can perform all actions on the project.
- Admin: Can perform all actions on the project except:
- Delete the project
- Edit project details
- Viewer: Can see the organization details, projects, and applications, but cannot edit them.
To add members:
- In Mix.dashboard, click the Projects icon, select the project, and click the Members tab.
- Click Add Member.
- In the User field, type the name of the user to find it.
- In the Role field, select the role for this user.
- Click Save.
To delete a member, hover your cursor over the member name and click the Remove member icon associated with that user.
Note: If you cannot see the Add Member or Delete icon:
- You may not have the privileges to perform this action. In order to add members to a project, you have to be an owner of that project. Once you are added as an owner of the project, you can then add other members to that project, even if the project resides in an organization that the user is not a member of. See Project roles for more information.
Manage your organizations
The Manage tab lists the organizations that are available to you. An organization is a space where you create projects. Projects created in an organization are shared with all the users in this organization. All users also have a personal organization (specified with the email address). Projects that you create in your personal organization can only be seen by you unless you choose to add a member to one of your projects. In this case, they can only see the project you've given them access to. Note that you cannot move a project from one organization to another.
To display the organizations that are available to you:
- Click the Manage tab.
- In the left-hand pane, expand the Organizations section.
The organizations to which you belong are displayed.
For each organization these tabs are available:
- The Users tab lists the users that are part of this organization with their roles. Roles are associated with specific permissions and can differ per company.
- The Promotion details tab provides the environments that are available in your deployment flows.
- The Webhooks tab enables you to configure webhooks to receive event notifications.
Manage organization users
Depending on your role, you may be able to add users to an organization and assign roles. For a description of roles, see Organization roles.
To add a user and assign roles:
- Click the Manage tab.
- In the left-hand pane, expand the Organizations section.
The organizations to which you belong are displayed. - Click the Users tab.
- Click Add user to organization.
- Find the user with the search box and click Add user to organization.
- To assign a role, click the Add icon
 under All roles for the user.
 - Select the role(s) to assign to the user. You select from one of three roles groups with the following roles:
- Standard roles—Member, Owner, or Viewer
- Advanced roles—Expert or Promotion approver
- Specialty roles—Pro services
To modify roles for an existing user:
- Click the Manage tab.
- In the left-hand pane, expand the Organizations section.
The organizations to which you belong are displayed. - Click the Users tab.
- To assign a role, click the Add icon under All roles and select a role from one of the above role groups, or the Remove icon
 within a preexisting role to remove a role.
Note: You cannot remove yourself as owner from your personal organization.
within a preexisting role to remove a role.
Note: You cannot remove yourself as owner from your personal organization.
To delete a user:
- Click the Manage tab.
- In the left-hand pane, expand the Organizations section.
The organizations to which you belong are displayed. - Click the Users tab.
- Click the Delete icon
 in the rightmost column for the user.
To download the user list for an organization:
- Click the Manage tab.
- In the left-hand pane, expand the Organizations section.
The organizations to which you belong are displayed. - Click the Users tab.
- Click the Download icon
 in the top-right corner.
A CSV file downloads that lists the name, email, roles, and last login for each user in the organization.
Understanding roles and permissions in Mix
Permissions are associated with roles at different levels in the Mix user interface. Roles are defined at the following levels:
- Organization: An organization is a space where you create projects. Projects created in an organization are shared with all the users in this organization. Roles and permissions created at the organization level also include permissions for applications and projects (both Mix.nlu and Mix.dialog).
- Application: Roles and permissions created at the application level apply to all the actions that can be performed on the Manage->Applications tab.
- Project: A Mix project contains all the data necessary for building Mix.asr, Mix.nlu, and Mix.dialog resources. Roles and permissions created at the project level include global permissions about the project as well as permissions for using the Mix.nlu and Mix.dialog tools.
Organization roles
By default, the following roles are available at the organization level:
- Owner — Can invite users, edit organization details, and create projects.
- Member — Can see the organization details and collaborate on projects/applications.
- Viewer — Can see the organization details, projects, and applications, but cannot edit them.
- Expert — Can access advanced platform capabilities, such as importing rule-based grammars. This role also requires the Member or Owner role, otherwise some capabilities will not be available to the user.
- Promotion approver — Can approve promotions of deployments in the organization.
- Pro services (PS) — Can access advanced platform capabilities such as admin portal or allowing approval of specific Dialog or NLU projects, as well as manage credentials.
Note: Additional roles may have been configured for your organization.
To see the organizations that are available to you, the users that belong to these organizations, and the available roles:
- In Mix.dashboard, click the Manage tab.
- In the left-hand panel, expand the Organizations section.
For more information on adding organization roles to new or existing users, see Manage organization users.
Application roles
By default, the following roles are available at the application level:
- Owner: Can create and deploy app configs and see app credentials.
- Viewer: Can see the app details but cannot edit them.
To see the users who have access to your applications as well as their roles:
- In Mix.dashboard, click the Manage tab.
- In the menu on the left, select Applications.
- Click the Members tab.
Project roles
By default, there are three main project roles:
- Owner: Can perform all actions on the project.
- Admin: Can perform all actions on the project except:
- Delete the project
- Invite other members
- Viewer: Can see the organization details, projects, and applications, but cannot edit them.
Note: If you do not have a specific role for a project, but this project was created in an organization to which you belong, then you will see the project in your list. The permissions that you have for this project will be the ones that you have for the organization.
For more information, see Add members
Update your password
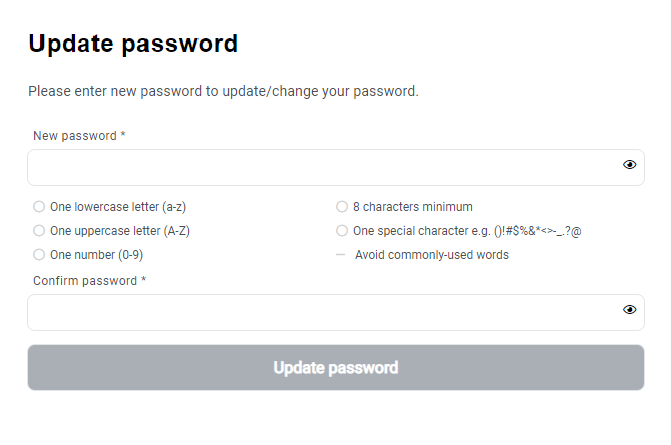
If you're a new Mix user, you will be prompted to create a password when signing up for Mix.
Your password must contain:
- At least one lowercase letter (a-z)
- At least one uppercase letter (A-Z)
- At least one number (0-9)
- A minimum of 8 characters
- One special character: ()!#$%&*<>-_.?@
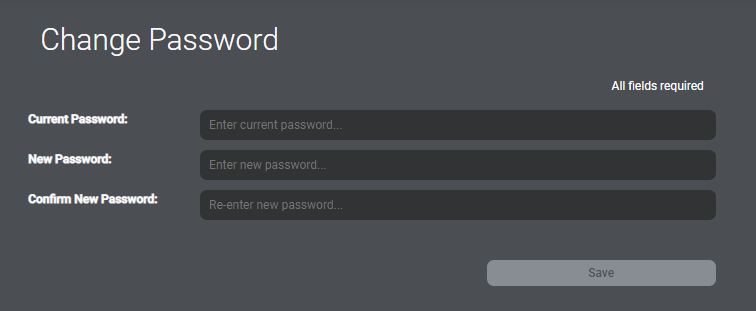
If you are logged in to Mix, to change your password:
- In Mix.dashboard, click your name and select Profile.
- Click Change Password.
- In Current Password, enter your current password.
- In New Password, enter your new password.
- In Confirm Password, enter your new password again.
- Click Save.